Advertisement
Available languages
Available languages
Quick Links
Advertisement

Related Manuals for Meister WU7474090

Summary of Contents for Meister WU7474090
- Page 2 4. Wichtige Nutzungshinweise Schließen Sie bitte kein Gerät an, bei der die Stromstärke 16(2)A überschritten wer- den kann. Stellen Sie sicher, dass der Stecker des anzuschließenden Gerätes voll- ständig in die Steckdose der Zeitschaltuhr eingesteckt ist. Sollte eine Reinigung des Produktes notwendig sein, trennen Sie die Zeitschaltuhr ganz vom Stromnetz und wischen Sie das Gerät mit einem trockenen Tuch ab.
- Page 3 Die folgende Tabelle zeigt eine Übersicht der möglichen Kombinationen von Wo- chentagen: Wochentage MO, TU, WE, TH, FR, SA, SU MO, TU, WE, TH, FR SA, SU MO, TU, WE, TH, FR, SA MO, WE, FR TU, TH, SA MO, TU, WE TH, FR, SU MO, WE, FR, SU 6.
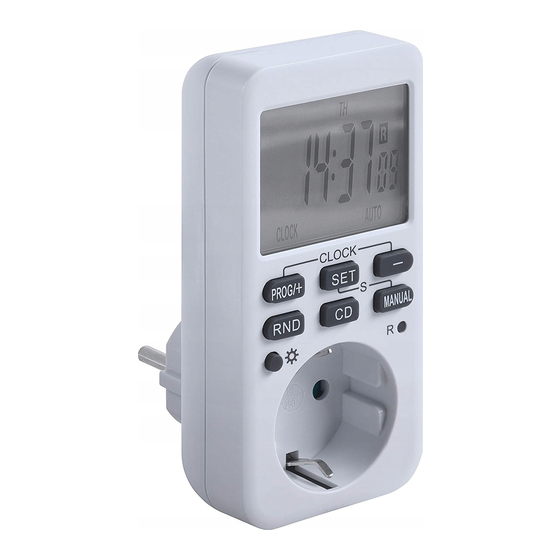
- Page 4 7. Einstellung der aktuellen Uhrzeit 1. Drücken Sie die Tasten PROG/+ oder —, bis die Uhrzeit im Display angezeigt wird. 2. Halten Sie die SET-Taste für ca. 2-3 Sekunden gedrückt bis MO für Montag an- fängt zu blinken, wählen Sie dann mit den Tasten PROG/+ oder — den aktuellen Wochentag aus.
- Page 5 a. Um ein Schaltprogramm zu deaktivieren, drücken Sie die PROG/+ Taste so oft, bis das Programm im Display erscheint. Mithilfe der MANUAL-Taste können Sie das Schaltprogramm nun aktivieren oder deaktivieren. Im Display erfolgt dann die Anzeige --:-- b. Stellen Sie bitte sicher, dass sich die Zeiten der einzelnen Schaltprogramme nicht überschneiden.
- Page 6 11. Countdown-Funktion CD 1. Zur Programmierung muss die Zeitschaltuhr sich im Anzeigemodus Uhrzeit be- finden. Drücken Sie die Taste —, um das Countdown-Programm einzustellen. Im Display erscheint CD. 2. Drücken Sie die SET-Taste einmal, entweder ON oder OFF beginnt zu blinken, mit den Tasten PROG/+ oder —...
- Page 7 Sicherheitshinweise und Haftungsausschluss Versuchen Sie nie das Gerät zu öffnen, um Reparaturen oder Umbauten vorzu- nehmen. Vermeiden Sie Kontakt zu den Netzspannung führenden Teilen. Schließen Sie das Produkt nicht kurz. Das Gerät ist nicht für den Betrieb im Freien zugelassen, verwenden Sie es nur im Trockenen.
- Page 8 Diese Druckschrift einschließlich aller ihrer Teile ist urheberrechtlich geschützt. Jede Verwertung außerhalb der engen Grenzen des Urheberrechtsgesetzes ist ohne Zustimmung der Conmetall Meister GmbH unzulässig und strafbar. Das gilt insbesondere für Vervielfältigungen, Übersetzungen, Mikroverfilmungen und die Einspeisung und Verarbeitung in...
- Page 10 4. Important terms of use Please do not connect any devices where the current is more than 16 (2) A. Make sure that the device plug is fully inserted into the timer port. If you need to clean the product, disconnect the timer from the mains completely and wipe the device using a dry cloth.
-
Page 11: Installation
The table below shows an overview of the combinations of weekdays: Weekdays MO, TU, WE, TH, FR, SA, SU MO, TU, WE, TH, FR SA, SU MO, TU, WE, TH, FR, SA MO, WE, FR TU, TH, SA MO, TU, WE TH, FR, SU MO, WE, FR, SU 6. - Page 12 7. Setting the current time 1. Press the buttons PROG/+ or — until the CLOCK displays in LCD. 2. Press and hold the SET button for 2-3 seconds until MO will begin to flash, press PROG/+ or — button to select the day of the week. 3.
- Page 13 9. Switching ON/OFF manually Operating modes can’t be changed during program settings. You can manually switch on and switch off the device connected to the timer using the MANUAL button, or enable the automatic control according to the configured timer program- mes again.
- Page 14 11. Countdown function CD 1. While the timer is at clock display status, press —, to set countdown program. The CD sign will be shown in the display. 2. Press SET button once, either ON or OFF will begin to flash, press PROG/+ or — button to select countdown ON or OFF mode.
- Page 15 Safety instructions and disclaimer Never try to open the device to carry out repairs or modifications. Avoid contact with the parts which are connected to the main voltage. Do not short-circuit the product. The device is not ap-proved for outdoor use. Therefore please use it only in dry surroundings.
- Page 16 Any use outside the narrow limits laid down by the Law on copyright (Urheberre- chtsgesetz) is unlawful and liable for prosecution without the consent of Conmetall Meister GmbH. This applies in particular to reproductions, translations, microfilming and feeding into and processing in electronic systems.
Need help?
Do you have a question about the WU7474090 and is the answer not in the manual?
Questions and answers