Advertisement
Table of Contents
- 1 Table of Contents
- 2 Unpack Your Box
- 3 Attaching the Hand-Crank Flywheel
- 4 Getting to Know the Master Tool Cub Sewing Machine
- 5 Threading
- 6 Filling Bobbins
- 7 Removing and Inserting Bobbin
- 8 Stitching
- 9 Adjusting Thread Tension
- 10 Adjusting Bobbin Tension
- 11 Changing the Needle
- 12 Needle & Thread Chart
- 13 Troubleshooting
- 14 Maintenance
- 15 Replacement Parts
- Download this manual
Advertisement
Table of Contents

Summary of Contents for Weaver Leather Master Tool Cub
- Page 1 MASTER TOOL CUB SEWING MACHINE OWNER’S MANUAL 800-932-8371 weaverleathersupply.com U.S. Patent #9,657,418 18-2129-SP INSERT-133 7/21...
-
Page 2: Table Of Contents
Attaching the Hand-Crank Flywheel ....... . 4 Getting to Know the Master Tool Cub Sewing Machine ....5 Threading . -
Page 3: Unpack Your Box
UNPACK YOUR BOX The Master Tool Cub arrives completely assembled. You’ll find the following in your box: ➊ Master Tool Cub Sewing Machine ➋ Thread Holder ➌ Two 4 oz. Spools White Thread ➍ Thread Nipper ➎ Bobbin Winder ➏ Two Bobbins ➐... -
Page 4: Attaching The Hand-Crank Flywheel
Shaft Bolts Bolts You may find it easier to transport the Master Tool Cub without the Flywheel attached. The Flywheel can be easily removed after loosening the Bolts with a 3/16" Allen Wrench. Below are instructions on attaching the Flywheel. -
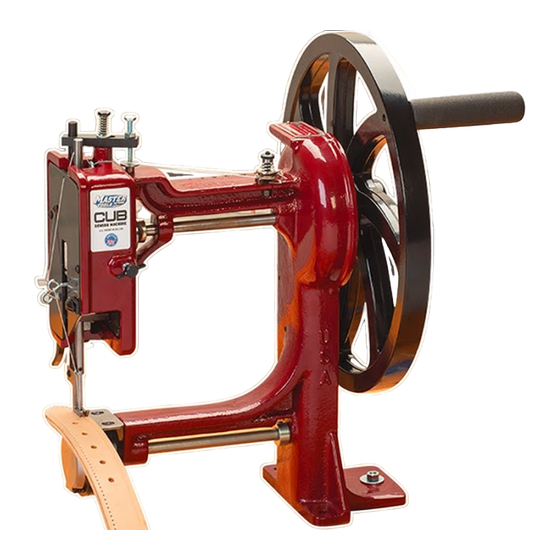
Page 5: Getting To Know The Master Tool Cub Sewing Machine
This guarantee does not extend to any component parts not manufactured by Weaver Leather, or if the machine is modified in any way. Weaver Leather makes no express warranties other than those that are specifically described herein. -
Page 6: Threading
THREADING 1) Run thread from spool (A) on thread stand (B) (Figure 4) to the Tensioner Eyelet 1 (C). (Figure 5) 2) Run thread between the Tensioner Discs (D), making sure the thread is pulled tightly, and out through Tensioner Eyelet 2 (E). (Figure 6) Figure 4 Figure 5 Figure 6... -
Page 7: Filling Bobbins
3) Run through Top Thread Eyelet (F). (Figure 7) 4) Run thread through top of Needle Bar (G) and through Top Hole in Side Plate (H). (Figure 8) 5) Run thread through Check Spring (I), the Bottom Thread Guide (J) and the Top Thread Guide (K) located on the side plate. -
Page 8: Removing And Inserting Bobbin
REMOVING & INSERTING BOBBIN REMOVING BOBBIN 1) Turn machine over until bobbin case sets in position shown. (Figure 13) 2) Pull back tab (A) to release bobbin case. 3) Lift base of bobbin case out to remove bobbin. (Figure 14) When closing bobbin case, be sure it snaps into the tab. -
Page 9: Stitching
STITCHING Please Note: This machine does not have reverse. DO NOT attempt to turn the crank in reverse or “backstitch.” You may choose to turn your work and take a “forward stitch” for a “backstitch,” or tie the thread off manually. (Figure 18) 1) Begin by lifting the presser foot by raising the Foot Lift Lever located directly behind it. -
Page 10: Adjusting Thread Tension
ADJUSTING THREAD TENSION Thread tension on the Master Tools Cub is controlled primarily from the Upper Thread Tension. As needed, turn the Tension Assembly Nut (A) clockwise to tighten the tension or counterclockwise to loosen the tension. (Figure 24) Figure 24 Wrong Wrong Correct... -
Page 11: Changing The Needle
Wrong Needle Needle Position Position NEEDLE & THREAD CHART The Master Tool Cub uses 794S (Chisel Point), 794LR (Twisted NEEDLE THREAD TOP/ Chisel Point) and 7X3R (Round Point) System Needles: SIZE BOTTOM • Chisel Point & Twisted Chisel Point Needles –... -
Page 12: Troubleshooting
TROUBLESHOOTING THREAD JAMMING The Master Tool Cub, as all sewing machines, must be threaded properly and used with the correct needle and thread combination. Because of its unique design, the Master Tool Cub reacts a little differently to improper threading. - Page 13 CHECK SPRING ADJUSTMENT 1) If thread balloons excessively at point (D), loosen screw (E) and move check spring (F) in direction (G) as shown. (Figure 28) Important Note: Adjust check spring ONLY enough to eliminate most of the ballooning as TOO MUCH check spring travel may cause early spring fatigue and failure.
-
Page 14: Maintenance
MAINTENANCE We recommend greasing the Master Tool Cub monthly with high pressure bearing grease and oiling it after every eight hours of use with Lily Stitching Oil. Oiling and greasing points are indicated on Figures 29, 30 and 31. GREASE... - Page 15 Figure 31 800-932-8371 weaverleathersupply.com...
-
Page 16: Replacement Parts
REPLACEMENT PARTS 63500-129 Check Spring 63500-125 88008-01 ➊ ➏ ➑ Thread Stand Set Screw, 8-32 x 3/16" 88009-01 Thread Guide Loop ➋ 63500-130 ➒ Stitch Length Tension Spring 63500-127 Shuttle ➌ 63500-102 Presser Foot ➐ 63500-124 Bobbin Winder ➍ 63500-126 Bobbin ➎...
Need help?
Do you have a question about the Master Tool Cub and is the answer not in the manual?
Questions and answers