Advertisement
Thank you for purchasing a Sealey product. Manufactured to a high standard this product will, if used according to these instructions
and properly maintained, give you years of trouble free performance.
IMPORTANT: PLEASE READ THESE INSTRUCTIONS CAREFULLY. NOTE THE SAFE OPERATIONAL REQUIREMENTS, WARNINGS AND
CAUTIONS. USE THE PRODUCT CORRECTLY AND WITH CARE FOR THE PURPOSE FOR WHICH IT IS INTENDED. FAILURE TO DO SO MAY
CAUSE DAMAGE AND/OR PERSONAL INJURY AND WILL INVALIDATE THE WARRANTY. PLEASE KEEP INSTRUCTIONS SAFE FOR FUTURE USE.
1.
SAFETY INSTRUCTIONS
! Before use inspect the drum loader for damage and worn components.
! If in any doubt do not use and have it inspected and/or repaired by an authorised service agent.
! Only use the drum loader on firm, level, unobstructed surfaces which are capable of supporting the
loader and drum.
" Do not overload the drum loader - maximum capacity is one 205 litre drum.
" Do not ride or allow others to ride on the drum loader.
" Do not use on tarmacadam. The drum loader must only be used on a concrete surface.
" Do not overload.
! Replace or repair damaged parts. Use only recommended parts. Unauthorised parts may be
dangerous and will invalidate the warranty.
! Use a qualified person to lubricate and maintain the drum loader.
# WARNING! Failure to comply with these instructions may result in loss of load, damage to drum
loader or other property and/or personal injury.
2.
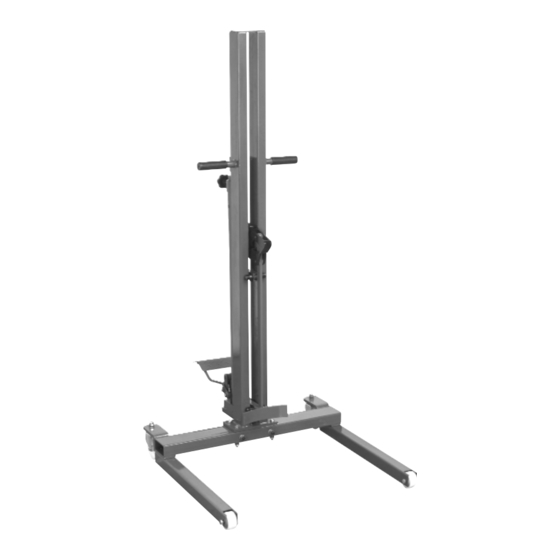
INTRODUCTION AND SPECIFICATION
2.1
Ideal for loading and unloading barrel bunds, vans and general barrel handling when a forklift is
not available. Suitable for handling 205 litre drums, Model DH03 has foot-operated hydraulics
and smooth-rolling wheels aid handling and manoeuvrability. There are side handles on the main
body to position the unit.
2.2
Specification
Model No . . . . . . . . . . . . . . . . . . . . . . . . . . . . . . . . . . . . . . . . . . . . . . . . . . . . . . . . . . . . . DH03
Maximum Drum Height . . . . . . . . . . . . . . . . . . . . . . . . . . . . . . . . . . . . . . . . . . . . . . . . . .1610mm
Leg Height . . . . . . . . . . . . . . . . . . . . . . . . . . . . . . . . . . . . . . . . . . . . . . . . . . . . . . . . . . . . 65mm
Leg Length . . . . . . . . . . . . . . . . . . . . . . . . . . . . . . . . . . . . . . . . . . . . . . . . . . . . . . . . . . . 590mm
Width Inside Legs . . . . . . . . . . . . . . . . . . . . . . . . . . . . . . . . . . . . . . . . . . . . . . . . . . . . . . .700mm
Maximum Width . . . . . . . . . . . . . . . . . . . . . . . . . . . . . . . . . . . . . . . . . . . . . . . . . . . . . . . . 800mm
Overall Maximum Height . . . . . . . . . . . . . . . . . . . . . . . . . . . . . . . . . . . . . . . . . . . . . . . . 1950mm
Overall Minimum Height . . . . . . . . . . . . . . . . . . . . . . . . . . . . . . . . . . . . . . . . . . . . . . . . . 1710mm
Weight . . . . . . . . . . . . . . . . . . . . . . . . . . . . . . . . . . . . . . . . . . . . . . . . . . . . . . . . . . . . . . .. . .67kg
3.
ASSEMBLY
3.1
Frame Assembly (Refer to the Frame and Ram Parts List diagrams)
3.1.1
Bolt the legs (67) to the base frame (64) using the screws (65) and spring washers (66).
3.1.2
Attach the castors (63) to the rear base frame (64) with spring washers (62) and nuts (61).
3.1.3
Bolt the post (51) to the base frame (64) using washers (54) (59), spring washers (55) (58), nuts
(56) (57), screw rods (60) and bolts (53).
3.1.4
Bolt the pump and ram to the base frame (64) with bolts (31).
3.2
Foot Pedal Installation (Refer to the Ram Parts List diagram)
3.2.1
Locate the foot pedal (27) in the base (1) using links (26), washers (28), snap pins (29) and pins (30).
Refer to Fig. 1.
3.3
Lifting Arm Assembly (Refer to the Frame Parts List diagram)
3.3.1
Remove the front rollers (44) from the lifting arm
3.3.2
Attach the fulcrum assembly (47) to lifting arm (40) using retaining rings (46) and pin (48).
3.3.3
Slide the fulcrum assembly (47) into position from the back of the post (51). Refer to Fig. 2.
3.3.4
Tighten the set screw (39) at the rear of the lifting arm (40) to attach it to the ram (not shown).
3.3.5
Replace the front rollers (44) removed at paragraph 3.3.1.
3.3.6
Remove the back rollers (44) from the support frame (50).
3.3.7
Push the support frame (50) into position in the post (51).
3.3.8
Replace the back rollers (44) removed at paragraph 3.3.6.
3.3.9
Attach the fulcrum assembly (47) to the support frame with pins (49) and retaining rings (46).
3.4
Handle Assembly
NOTE: The handles come with the grub screws attached.
3.4.1
Locate the handle grips (52) in the post (51).
3.4.2
Push the handle grips (52) fully in position.
3.4.3
Unscrew the two grub screws on the handle grip shafts until the handle grips (52) lock in position.
INSTRUCTIONS FOR:
HYDRAULIC DRUM LOADER
Model: DH03
Fig. 1
Fig. 2
DH03 -1 - 020806
Advertisement
Table of Contents

Summary of Contents for Sealey DH03
- Page 1 HYDRAULIC DRUM LOADER Model: DH03 Thank you for purchasing a Sealey product. Manufactured to a high standard this product will, if used according to these instructions and properly maintained, give you years of trouble free performance. IMPORTANT: PLEASE READ THESE INSTRUCTIONS CAREFULLY. NOTE THE SAFE OPERATIONAL REQUIREMENTS, WARNINGS AND CAUTIONS.
- Page 2 Signed by Mark Sweetman 2nd August 2006 For Jack Sealey Ltd. Sole importer into the UK of Sealey Power Products. NOTE: It is our policy to continually improve products and as such we reserve the right to alter data, specifications and component parts without prior notice.
Need help?
Do you have a question about the DH03 and is the answer not in the manual?
Questions and answers