Table of Contents
Advertisement
Available languages
Available languages
Quick Links
M1.1.TZHD30S-50S.NLFREN - 15032019
P.02 Gelieve te lezen en voor later gebruik bewaren
NL
P.19 Veuillez lire et conserver pour consultation ultérieure
FR
P.36 Please read and keep for future reference
EN
HANDLEIDING - MODE D'EMPLOI - MANUAL
TZHD30S (790031754)
TZHD50S (790032182)
Tafelzaag
Scie à table
Table saw
Advertisement
Chapters
Table of Contents

Summary of Contents for MW TZHD30S
- Page 1 M1.1.TZHD30S-50S.NLFREN - 15032019 HANDLEIDING - MODE D’EMPLOI - MANUAL TZHD30S (790031754) TZHD50S (790032182) Tafelzaag Scie à table Table saw P.02 Gelieve te lezen en voor later gebruik bewaren P.19 Veuillez lire et conserver pour consultation ultérieure P.36 Please read and keep for future reference...
-
Page 2: Table Of Contents
M1.1.TZHD30S-50S.NLFREN - 15032019 Inhoud 1 Veiligheid ������������������������������������������������������������������������������������������������������������������������������������������2 1.1 Veiligheidsvoorschriften ........................... 3 1.2 Veiligheidsvoorzieningen ..........................4 2 Omschrijving van de machine ������������������������������������������������������������������������������������������������������������5 2.1 Technische gegevens ............................5 2.2 Omschrijving van de machineelementen ......................6 2.3 Toepasselijk gebruik ............................6 2.4 Vereisten voor stroomvoorziening ........................7 2.5 Geluidsniveau .............................. -
Page 3: Veiligheidsvoorschriften
M1.1.TZHD30S-50S.NLFREN - 15032019 1�1 Veiligheidsvoorschriften Algemene veiligheidsvoorschriften • Ken uw machine. Lees en begrijp de handleiding en de op de machine aangebrachte etiketten. Leer meer over de toepassingen en beperkingen en de specifieke potentiële gevaren. • Aard de machine. Elektrocutie, brand of materiële schade kunnen optreden als de machine niet goed elektrisch aangesloten en geaard is. -
Page 4: Veiligheidsvoorzieningen
M1.1.TZHD30S-50S.NLFREN - 15032019 4.3 Residual risks • Gebruik de langsgeleider nooit als lengteaanslag bij het uitvoeren van dwarssneden. and or have any part of your body in line Take precautions to reduce the hazard of • Probeer nooit een vastzittend zaagblad los te maken zonder eerst de machine uit te schakelen. -
Page 5: Omschrijving Van De Machine
M1.1.TZHD30S-50S.NLFREN - 15032019 2 Omschrijving van de machine 2�1 Technische gegevens Model TZHD30S TZHD50S Gewicht 260 kg (ongeveer) 1582 x 1100 x 1016 2090 x 1100 x 1016 Machine afmetingen L x l x h Afstand tussen de voeten 508 x 508 mm... -
Page 6: Omschrijving Van De Machineelementen
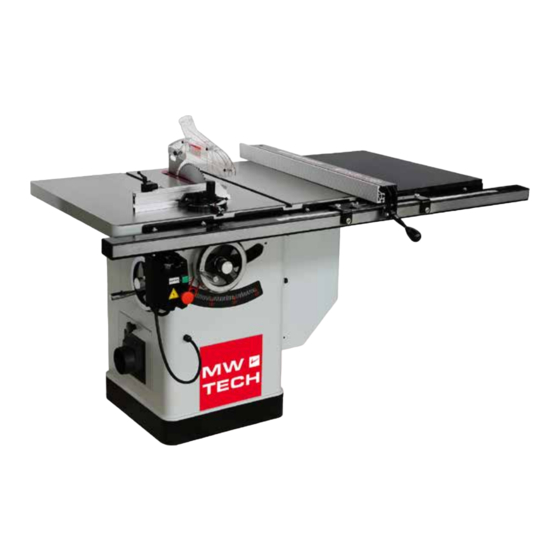
M1.1.TZHD30S-50S.NLFREN - 15032019 2�2 Omschrijving van de machineelementen 3.2 Feature Identification ( Fig.1) 1. Achterrail 2. Hoofdtafel 3. Zaagbladbescherming 4. Rechter verlengstuk 5. Langsgeleider 6. Verlengtafel 7. Voorste rail + buis 8. Voet 9. Motorkap 10. Handwiel voor zaagbladhoogteinstelling 11. ON/OFF (AAN/UIT) schakelaar 12. -
Page 7: Vereisten Voor Stroomvoorziening
M1.1.TZHD30S-50S.NLFREN - 15032019 2�4 Vereisten voor stroomvoorziening Lijst van de meest gebruikte en voorbedrade spanningen: Motor 4 kW (5,5 pK) Spanning 380 V Fasen 3 Ph Frequentie 50 Hz Nominale stroom 8,3 A Voorbedrading 380 V / 3 F Draden De stabiele AC voeding is 0,9 ~ 1,1 maal de nominale waarde. -
Page 8: Installatie Van De Machine
The machine endures transportation and store in -25~55°C ambient M1.1.TZHD30S-50S.NLFREN - 15032019 temperature. Be care of not making machine exposed to rain or damaging the packing during transportation and store. De vermelde cijfers zijn emissieniveaus en zijn niet noodzakelijkerwijze veilige bedrijfsniveaus. Hoewel er een verband... - Page 9 M1.1.TZHD30S-50S.NLFREN - 15032019 from the pallet. ----- FLOOR: This tool distributes a large amount of weight over a small area. Make certain that the floor is capable of supporting both the weight of the machine and the operator.
- Page 10 M1.1.TZHD30S-50S.NLFREN - 15032019 Montage van de rail en langsgeleider 1. Monteer de achterste rail, voorste rail, buis en verlengtafel (zie opengewerkte tekening op pagina 53). Voordat u de bevestigingen aandraait, zorg ervoor dat de bovenrand van de achterste rail op één lijn ligt met de onderrand van de twee T-bouten, zodat de verstekgeleider tijdens de installatie soepel kan glijden, zoals getoond op figuur 8.
- Page 11 (Fig.12) M1.1.TZHD30S-50S.NLFREN - 15032019 Fig.14 Kn B. slide th Installatie van de schakelaar into the b Monteer de magneetschakelaar links onder de voorste rail (figuur 12). disengage Montage van het zaagblad engages t 1. Verwijder het tafelinzetstuk.
- Page 12 M1.1.TZHD30S-50S.NLFREN - 15032019 D. Place a straightedge against the blade and the 5.4.9 Extraction system spreader. When properly aligned, spreader/riving knife will be in the "alignment zone," shown in Fig.16, and will be parallel with the Dust collector device should be prepared by 4.
- Page 13 M1.1.TZHD30S-50S.NLFREN - 15032019 Elektrische installatie WAARSCHUWING! • De bekabeling moet door professionele elektriciens uitgevoerd worden� Zorg er altijd voor dat de machine correct geaard is� • De bekabeling in de machine moeten na het einde van de elektrische installatie tegen een direct contact beschermd worden met een beschermingsgraad van minstens IP2X�...
-
Page 14: Instellingen
M1.1.TZHD30S-50S.NLFREN - 15032019 4 Instellingen OPMERKING De machine moet voor gebruik zorgvuldig ingesteld worden, om de beste prestaties te leveren� Maak de volgende instellingen: make sure the fence remains parallel with the table 6. Adjustment De hoogte en de helling van het zaagblad instellen T-slot. - Page 15 M1.1.TZHD30S-50S.NLFREN - 15032019 2. If an adjustment is necessary, loosen the screws 6.5 Aligning Blade Guard Splitter or Riving as arrow point which fix to the table, make the Knife with Blade needed adjustment until both measurements are equal or less than 0.2mm. and retighten the screws.
-
Page 16: Bediening
7. Operations 7.1 Electrical Operation Fig.27 M1.1.TZHD30S-50S.NLFREN - 15032019 ON Button: Starts the motor. Hole for safety pin: When installed pin, disables the ON Button to prevent accidental startup. STOP Button: Turns machine. 5 Bediening 5�1 Elektriciteit ON knop Gat voor... -
Page 17: Onderhoud
M1.1.TZHD30S-50S.NLFREN - 15032019 Als het voltooid is, blijft het werkstuk op de tafel liggen, kantelt het licht en wordt door het achterste uiteinde van de zaagbladbescherming vastgepakt, of glijdt van de tafel af en valt op de grond. Het kan ook gebeuren dat de toevoer tot het einde van de tafel doorgaat, waarna het werkstuk opgetild wordt en langs de buitenste rand van de geleider teruggevoerd. -
Page 18: Storingen Oplossen
M1.1.TZHD30S-50S.NLFREN - 15032019 7 Storingen oplossen Storingen Mogelijke oorzaken Oplossingen Machine niet aangesloten Sluit de machine aan Zekering doorgebrandt of stroomonderbreker Vervang de zekering of reset de De machine start niet geactiveerd stroomonderbreker Aansluitkabel beschadigd Laat de kabel door een elektricien vervangen... -
Page 19: Sécurité
M1.1.TZHD30S-50S.NLFREN - 15032019 Table des matières 1 Sécurité �������������������������������������������������������������������������������������������������������������������������������������������� 19 1.1 Consignes de sécurité ........................... 20 1.2 Dispositifs de sécurité ............................ 21 2 Description de la machine ���������������������������������������������������������������������������������������������������������������� 22 2.1 Données techniques ............................22 2.2 Description des éléments de la machine ......................23 2.3 Utilisation conventionnelle .......................... -
Page 20: Consignes De Sécurité
M1.1.TZHD30S-50S.NLFREN - 15032019 1�1 Consignes de sécurité Consignes de sécurité générales • Connaissez votre machine. Lisez et comprenez le manuel d’utilisation et les étiquettes fixées sur la machine. Apprenez ses applications et ses limites ainsi que les dangers potentiels spécifiques. -
Page 21: Dispositifs De Sécurité
M1.1.TZHD30S-50S.NLFREN - 15032019 4.3 Residual risks • N’essayez jamais de libérer une lame de scie bloquée sans d’abord éteindre la machine. and or have any part of your body in line Take precautions to reduce the hazard of • Prévoyez un support adapté à l’arrière et sur les côtés de la scie pour les pièces longues ou larges. -
Page 22: Description De La Machine
M1.1.TZHD30S-50S.NLFREN - 15032019 2 Description de la machine 2�1 Données techniques Modèle TZHD30S TZHD50S Poids 260 kg (environ) Dimensions de la machine L x l x h 1582 x 1100 x 1016 mm 2090 x 1100 x 1016 mm Embase 508 x 508 mm Magnétique avec thermique de sécurité... -
Page 23: Description Des Éléments De La Machine
M1.1.TZHD30S-50S.NLFREN - 15032019 2�2 Description des éléments de la machine 3.2 Feature Identification ( Fig.1) 1. Rail arrière 2. Table principale 3. Protection de la lame 4. Rallonge droite 5. Guide longitudinal 6. Table de rallonge 7. Rail avant + tube 8. -
Page 24: Exigences En Matière D'alimentation Électrique
M1.1.TZHD30S-50S.NLFREN - 15032019 2�4 Exigences en matière d’alimentation électrique Liste des tensions les plus utilisées et précâblées : Moteur 4 kW (5,5 HP) Tension 380 V Phases 3 Ph Fréquence 50 Hz Courant nominal 8,3 A Précâblage 380 V / 3 Ph Fils L’alimentation en courant alternatif en régime permanent est de 0,9 ~ 1,1 fois la valeur nominale. -
Page 25: Installation De La Machine
The machine endures transportation and store in -25~55°C ambient M1.1.TZHD30S-50S.NLFREN - 15032019 temperature. Be care of not making machine exposed to rain or damaging the packing during transportation and store. Les chiffres cités sont des niveaux d’émission et ne sont pas nécessairement des niveaux de fonctionnement sûrs. Bien qu’il existe une corrélation entre les niveaux d’émission et d’exposition, celle-ci ne peut être utilisée de manière fiable pour déterminer... - Page 26 ----- FLOOR: This tool distributes a large amount of M1.1.TZHD30S-50S.NLFREN - 15032019 weight over a small area. Make certain that the floor is capable of supporting both the weight of the machine and the operator.
- Page 27 M1.1.TZHD30S-50S.NLFREN - 15032019 Installation du rail et du guide longitudinal 1. Installez le rail arrière, le rail avant, le tube et la table de rallonge (voir vue éclatée en page 53). Avant de fixer les attaches, assurez-vous que le bord supérieur du rail arrière est au même niveau que le bord inférieur des deux boulons en T, pour que le guide d’onglet puisse coulisser en douceur lors de son installation, comme illustré...
- Page 28 (Fig.12) M1.1.TZHD30S-50S.NLFREN - 15032019 Fig.14 Kn B. slide th Installation de l’interrupteur into the b Installez l’interrupteur magnétique à gauche, sous le rail avant (figure 12). disengage Installation de la lame engages t 1. Enlevez l’insert de table.
- Page 29 M1.1.TZHD30S-50S.NLFREN - 15032019 D. Place a straightedge against the blade and the 5.4.9 Extraction system spreader. When properly aligned, spreader/riving knife will be in the "alignment zone," shown in Fig.16, and will be parallel with the Dust collector device should be prepared by 4.
- Page 30 M1.1.TZHD30S-50S.NLFREN - 15032019 Installation électrique AVERTISSEMENT ! • Le câblage doit être effectué par des électricien professionnels� Assurez-vous toujours que la machine est correctement mise à la terre� • Tous les câblages à l’intérieur de la machine doivent être protégés d’un contact direct avec un indice d’au moins IP2X lorsque l’installation électrique est terminée�...
-
Page 31: Réglages
M1.1.TZHD30S-50S.NLFREN - 15032019 4 Réglages REMARQUE Avant utilisation, la machine doit être soigneusement réglée afin de fournir les meilleures performances� Effectuez les réglages suivants : make sure the fence remains parallel with the table 6. Adjustment T-slot. Retighten lock nuts. - Page 32 M1.1.TZHD30S-50S.NLFREN - 15032019 2. If an adjustment is necessary, loosen the screws 6.5 Aligning Blade Guard Splitter or Riving as arrow point which fix to the table, make the Knife with Blade needed adjustment until both measurements are equal or less than 0.2mm. and retighten the screws.
-
Page 33: Utilisation
7.1 Electrical Operation Fig.27 M1.1.TZHD30S-50S.NLFREN - 15032019 ON Button: Starts the motor. Hole for safety pin: When installed pin, disables the ON Button to prevent accidental startup. STOP Button: Turns machine. 5 Utilisation 5�1 Électricité Bouton Trou pour goupille de Voir figure 27 : sécurité... -
Page 34: Entretien
M1.1.TZHD30S-50S.NLFREN - 15032019 Quand c’est fait, la pièce reste sur la table, s’incline légèrement et est attrapée par l’extrémité arrière de la protection de la lame, ou glisse de la table et tombe sur le sol. Il est possible aussi que l’alimentation continue jusqu’au bout de la table, après quoi la pièce est soulevée et ramenée le long du bord extérieur du guide. -
Page 35: Résolution Des Pannes
M1.1.TZHD30S-50S.NLFREN - 15032019 7 Résolution des pannes Pannes Causes possibles Solutions La machine n’est pas branchée Branchez la machine Remplacez le fusible ou réinitialisez le La scie ne démarre pas Fusible grillé ou disjoncteur déclenché disjoncteur Câble d’alimentation endommagé Faites remplacer le câble par un électricien Rallonge électrique trop légère ou trop... -
Page 36: Safety
M1.1.TZHD30S-50S.NLFREN - 15032019 Contents 1 Safety ���������������������������������������������������������������������������������������������������������������������������������������������� 36 1.1 Safety instructions ............................37 1.2 Safety equipment ............................38 2 Machine description ������������������������������������������������������������������������������������������������������������������������� 39 2.1 Technical parameters ............................. 39 2.2 Feature identification ............................. 40 2.3 Intended use ..............................40 2.4 Requirements of electrical power ........................41 2.5 Noise ................................ -
Page 37: Safety Instructions
M1.1.TZHD30S-50S.NLFREN - 15032019 1�1 Safety instructions General safety instructions • Know your machine. Read and understand the owner’s manual and labels affixed to the machine. Learn its application and limitations as well as it’s specific potential hazards. • Ground the machine. Electrocution, fire, or equipment damage may occur if machine is not correctly grounded and connected to the power supply. -
Page 38: Safety Equipment
M1.1.TZHD30S-50S.NLFREN - 15032019 • Move the rip fence out of the way when crosscutting. • When cutting mouldings. Never run the stock between the fence and the moulding cutter-head. Refer to moulding applications in the accessory manual for details. •... -
Page 39: Machine Description
M1.1.TZHD30S-50S.NLFREN - 15032019 2 Machine description 2�1 Technical parameters Model TZHD30S TZHD50S Weight 260 kg (approximately) Product dimensions L x w x H 1582 x 1100 x 1016 mm 2090 x 1100 x 1016 mm Foot print 508 x 508 mm... -
Page 40: Feature Identification
M1.1.TZHD30S-50S.NLFREN - 15032019 2.2 Feature identification 3.2 Feature Identification ( Fig.1) 1. Rear rail 2. Main table 3. Blade guard 4. Right extension wing 5. Fence 6. Extension table 7. Front rail + tube 8. Leg 9. Motor cover 10. Blade height handwheel 11. -
Page 41: Requirements Of Electrical Power
M1.1.TZHD30S-50S.NLFREN - 15032019 2�4 Requirements of electrical power List of the most using and prewired voltage: Motor 4 kW (5.5 HP) Voltage 380 V Phase 3 Ph Frequency 50 Hz Nominal current 8.3 A Prewired 380 V / 3 Ph Cords The steady-state AC power supply is 0.9 ~ 1.1 times of the rated value. -
Page 42: Installation Of The Machine
-25~55°C ambient temperature. M1.1.TZHD30S-50S.NLFREN - 15032019 Be care of not making machine exposed to rain or damaging the packing during transportation and store. The figures quoted are emission levels and are not necessarily safe working levels. Whilst there is a correlation between the emission and exposure levels, this cannot be used reliably to determine whether or not further precautions are required. - Page 43 Make certain that the floor is capable of supporting both the weight of the M1.1.TZHD30S-50S.NLFREN - 15032019 machine and the operator. The floor should also be a level surface. If the unit wobbles or rocks once in place, be sure to eliminate by using shims.
- Page 44 M1.1.TZHD30S-50S.NLFREN - 15032019 Install the rail and fence 1. Install the rear rail , front rail, tube, extension table (see exploded view on page 53). Before tightening the fasteners, check to make sure the top edge of rear rail is flush with the lowest edge of both T-bolts so the miter gauge will slide smoothly when installed later, as on figure 8.
- Page 45 M1.1.TZHD30S-50S.NLFREN - 15032019 Fig.14 Kn B. slide th into the b disengage Install the switch engages t Install the magnetic switch onto the bottom left hand side of the front rail (figure 12) C. give the Install the blade is locked t make sure it is parallel with the tube, and the“0”...
- Page 46 M1.1.TZHD30S-50S.NLFREN - 15032019 D. Place a straightedge against the blade and the 5.4.9 Extraction system spreader. When properly aligned, spreader/riving knife will be in the "alignment zone," shown in Fig.16, and will be parallel with the Dust collector device should be prepared by blade.
- Page 47 M1.1.TZHD30S-50S.NLFREN - 15032019 Electrical installation WARNING! • Wiring should only be done by professional electricians� Always make sure the machine is properly earthed� • All wirings in the cabinets should be protected against direct contact to at least IP2X when finishing electrical installation.
-
Page 48: Adjustment
M1.1.TZHD30S-50S.NLFREN - 15032019 4 Adjustment NOTICE make sure the fence remains parallel with the table 6. Adjustment Before operation, the machine should be carefully adjusted for best performance� Please make T-slot. Retighten lock nuts. adjustment as following: 3. To set the fence perpendicular to the table, place... - Page 49 M1.1.TZHD30S-50S.NLFREN - 15032019 2. If an adjustment is necessary, loosen the screws 6.5 Aligning Blade Guard Splitter or Riving as arrow point which fix to the table, make the Knife with Blade needed adjustment until both measurements are equal or less than 0.2mm. and retighten the screws.
-
Page 50: Operation
7.1 Electrical Operation Fig.27 M1.1.TZHD30S-50S.NLFREN - 15032019 ON Button: Starts the motor. Hole for safety pin: When installed pin, disables the ON Button to prevent accidental startup. STOP Button: Turns machine. 5 Operation 5�1 Electrical operation button Hole for safety pin... -
Page 51: Maintenance
M1.1.TZHD30S-50S.NLFREN - 15032019 6 Maintenance This table saw requires very little maintenance other than minor 8. Maintenance lubrication and cleaning. The following sections detail what will need to be done in order to assure continued operation of your saw. This table saw requires very little maintenance other than minor lubrication and cleaning. -
Page 52: Troubleshooting
M1.1.TZHD30S-50S.NLFREN - 15032019 7 Troubleshooting Problem Possible cause Solution Saw not plugged in Plug in saw Fuse blown or circuit breaker tripped Replace fuse or reset circuit breaker Saw will not start Have cord replaced by a certified Cord damaged... -
Page 53: Onderdelen
M1.1.TZHD30S-50S.NLFREN - 15032019 10. Parts List 8 Onderdelen Table Saw Body Breakdown 8 Pièces détachées 8 Spare parts Zaaglichaam Corps de la scie Saw body... - Page 54 M1.1.TZHD30S-50S.NLFREN - 15032019 Zaaglichaam - Onderdelenlijst Body Assembly Parts List Corps de la scie - Liste des pièces Saw body - Part list REF# DESCRIPTION REF# DESCRIPTION cabinet lock washer 8 rivet nut M5x12 pan HD screw M8*30 hook wheel rivet nut M6x13.5...
- Page 55 M1.1.TZHD30S-50S.NLFREN - 15032019 Tunnion Assembly Breakdown Astap samenstelling Ensemble tourillon Trunnion assembly...
- Page 56 M1.1.TZHD30S-50S.NLFREN - 15032019 Astap samenstelling - Onderdelenlijst Ensemble tourillon - Liste des pièces Trunnion Assembly Parts List Trunnion assembly - Part list REF# DESCRIPTION REF# DESCRIPTION REF# DESCRIPTION cap screw M6x20 cap screw M8*35 wave lock washer lock washer 6...
- Page 57 M1.1.TZHD30S-50S.NLFREN - 15032019 Blade Guard Breakdown Blade Guard Breakdown Blade Guard Breakdown Blade Guard Breakdown Zaagbladbescherming Capot de protection de la lame Blade guard Zaagbladbescherming - Onderdelenlijst Capot de protection de la lame - Liste des pièces Blade Guard Parts List...
- Page 58 M1.1.TZHD30S-50S.NLFREN - 15032019 Miter Gauge Breakdown Miter Gauge Breakdown Verstekgeleider Guide d'onglet Miter gauge Verstekgeleider - Onderdelenlijst Miter Gauge Parts List Guide d'onglet - Liste des pièces Miter Gauge Parts List Miter gauge - Part list REF# DESCRIPTION REF# DESCRIPTION...
- Page 59 M1.1.TZHD30S-50S.NLFREN - 15032019 Fence Breakdown Fence Breakdown Langsgeleider Guide longitudinal Fence Fence Parts List Langsgeleider - Onderdelenlijst Fence Parts List Guide longitudinal - Liste des pièces Fence - Part list REF# DESCRIPTION REF# DESCRIPTION REF# DESCRIPTION REF# DESCRIPTION Guide tube insert...
- Page 60 M1.1.TZHD30S-50S.NLFREN - 15032019 30″Rail & Extension Table Breakdown 30'' rail en verlengtafel 30″Rail & Extension Table Breakdown Rail 30'' et rallonge de table 30'' rail and extension table 30'' rail en verlengtafel - Onderdelenlijst 30″Rail & Extension Table Parts List Rail 30'' et rallonge de table - Liste des pièces...
- Page 61 M1.1.TZHD30S-50S.NLFREN - 15032019 50″Rail & Extension Table Breakdown 50'' rail en verlengtafel 50″Rail & Extension Table Breakdown Rail 50'' et rallonge de table 50'' rail and extension table 50″Rail & Extension Table Parts List 50'' rail en verlengtafel - Onderdelenlijst Rail 50'' et rallonge de table - Liste des pièces...
-
Page 62: Eg Conformiteitsverklaring
M1.1.TZHD30S-50S.NLFREN - 15032019 9 EG conformiteitsverklaring 9 Déclaration de conformité CE 9 EC declaration of conformity Fabrikant/Invoerder Vynckier Tools sa Fabricant/Importateur Avenue Patrick Wagnon, 7 Manufacturer/Retailer ZAEM de Haureu B-7700 Mouscron Verklaart hierbij dat het volgende product : Déclare par la présente que le produit suivant :...
Need help?
Do you have a question about the TZHD30S and is the answer not in the manual?
Questions and answers