Table of Contents
Advertisement
Quick Links
Advertisement
Table of Contents

Subscribe to Our Youtube Channel
Related Manuals for PERMASTEEL PH-90204-BK

Summary of Contents for PERMASTEEL PH-90204-BK
- Page 1 INSTRUCTION MANUAL Model No: PH-90204-BK 110-120V 1500W Ques Concerns, Missing parts? Before returning to the store, please contact our customer service team Please call 888-287-0735 / 8am – 5pm PST / Monday to Friday Email: Service@Permasteel.net...
- Page 2 ASSEMBLY & OPERATION INSTRUCTION Please read carefully and Save this instruction for future reference Introduction The infrared heater contains a gold halogen lamp formed reflector heating system that provides even heat distribution. The infrared heater saves 30%-40% of electricity in comparison to traditional heaters. The infrared heater is commonly used for indoor or outdoor spot heating.
- Page 3 13. Do not put fingers or foreign objects into the heater element while in operation. 14. Do not leave the appliance unattended when not in use. 15. This heater is not intended for use in bathrooms, laundry room and similar indoor locations. Never use the heater where it may fall into a bathtub or other water container.
- Page 4 NEVER place hands under the heating elements. Introduction halogen heater produces instant and comfortable heat like the sun. These robust PH-90204-BK and weatherproof heaters are designed for domestic and commercial heating applications within outdoor areas. It is intended for outdoor use only.
-
Page 5: Installation Hardware
ASSEMBLY INSTRUCTIONS Installation Hardware: A Bracket L Shape 4PCS B Plastic Anchor 4PCS C Mounting Screw PA5mm*25mm 4PCS D Bolts M5mm*10mm 4PCS E Nuts M6mm 2PCS F Hex Bolts M6mm*12mm 2PCS... -
Page 6: Installation Instructions
INSTALLATION INSTRUCTIONS Tools Needed: Pencil Hammer Level Screw-Driver Power Drill Drill Bits A wall mounting bracket & hardware is provide with the heater which has been specifically designed to allow this product to be Mounted to a wall or ceiling. Before drilling holes on the wall/ceiling, make sure the wall is a solid structure and that there are no hidden water pipes or electric wires. - Page 7 1. Attach 2pcs (A) L brackets to heater unit with 4pcs (D) M5mm*10mm Bolts (see Figure A). rill 5/16” diameter holes on wall or celling. (see Figure B) For best results, attach directly on wall 2. D studs if possible. 5/16”...
- Page 8 4. Insert 4pcs (B) wall anchors into drilled holes on wall (see Figure C). 1” 3-3/8” 5. Mount the 2pcs (A) brackets using 4pcs (C) PA5mm*25mm mounting screws making sure they are snug and level (see Figure D).
- Page 9 6. Attach heater unit to wall brackets (Note: two people are needed for this step) while one person holds & aligns the heater unit to mounting brackets, the 2nd person should use the two (E) nuts M6mm and two (F) M6mm* 12mm Hex Bolts to attach to wall brackets. Please install the bolts from the inside and tighten the bolt nuts from the outside to secure the brackets and adjust brackets if necessary.
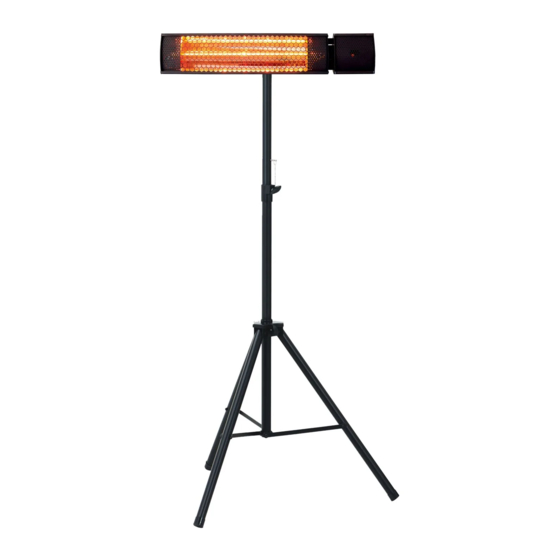
- Page 10 INSTALLATION WITH TRIPOD STAND Accessories: 4pcs M5mm*10mm bolts 2pcs L shaped brackets 1 hand bolt & 1 hand nut 1. Attach 2pcs (A) L brackets to heater unit with 4pcs (D) M5mm*10mm Bolts (see Fig. A) 2. Make sure plastic spacers are attached to tripod post (see Fig. B)
- Page 11 3. with the help of a partner attach the heater assembly to tripod stand use the hand bold & nut hand tighten snugly.
-
Page 12: Remote Control Instruction
Hi setting Level 2 (100%*power) MOTED: All Permasteel heaters and their remote controls have the same frequency, so it is possible to control several heaters with just one remote. PUSH BUTTON: on the right side of the heater, the heater can be operated manually without the remote control. -
Page 13: Cleaning And Maintenance
CLEANING AND MAINTENANCE Regular and careful cleaning helps your infrared heater to operate efficiently for many trouble-free years. To clean your heater, please follow the steps below: 1. Unplug the power cord for your safety before cleaning your heater. 2. Make sure the heater is cool before continuing 3. -
Page 14: Limited Warranty
The above warranty gives you specific legal rights, and you may have other rights which vary from state to state. Ques Concerns, Missing parts? Before returning to the store, please contact our customer service team Please call 888-287-0735 / 8am – 5pm PST / Monday to Friday Email: Service@Permasteel.net...
Need help?
Do you have a question about the PH-90204-BK and is the answer not in the manual?
Questions and answers