Table of Contents
Advertisement
Quick Links
Advertisement
Table of Contents

Summary of Contents for Ceetec P-40
- Page 1 Users guide - - - - - ® Ceetec P-40 1/18...
-
Page 2: Table Of Contents
CONTENTS Introduction ...................... 3 Safety Instructions ................... 4 Use of machine ....................4 Clothing......................4 Personal protective equipment ............... 4 Fluids: ......................4 2.4.1 Water based wood protection: ..................5 2.4.2 Oil based paint ......................5 Room temperature ..................5 Ventilation ....................... -
Page 3: Introduction
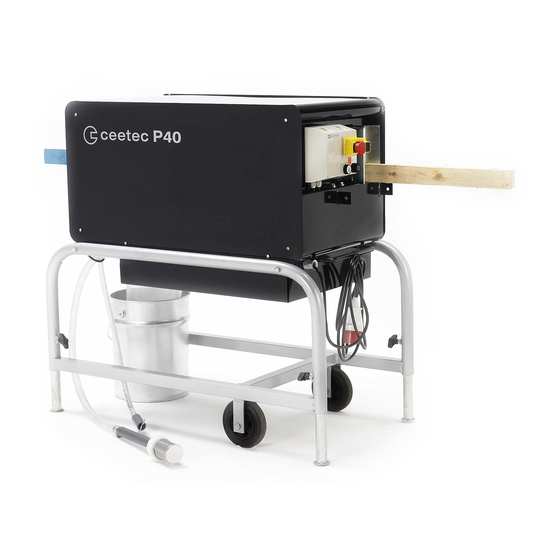
1. Introduction The Ceetec P40 painting machine is built to treat wood with wood protection products. It is suitable for rough, planed and shaped wood. Key factors of the Ceetec P40 are ease and safety of operation and maintenance. The simple machine construction makes it easy to use. The machine is on rubber wheels and can be easily moved around. -
Page 4: Safety Instructions
2. Safety Instructions Important: The following safety instructions must be adhered to for reasons of personal safety. All users must be familiar with these user instructions. Read thoroughly before use to know the machine functions entirely. 2.1 Use of machine The machine is only to be used for treating wood with water and oil based wood protection products. -
Page 5: Water Based Wood Protection
2.4.1 Water based wood protection: E.g.: Tintex Tinova VX, Ready V40, produced by Akzo Nobel.Gori 11, Gori 356, Gori 410, Gori 411, Gori 413, Gori 417, Gori 892, Gori 894 all produced by Dyrup A/S. 2.4.2 Oil based paint E.g.: Gori 22 wood primer, Gori 44 wood protection, Gori 88 semi-/full coverage wood protection, Gori wood oil, Gori outdoor wood treatment, Gori 400, Gori 541, all produced by Dyrup A/S. -
Page 6: Technical Data
3. Technical Data Type: P-40 Height: 1.090 mm Dimensions: Length: 1.140 mm Width: 700 mm Product number: 9010-05000 Motor, power connection 3 x 400 V + J - IP classification: 65 Wattage, motor and pump: 0.37 kW Forward drive speed: Approx. -
Page 7: Preparing The Machine For Use
4. Preparing the machine for use Place the machine on a flat, firm surface. Lower the four support legs so that the machine stands stable. Screw the adapter for the filter bag (item 519) onto the outlet pipe and hang the filter bag (item 517) on it. -
Page 8: Adjusting The Machine
5. Adjusting the machine The emergency stop must be activated. (The machine is disconnected from all power.) NB: Use rubber gloves and goggles during the process. Check product information from the supplier of the used paint for further requirements regarding protection equipment. 1. - Page 9 Ensure that all valves are closed. Adjust the nozzles to the desired position. Adjust the fluid amount using the nozzle valves. Always open the upper nozzle first. The machine can treat 1-2-3 or 4 sides of the item at the same time.
-
Page 10: Cleaning
Cleaning 6.1 After use of water based products After daily use or when changing colour, it is important that the machine is thoroughly cleaned. Due to safety it is important that signs and handles are kept clean and free of paint. NB: Rubber gloves and eye protection must be used during the cleaning of the machine. -
Page 11: After Using Oil Based Products
More thorough cleaning of the machine before reuse or when changing colour First clean the machine as described above. Replace the buckets with a bucket of cleaning solution. Place the suction and excess pressure hoses into the bucket. Start the pump. Wash down the machine with the built in washing hose and a brush, if necessary. - Page 12 Start the pump and open the nozzle valves (remember to always open the side nozzles first). Close the nozzle valves when they are clean. Rinse the machine with the inbuilt washing hose and a brush, if necessary. Finally, clean the filter bag, suction filter and excess pressure valve. Repeat the treatment if necessary.
-
Page 13: Maintenance
7. Maintenance Switch the main switch to "0" and unplug before commencing maintenance work. All adjustable mechanical parts are easily accessed by removing the side panel and/or the lower protective caps. Important. When the adjustments are done, assembling is done in reverse order. Do NOT start the machine before all safety guards are put back into place. -
Page 14: Replacing Spart Parts
8. Replacing spare parts Switch the main switch to "0" and unplug before replacing any parts. Removing the side panel, shield on the rear and/or the removing the lower protection cap can easily access all replaceable parts. When the adjustments are done, assembling is done in reverse order. Do NOT start the machine before all safety guards are put back into place. -
Page 15: Trouble Shooting
9. Trouble shooting Fault Possible cause Action A. Pumps/forward drive/brushes The machine is not connected to the Connect the power will not start power source The main switch is turned off Switch the main switch to position ”I” There has been a thermal cut-out Check the frequency converter in the electrics cabinet See ”A”... -
Page 16: Spare Part Lists
10. Spare part list Number guide: The last 3 numbers refer to the item numbers on the detail pictures placed in the back of this folder. E.g. filter bag 600 (order number 9011-20517 = item 517) Item no Piece Description Picture 9011-05610 Shaft for drive roller... - Page 17 Item no Piece Description Picture Suction hose 3/4” x 1150 mm 9011-05681 Armoured hose 1/2” x 3 mtr. 9011-05682 9011-05689 Scraper (set) 9011-05699 Modular brush, short 9011-10742 Pressure control valve Suction hose 3/4” x 1150 mm 9011-10743 9011-10775 Suction hose with connections 9011-10792 1 set of diaphragms 9011-20515...
-
Page 18: Accessories
11. Accessories The following accessories are available for the Ceetec P40 9011-05603 Set of conveyor 2 x 2 mtr. 9011-20504 Carrying roller with smooth rollers (front) 9011-20505 Carrying roller with pulley roller (rear) 9011-05664 1 set complete brushes 9011-05664a 1 set complete horse hair brushes...
Need help?
Do you have a question about the P-40 and is the answer not in the manual?
Questions and answers