Advertisement
Quick Links
Package Contents
GCS1932H
1 x GCS1932H
2 x HDMI Cables
2 x USB 3.0 Cables
2 x Audio Cable Sets
1 x Power Adapter
1 x Quick Start Guide
1 x Warranty Card
Quick Start Guide
System Requirements
2/4-Port 4K KVMP Switch with HDMI
®
Connection, USB 3.0 Hub, and Audio Mixer
Console:
• HDMI monitor
GCS1932H/GCS1934H
• Standard wired USB keyboard
PART NO. Q1644 / Q1645
• Standard 3-button wired USB mouse
• Speakers(optional)
Computer:
• 1 x HDMI port
• USB Type-A port
• Audio port (optional)
Operating Systems:
• Windows
• Mac OS X 9.0+
• Linux
www.iogear.com
1
Overview
GCS1934H
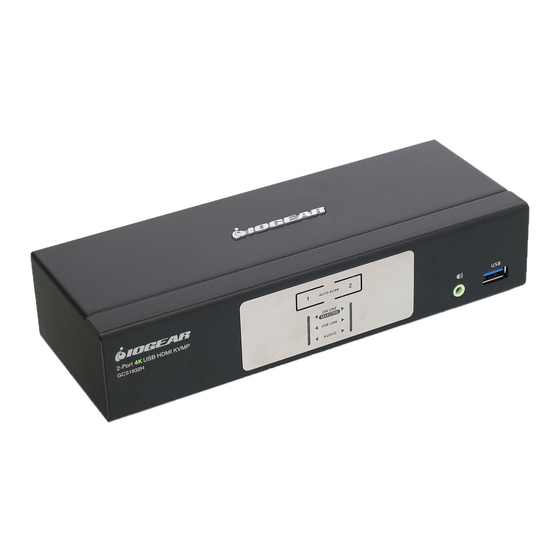
GCS1932H Front View
1 x GCS1934H
4 x HDMI Cables
4 x USB 3.0 Cables
4 x Audio Cable Sets
1 x Power Adapter
1 x Quick Start Guide
1 x Warranty Card
GCS1932H Rear View
A. Port selection pushbuttons
2000, Vista, 7, 8.1, 10
®
B. Port LEDs
C. Audio Port
, UNIX, and other USB supported systems
®
D. USB 3.0 Hub
E. Console Ports
F. KVM Ports
G. Power Jack
H. Ground Terminal
GCS1934H Front View
A
1
2-Port 4K USB HDMI KVMP
GCS1932H
B
1
C
1
D
1
GCS1934H Rear View
E
1
H
1
1
G
F
1
H
1
2
A
1
B
D
1
C
1
1
E
1
G
1
F
1
Hardware Installation
3
1. Ground the GCS1932H/GCS1934H by connecting one end of a
grounding wire to the grounding terminal, and the other end of
the wire to a suitable grounded object
2. Connect the USB keyboard and mouse to the
GCS1932H/GCS1934H console ports
3. Connect the HDMI monitors to the GCS1932H/GCS1934H
console ports
4. Turn the monitor power to ON
5. Connect the speaker into the GCS1932H/GCS1934H speaker jack
located on the front side panel.
6. Connect the secondary speaker into the GCS1932H/GCS1934H
speaker jack located on the rear side panel.
7. Connected the HDMI connectors into any available HDMI ports
in the KVM Port section. Connect the USB and speaker
connectors into the GCS1932H/GCS1934H. Connect the other
end of the KVM cables to their respective HDMI, USB, and
speaker ports on the computers.
8. Connect up to 2 USB peripherals into the USB 3.0 Type-A ports
(front and rear panel of the GCS1932H/GCS1934H)
9. Connect the power adapter to an AC power source. Then,
connect the power adapter cable to the GCS1932H/GCS1934H
power jack.
10. Turn all connected computers power to On
Advertisement

Subscribe to Our Youtube Channel
Related Manuals for IOGear GCS1932H

Summary of Contents for IOGear GCS1932H
- Page 1 Package Contents Overview Hardware Installation GCS1932H GCS1934H 1. Ground the GCS1932H/GCS1934H by connecting one end of a GCS1932H Front View GCS1934H Front View grounding wire to the grounding terminal, and the other end of 1 x GCS1932H 1 x GCS1934H...
- Page 2 (2) this device must accept any interference received, including www.iogear.com/product/GCS1934H 1. Visit www.iogear.com for more product information interference that may cause undesired operation. 2. Visit www.iogear.com/support for live help and product support GCS1932M Front View GCS1934H Front View CE Statement...
Need help?
Do you have a question about the GCS1932H and is the answer not in the manual?
Questions and answers