Advertisement
Table of Contents
- 1 Table of Contents
- 2 Application and Unique Features
- 3 Installation and Cautions
- 4 Cautions During Operation
- 5 Function and Performance of each Part
- 6 Unit Operation
- 7 Maintenance
- 8 Action for Malfunction
- 9 Warranty Criterion
- 10 Specification
- 11 Install Lab Tracer
- 12 How to Use Lab Tracer
- Download this manual
Advertisement
Table of Contents

Subscribe to Our Youtube Channel
Summary of Contents for Lab companion OV-11
- Page 1 Operation manual [VACUUM OVEN] Model : OV-11/12 Manual No : 00HAA0001117 ( Version : 5.0 ) Page 1...
- Page 2 Thank you for purchasing a Lab companion product. We always do our best to provide customer satisfaction. This unit is designed using our own new technology and materials. This operation manual describes the performance of the unit and gives instructions for its correct use. All users must read this operation manual carefully before you use this unit.
-
Page 3: Table Of Contents
Contents Application and unique features----------------------------- Installation and cautions---------------------------------- Cautions during operation--------------------------------- Function and performance of each part ----------------------- Unit operation ----------------------------------------- Maintenance ------------------------------------------ Action for malfunction ----------------------------------- Warranty criterion --------------------------------------- SPECIFICATION ---------------------------------------- Install lab tracer ---------------------------------------- How to use lab tracer ------------------------------------ Page 3... -
Page 4: Application And Unique Features
1. Application and unique features 1) Application (1) You can obtain a perfect dry compound free of residues from a solvent or moisture on a powder state or a resin state of a compound. (2) You can completely separate a solvent from a solution without drying a phase of the substance that contains humidity or other solvents. -
Page 5: Installation And Cautions
designed to adapt narrow tube for slow air incoming to chamber so that Vent system can prevent diffusion of powder type of sample. Incoming air to Chamber can be controlled with the adjustable Vent valve. (8) Safe-circuit is adapted for over-current and over temperature of heating element. (9) Temperature sensor is attached to shelf that sample is put on. -
Page 6: Cautions During Operation
(8) Please let the unit avoid organic solvent like Acetone and Methyl Chloride and also avoid from instrument the strong high frequency noise. (9) Door can be opened up to 180° to left side and so please consider enough space. (10) Please do not put the unit around machine caused strong high frequency noise such as High frequency welder, High frequency sewing machine, High capacity SCR controller. - Page 7 (5)Exchange vacuum oil regularly at an 100hr interval of vacuum pump use. (6) Equip cold trap and filter to protect wall of rotary vane pump cylinder and prevent vacuum oil contamination. Do not put in explosive, combustible samples such as Alcohol, Benzene, and other inflammable solvent inside the chamber.
- Page 8 3) How to vacuum and vent (release) (1) How to create vacuum; ① Put in the sample in the oven and close the door. ② Vent valve handle on right side must be located to close. ③ Turn Vacuum valve handle on the left side to 12 o’clock position (OPEN) ④...
-
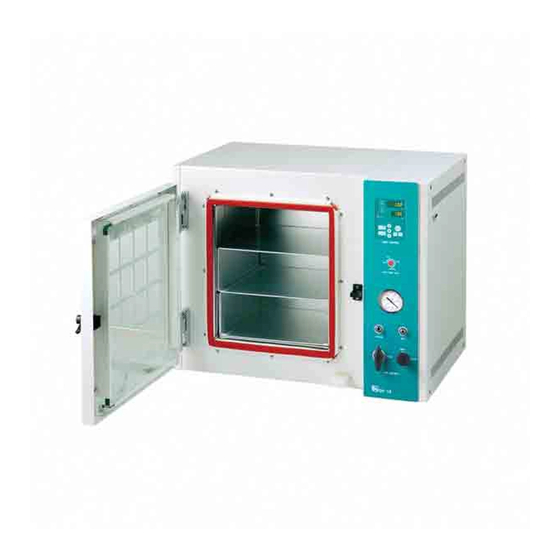
Page 9: Function And Performance Of Each Part
4. Function and performance of each part 1) Unit (1) Body Manufactured by steel and painted. (2) Door gasket Silicone seamless gasket to seal air tightly. (3) Shelf A place to put sample and surface finished on aluminum plate. (4) Chamber Stainless steel. - Page 10 (7) Safety cover Optional. (8) Push lock latch When you close door, push Latch handle. Push handle button when you open door. (9) Temp. controller Micro processor (CPU) having digital PID Auto tuning function is equipped and has multi safety functions. (10) Over temp.
- Page 11 2) Temp. controller (1) Run LED This LED indicates Work/Stop state of unit. It turns on when the unit runs and turns down when the unit stops. (2) Heater LED This LED indicates heater is activated. (3) Auto tuning LED This LED indicates Auto Tuning is proceed Auto Tuning.
- Page 12 (6) Over temp. LED It stops instrument, alarm buzzer and O/T LED is blinking when the temperature inside chamber is higher than set value of mechanical over temperature prohibit device on the front panel. In this case the instrument halted because of some unstable factor (over heating) there for remove over heating factor and press Start/Stop button once then the Buzzer and blinking LED set normal state.
-
Page 13: Unit Operation
5. Unit operation 1) Basic operation (1) Put in the sample in the oven and close the door. (Do not turn on the oven.) (2) Connect vacuum pump and the oven to create vacuum. (Please refer to p8.) (3) Switch on the power. (4) Set the Over Temp. - Page 14 3) Additional function of button (1) This function is to save and load a set temperature. Setting is as follows. Press button and button to vary temperature and press button to save Set temperature is saved in memory and set temperature variations SV 2, SV 3 are input the same way.
- Page 15 4) Timer set way (1) Press button. Timer (On Timer / Off Timer) is shown on PV and time is shown on SV. Set time by pressing button and save and finish by pressing button. (2) W/ON LED turns on with a Beep sound after finishing the wait on timer setting.
- Page 16 (5) The timer function is shown below... T e m p e ra tu re T im e W a it o n T im e r W a it o ff T im e r ① Wait On Timer - The unit begins to work when the time programmed into ‘Wait On’...
- Page 17 5) Additional function of button. Press button once again on wait On/Off Timer function then following additional function displayed. (1) This is to select the machine mode after power failure. If you set ‘yes’ the unit will run after power failure situation. If ‘no’ is selected it will not resume after any power failure.
-
Page 18: Maintenance
6. Maintenance Please take out plug out of socket before maintenance and cleaning. Otherwise you might get electric shock. 1) Main body cleaning (1) Turn off the main power switch and pull out the power plug from wall outlet. (2) Put pressure air to Vacuum line and Vent line for cleaning. (3) Wash with soft cloth containing neutral detergent. -
Page 19: Action For Malfunction
7. Action for Malfunction 1) Check points for non operation. (1) Check power supply. (2) Check fuse. (3) Check to see if the Run LED on display is off. Please press Start / Stop button if it is off. 2) Check points when the unit’s temperature control isn’t correct. (1) Temperature sensor is not working or is not connected when “Err.S”, message shows in PV window. - Page 20 3) Trouble Shooting Phenomenon Confirmation Measures Fit a handle of Vacuum valve in an Handle direction of Vacuum valve OPEN direction. completely lock a handle of Vent Lock state of Vent valve valve No leak between vacuum pump and If a vacuum does Connection state of a vacuum hose Vacuum hose or between vacuum not work...
-
Page 21: Warranty Criterion
8. Warranty criterion 1) Warranty service duration It covers for 2 year limited warranty since you purchase the unit and then after the duration you need to pay for service parts. Please contact your authorized Jeio tech dealer when you need warranty service. You have a right to repair, replacement and payback within the warranty service duration. -
Page 22: Specification
9. SPECIFICATION Model OV-11 OV-12 Chamber Volume Temperature 5℃ to 40℃ Permissible Maximum relative humidity 80% environmental condition Altitude up to 2,000m Range Amb. 5℃~250℃ Fluctuation ±0.1℃ at 100℃ ±0.3℃ at 100℃ Variation ±3.7℃ at 100℃ Temperature Controller PID Controlled microprocessor touch pad, Digital display Timer Wait on time, Wait off time(Max. -
Page 23: Install Lab Tracer
10. Install Lab Tracer (1) Insert Installation CD and the software starts installation automatically. (In case of no automatic running, run “SETUP.exe” file in CD.) (2) Click “Next” button to choose destination of installation. (Default folder recommended) (3) Click “Install” to start installation. (4) Lab Tracer icon will be created on desktop after installation successfully. -
Page 24: How To Use Lab Tracer
11. How to use Lab Tracer. (1) Connection for communication Click Comm → Connect and your PC and equipment start connection of communication. (In case of no connection, click Comm → Port and try to other ports.) “On Line” displays on the bottom of the software, once communication is connected successfully. - Page 25 ② If you click View → Status, additional separate window appears below showing actual temperature and set point window. Operating, Auto Tune, Program, Over Temp., Level, and etc display on this window. The following picture is a monitoring window after choosing Status and Parameter in View menu.
- Page 26 ③ Parameter interface has following values; ☞ PV is actual temperature. ☞ SV is temperature set point. ☞ Heat is output value of heating element. ☞ Run Time says operating time after you press button. ☞ Wait On Timer, Wait Off Timer displays remained time from setting time. ☞...
- Page 27 ⓝ ⓞ ⓟ ⓠ ⓡ ⓢ ⓣ ⓤ ⓥ ⓦ ⓧ ⓨ ⓝ To display Status interface. (Ctrl + T) ⓞ To display Parameter interface. (Ctrl + R) ⓟ Panel View When you click Panel View, the same appearance of display panel of unit pops up and you can control the unit by the pop-up window.
- Page 28 ① Print range - All : Print a total page. - Print the screen : Print the current screen. (In case Graph, Status, Parameter Frame on the window, they are printed. If not, they are not printed. - Current page : Print a page of the currently main screen. - Selected pages : Print selected page(s).
- Page 29 - Delete last set point. ② All Point Delete - Delete all set points. ③ Zoon in / out - Zoon in or Zoon out. (6) Display Performance of Display window is same as that of main display panel. If communication via RS-232 between PC and main body is successful, user can control main body with your PC at a distance.
- Page 30 Pic 2. Pattern Program In case you move mouse and click a certain point like pic 3., temperature set point and time, step number display on left side of window. Pic 3. SV Pattern after clicking a certain point of window. If you want to edit the selected point, Drag &...
- Page 31 ↓ : Decrease temperature by 1 degree. ← : Decrease time by 1 minute. → : Increase time by 1 minute. Alt + ↑ : Move an edit point to the right (the following step) Alt + ↓ : Move an edit point to the left (a previous step) Alt + ←...
- Page 32 - If you put and set number of pattern repetition, the main body will work as programmed. - If you tick “Deleting the previous data” and press start icon, previous data will be erased. Please, be cautious. ※ Caution - Maximum operating time is up 99 hours. - If you program total working time over 99 hours, the unit does not perform in Program Mode.
- Page 33 Page 33...
- Page 34 Page 34...
- Page 35 Page 35...
Need help?
Do you have a question about the OV-11 and is the answer not in the manual?
Questions and answers