Advertisement
Quick Links
SETUP
™
CORNER SNUGGERS:
The corner snuggers are designed to tighten plate position by pressing outward in all
four corners. They are not designed to clamp the plate down to the table.
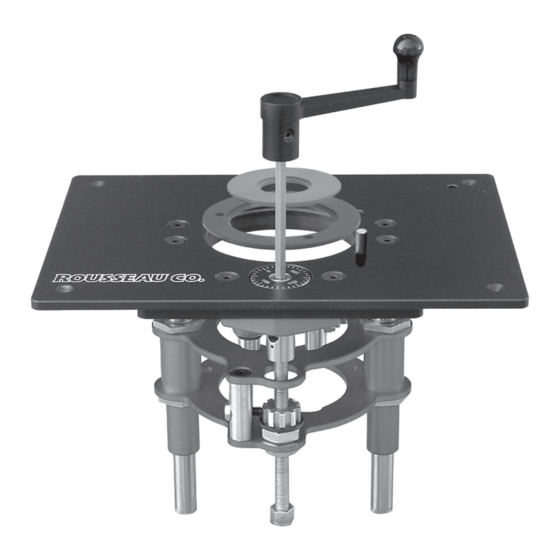
1. Once router is mounted, place plate in top opening with starting pin holes to
the right side. Assemble Corner Snuggers™ through plate using hardware pro-
vided (Fig. 1).
2. To hold plate in position push Corner Snuggers™ into all four corners and
tighten.
INSERT RINGS: The insert rings are designed to snap together with a tight fit,
so that they will stay securely in place.
To remove and replace the rings you may need to apply considerable force. We
recommend tapping the rings gently but firmly using a soft mallet or piece of wood.
If you desire a looser fit, you may lightly sand the inside diameter of the plate and red ring.
When replacing red ring the tab on underside must line up with one of the two notches in plate.
OPERATING INSTRUCTIONS
To get the most versatility and safety from your router table we highly recommend our router fences (3301 Basic or
3301DL Deluxe).
FREEHAND OPERATION: The starter pin is included for freehand routing of curved pieces, using a pilot bearing
bit. Caution: Never rout freehand (w/out a fence) using a non-piloted bit. The starter pin may be used in one of the
two predrilled locations in the mounting plate or three locations in the red ring. To store the starter pin use the
predrilled hole in the back right of the mounting plate.
When using the starter pin, the feed direction of the workpiece is always right to left across the front of the bit.
Set the workpiece against the front of the starter pin and pivot it slowly into the bit.
Once the workpiece has contacted the bit's pilot bearing move it away from starter pin.
While routing, make sure the workpiece is always in contact with the bearing.
1718 13th Street Clarkston, WA 99403
800-635-3416 • 509-758-3954 • Fax 509-758-4991
email:salesinfo@rousseauco.com • www.rousseauco.com
Fig. 1
3000 REV. 10-04
Router Lift LS
Models 3002, 3003 & 3004
IMPORTANT
Read and understand all safety guidelines and
instructions carefully before operating.
Advertisement

Summary of Contents for Rousseau Router Lift LS
- Page 1 Caution: Never rout freehand (w/out a fence) using a non-piloted bit. The starter pin may be used in one of the two predrilled locations in the mounting plate or three locations in the red ring. To store the starter pin use the Router Lift LS predrilled hole in the back right of the mounting plate.
- Page 2 INSTALLATION OF BASEPLATE LEVELING SYSTEM You have purchased a ROUSSEAU CO. 3000 SERIES ROUTER LIFT LS. This product is designed to allow quick and easy bit height adjustment from the top of your table by fast and accurate raising and lowering of the router.
- Page 3 Clamp router in place as described in step 2. The lift is now ready for your router table. The Rousseau Router Lift is designed to fit Rousseau router tables, Rousseau router table tops and is interchangeable with Rousseau Deluxe Base Plates. See “Installing Base...
- Page 4 INSTRUCTIONS FOR USE INSTALLING BASE PLATE INTO A BLANK TABLE TOP Fig. 2 If you do not have our Base Plate Installation Kit (3509-T), follow the instructions below. With the adjustment handle in the hex socket in the middle of the dial, turn the handle 1.
Need help?
Do you have a question about the Router Lift LS and is the answer not in the manual?
Questions and answers