Table of Contents
Advertisement
Quick Links
AXWV WIRELESS VEHICLE SENSOR
OVERVIEW
WARNING: DO NOT USE THIS DEVICE WITH LIVESTOCK OR OTHER ANIMALS.
NOTE:
THIS VEHICLE SENSOR ONLY WORKS WITH GHOST CONTROLS OPENER SYSTEMS.
PLEASE READ THE INSTRUCTIONS INCLUDED WITH THIS ITEM PRIOR TO INSTALLING.
IMPORTANT ITEMS REQUIRED
Two (2) C Alkaline Batteries are required and not included. One (1) Ghost Controls Transmitter that already operates the gate.
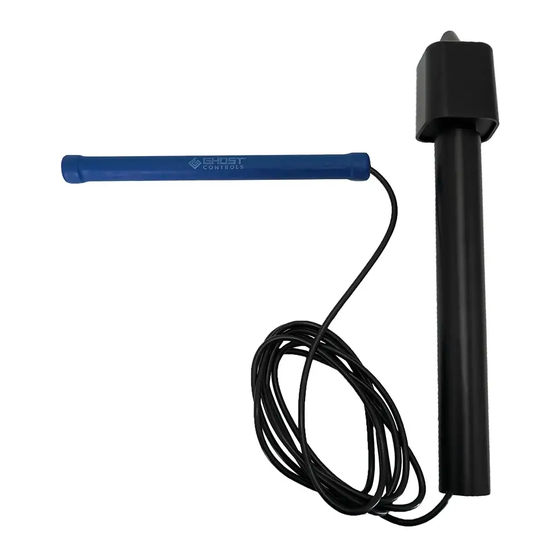
KIT CONTENTS:
■ 1 – Control Board Cover with control board (to be installed above ground)
■ 1 – Sensor Probe with 10 foot cable (to be buried below ground)
■ 1 – 12" PVC Pipe
PREPARING FOR INSTALLATION:
■ Must be located at least 20 feet beyond the path of the moving gate.
■ Must be located where the driver of the approaching vehicle has clear view of the gate.
■ Bury Sensor Probe approximately 12" deep and as close to the driveway as possible for maximum detection
of moving vehicles.
■ The Control Board must be at least 6" above ground.
■ The Control Board also should be with 100 feet of the Ghost Controls receiver/control box.
NOTE
The operating distance may vary depending on Radio Frequency interference at each installation site. Avoid installing the sensor near
power lines, transformers or running motors.
WARNING: This product can expose you
to chemicals including lead, which is known
to the State of California to cause cancer.
For more information, go to
www.P65Warnings.ca.gov
Minimum of 20 Feet
Sensor Probe
PVC Pipe
Sensor Probe
Maximum of 100 Feet from
Operator Control Board
sensor cable
Control Board
Control Board Cover
Control Board
Advertisement
Table of Contents

Summary of Contents for Ghost Controls AXWV
- Page 1 THIS VEHICLE SENSOR ONLY WORKS WITH GHOST CONTROLS OPENER SYSTEMS. PLEASE READ THE INSTRUCTIONS INCLUDED WITH THIS ITEM PRIOR TO INSTALLING. IMPORTANT ITEMS REQUIRED Two (2) C Alkaline Batteries are required and not included. One (1) Ghost Controls Transmitter that already operates the gate. Control Board Cover KIT CONTENTS: PVC Pipe ■...
- Page 2 1. SETTING UP YOUR WIRELESS VEHICLE CONTROL BOARD*: BEFORE CONTINUING MAKE SURE YOUR GATE IS CLOSED. TURN THE GATE OFF BY TURNING THE SWITCH TO THE OFF POSITION ON THE BOTTOM OF THE CONTROL BOX. *The following steps can be performed indoors BEFORE digging and burying the Sensor Probe. A.
- Page 3 C. Place the transmitter next to Control Board on left side with the remote transmitter LEARN button located closest to the left side of (Shown below, Step 2C) the Control Board. Step 2C Learn button on remote transmitter closest to left edge of Control Board.
- Page 4 B. Observe that the yellow “DETECT” LED turns ON and the green “XMIT” LED is blinking for 1 second. (Shown in Step 3B.) This LED sequence indicates that the Vehicle Sensor has detected the metal and is transmitting. Step 3B XMIT LED Detect LED 4.
- Page 5 Yellow LED is ON for ~3 seconds when “moving vehicle” is detected. Transmitting to follow. NOTE: Pressing and releasing the LEARN button will simulate vehicle detection. BLINKING TRANSMITTING Green LED is blinking for ~3 seconds when unit is transmitting OPEN command to Ghost Controls receiver.
- Page 6 Wireless Vehicle Sensors are warrantied for 18 months with proof of purchase. An additional 6 month warranty is available at ® NO COST if you register your product within 30 days of purchase on ghostcontrols.com/register. See warranty terms on ghostcontrols.com/warranty. For more information on GHOST CONTROLS Automatic Gate Openers and Accessories please visit our website at ghostcontrols.com. ®...
Need help?
Do you have a question about the AXWV and is the answer not in the manual?
Questions and answers