Table of Contents
Advertisement
Quick Links
Quick Start Guide
WDE143 series
Enjoy peace of mind.
Register your appliance today.
Stay updated on better living services, safety notices and shop for accessories.
1. Open the camera app on your smartphone and point at the QR code to scan
Product Registration QR code is located on the front of your appliance or
inside the door rim*.
2. Tap the notification or link to open the registration form
3. Complete your details and enjoy peace of mind
*Exact location of QR code may vary depending on oven model
Need more help?
To access your detailed user manual online, simply scan the
QR code on your smart phone. If you prefer a printed manual,
please contact our Customer Care Centre using details below.
Contact us if you need more help
Electrolux Home Products Australia
telephone:
13 13 49
email:
customercare@electrolux.com.au
web:
electrolux.com.au
Customer Care Centre
Electrolux Home Products New Zealand
telephone:
0800 436 245
email:
customercare@electrolux.co.nz
web:
electrolux.co.nz
and WESTINGHOUSE are trademarks of Westinghouse Electric Corporation. Used under license by Electrolux Home Products Pty Ltd. All Rights Reserved.
© 2021 Electrolux Home Products Pty Ltd. ABN 51 004 762 341 W_QSG_WDE143_A4_Jun21 A21711802 RevA (Assy ANC A21711902 RevA)
Quick Start Guide
WDE143 series
Dear Customer,
Thank you for purchasing a Westinghouse appliance. You have chosen a product that
comes from a history of durable and reliable products loved by many families. We look
to help you make the most of your time at home, so you can spend your time doing
what you really love, with the ones you love.
Welcome to Westinghouse.
Ready
This is a Quick Start Guide. Please refer to user manual
online for detailed information and installation
To access your detailed user manual online, simply scan the QR code on your smart phone.
For more detailed information and installation guide refer to user manuals
at westinghouse.com.au/manuals
Before you start, please make sure:
Your cooker has been correctly installed by a qualified person.
Your cooker has power and is switched on.
You've removed all relevant packaging.
Set...
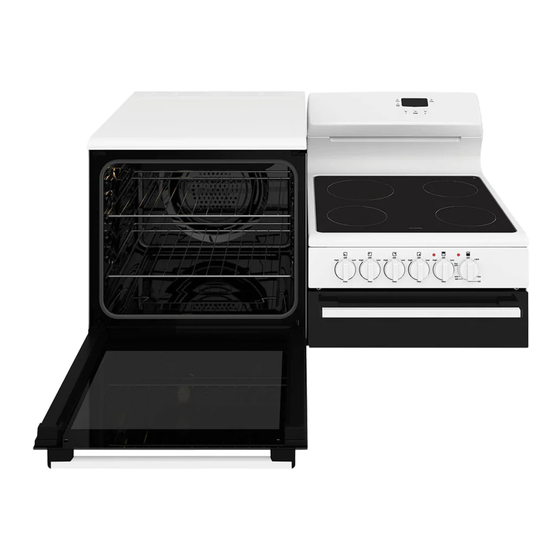
Get to know the control panel:
1
1
Magenta Guides - DO NOT PRINT
2
Print Black 7802
Most of the packaging
materials can be recycled.
Please dispose of them at
your local recycling centre
or in your own recycling bin.
6
1
Ceramic cooktop
control knob
2
Grill indicator light
3
Grill temperature
control knob
4
Oven indicator light
5
Oven temperature
control knob
6
Programmable clock
2
3
4
5
D 15.02.21
Adjusted Low and high for better readability, added WDE132WC to Artwork
AJG
BRAND
Westinghouse
Westinghouse Aspire FSC
Control Panel - WDE 143 WC, WDE 132 WC
C 11.02.21
Adjusted Dial and timer positions to make concentric with corrected knob position
AJG
CREATED BY
Robert Jurgens
B 09.02.21
Removed "Auto Off" from timer. Added "Light" to Oven Dial
AJG
APPROVED
Genevieve Rossi
A 01.11.20
Added timer to artwork.
GLR
23.09.2020
ART11432
D
DATE
100%
© Electrolux Home Products Pty Ltd. This drawing contains confidential information and is the property of Aktiebolaget Electrolux, Sydney, Australia without whose
permission it may not be copied, shown or handed to a third party or otherwise used, and it is to be returned promptly upon request to Aktiebolaget Electrolux.
Advertisement
Table of Contents

Related Manuals for Westinghouse WDE143 Series


Summary of Contents for Westinghouse WDE143 Series
- Page 1 WESTINGHOUSE are trademarks of Westinghouse Electric Corporation. Used under license by Electrolux Home Products Pty Ltd. All Rights Reserved. © 2021 Electrolux Home Products Pty Ltd. ABN 51 004 762 341 W_QSG_WDE143_A4_Jun21 A21711802 RevA (Assy ANC A21711902 RevA) D 15.02.21...
- Page 2 Set... Installing the accessories You’re ready to use your new Westinghouse appliance. A few tips from us: Fitting the oven shelves Fitting the grill dish supports Remember to pre-heat each time. Ensure shelf orientation is correct Insert the ends of the supports into the holes and For best cooking results pre-heat the oven.
Need help?
Do you have a question about the WDE143 Series and is the answer not in the manual?
Questions and answers