Table of Contents
Advertisement
Quick Links
Pitminder NanoQ I I USE R G U I D E Rev. 1.0 for V er. 0.4 F irmware
1. SAFETY WARNINGS ................................................................................................... 2
2. LIMITED WARRANTY ................................................................................................ 3
3. NanoQ Features .............................................................................................................. 3
4. Probes .............................................................................................................................. 3
5. Power Draft Blowers....................................................................................................... 4
5.1. Blower Size .............................................................................................................. 4
5.2. Blower Damper Adjustment .................................................................................... 4
6. Key Operation ................................................................................................................. 4
7. Powering up .................................................................................................................... 4
7.1. Power Interruption Recovery Feature with Internal Memory .................................. 5
8. Connection and Indicator Diagram ................................................................................. 5
9. The Display ..................................................................................................................... 5
9.1. Blower Status Indicator LED ................................................................................... 5
9.2. Error Indicator LED ................................................................................................. 5
9.3. Utility Indicator LED ............................................................................................... 5
10. Setting the Setpoint ....................................................................................................... 5
10.1. To Capture a Temperature Setpoint ....................................................................... 6
10.1.1. To Capture a Temperature Setpoint on the way up to 475 degF. ................... 6
10.2. Restoring a Temperature Setpoint of 225 degF. .................................................... 6
10.3. Setting a Temperature Setpoint of 475 degF. ........................................................ 7
11. Open Lid Detect ............................................................................................................ 7
11.1. Open Lid Detect ! Overshoot Eliminator .............................................................. 7
11.2. Open Lid Detect Configuration ............................................................................. 7
12. Adaptive Control Strategy ............................................................................................ 7
13. Building a Proper Fire for Good Control ...................................................................... 8
13.1. Eliminating Large Fluctuations in the Pit Temperature ......................................... 8
13.2. To Extinguish The Pit ............................................................................................ 8
14. Connections................................................................................................................... 8
15. Contact THE BBQ GURU ............................................................................................ 8
!
!
!
!
!
!
!
!
!
!
!
!
!
!
!
!
!
!
!
!
!
!
!
!
!
!
!
!
!
Advertisement
Table of Contents

Summary of Contents for BBQ Guru Pitminder NanoQ II
- Page 1 12. Adaptive Control Strategy .................... 7 13. Building a Proper Fire for Good Control ..............8 13.1. Eliminating Large Fluctuations in the Pit Temperature ......... 8 13.2. To Extinguish The Pit .................... 8 14. Connections........................8 15. Contact THE BBQ GURU .................... 8...
- Page 2 1.SA F E T Y W A R N I N GS I NST A L L A T I O N / SA F E T Y I N F O R M A T I O N: R E A D A N D U N D E RST A N D T H IS USE R G U I D E C O M P L E T E L Y B E F O R E I NST A L L I N G O R USI N G T H IS PR O D U C T!! W A R N I N G : FIRE HAZARD, BURN HAZARD!! Even quality electronics can fail CAUSING...
- Page 3 2.L I M I T E D W A R R A N T Y THE BBQ GURU warrants this product to be free from defect in workmanship and materials for a period of ninety days from the date of purchase.
- Page 4 the supplied Curleez. These probes are user-replaceable and are available at www.thebbqguru.co m ; we recommend having a spare set for unforeseen emergencies. Important Note: Be sure to fully insert your probes into the control. Push the plug into the connection securely until you feel and hear it snap in place.
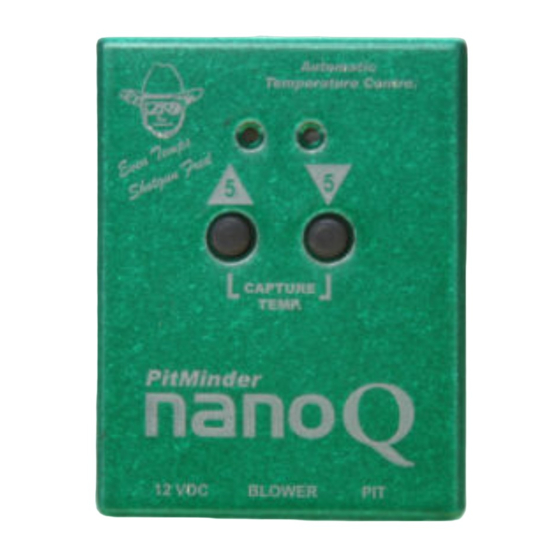
- Page 5 7.1.Power Interruption Recovery Feature with Internal Memory Because of the internal memory, if there is a brief or sustained power interruption at any time while cooking with your NanoQ, the unit will automatically restart and continue to control your grill/smoker at the same settings you originally set, once power is restored. 8.Connection and Indicator Diagram 9.T he Display 9.1.Blower Status Indicator LED...
- Page 6 When the NanoQ arrives from the factory, the setpoint will be 225 deg F +/- 10 deg (all temperatures reffered to in this user guide are +/- 10 deg F tolerance). To adjust the setpoint up by 5 deg F, simply press the UP key.
- Page 7 E0/B/B5/0/8F&1*0&-#/&3/6-&-$B/&$-&$%&7*'/0/8&,7&U*0&$3&-#/&/./3-&*1&)&7*'/0&0/2*./0+& after an interruption). 10.3. Setting a Temperature Setpoint of 475 degF. To set the setpoint to 475 deg F, simply hold down the UP & D O W N keys for 10 seconds until the Utility LED blinks off three times. It will blink off after one second to show the setpoint capture, it will blink off again after 3 seconds to show the restoration of a 225 deg F setpoint, and it will blink off again after 5 seconds to show the setting of the setpoint to 475 deg F.
- Page 8 This should put the fire out in about 30-45 min. 14. Connections From left to right: Power Input, Blower Output, Pit probe. 15. Contact T H E B B Q G U R U THE BBQ GURU Therm-omega-tech, Inc. 353 Ivyland Road Warminster PA. 18974-2205 www.thebbqguru.com...
Need help?
Do you have a question about the Pitminder NanoQ II and is the answer not in the manual?
Questions and answers