Table of Contents
Advertisement
Quick Links
detailed instructions for assembly and operation
Congratulations for the purchase of your new electronic module made by ElMod. After the
assembly your model will be equipped with new functionality.
Please read these instructions carefully before assembling the parts.
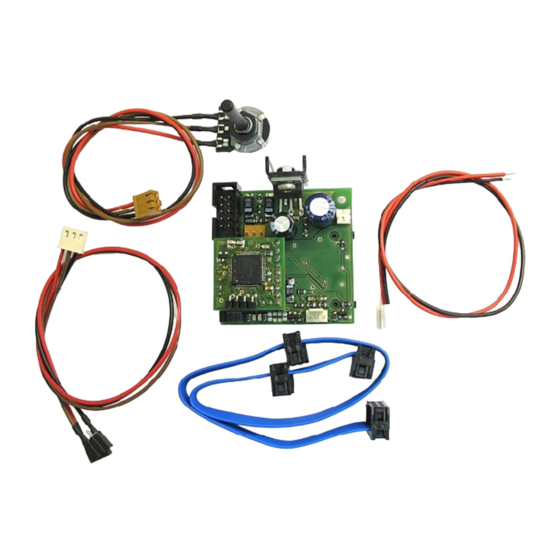
ThinkTank Blaster PCB
ThinkTank Blaster CPU PCB
EMNet ribbon cable with four connectors (A)
volume control cable (B)
speaker cable (C)
cable for connection with proportional receiver (channel 5+6)
(D)
SD-card
To operate the module you need a ThinkTank Booster
(firmware 1.20 or later) and a ThinkTank TLS (firmware 1.17
or later).
Functionalities
•
sound module for tank models equipped with ElMod electronic parts.
•
up to five independent voices
•
22kHz Sampling-frequency, 8-bit, wav-files.
•
10-bit mixer
•
storage medium: standard SD-card
•
customizable: creating your own sets of samples is possible with a personal computer.
•
supported sounds (depending on the model):
•
up to ten sounds for switching on/off of the motor (shuffle)
•
determination between cold and warm start
•
motor sound depending on speed
•
Up to ten different sounds for squieking chains which are played randomly depending on
speed
•
sounds for turning turret with differentiation between manual and hydraulic/electrical
turning
•
sound for barrel moving
•
Gun and MG shot
•
up to four sounds defined by the user (when using a a six-channel proportional set)
•
Connection with 4 or 8 Ohm speakers
•
Power: 5W at 8Ohm, 10W at 4Ohm
•
Size: 48x47 qmm (2x2")
•
ElMod-Bus system (EMNet) : Simple connection with other ThinkTank-Modules
ThinkTank Blaster
Contents
Overview of connectors
1 EMNet-connector
2 connector for volume control
3 connector for speaker
4 connector for proportional receiver (channel 5+6)
J jumpers used for configuration of blaster
SD slot for sd-cards
L1 Power LED
L2 Busy LED
Assembly and connection
Please read the following text carefully!
• Connect connector 1, all other ThinkTank modules and the BEC-supply, when existend, with
the EMNet cable A
• Connect volume control B with connector 2
• Connect the speaker with cable C to connector 3. If you ordered the blaster with a speaker it
will already be delivered with the cable.
• Leave all jumpers closed to activate the standard set of samples for the tiger tank.
• When you install the cirquit board, make sure no short cirquits can occur.
• A second mounting hole is placed below the CPU PCB.
It is essential for proper function of the module that the tank itself and all other modules are
• Make sure all cables have been installed correctly.
• Make sure that all jumpers are put in the right possition and that the SD card is well fixed.
• Put in a full charged battery and switch on the tank.
• The power LED starts blinking uniformly for a short time as soon as the connection with the
other modules is established.
Initiation
installed correctly!
Advertisement
Table of Contents

Related Manuals for ElMod ThinkTank Blaster

Summary of Contents for ElMod ThinkTank Blaster
- Page 1 ThinkTank Blaster Overview of connectors detailed instructions for assembly and operation Congratulations for the purchase of your new electronic module made by ElMod. After the 1 EMNet-connector assembly your model will be equipped with new functionality. 2 connector for volume control Please read these instructions carefully before assembling the parts.
- Page 2 Switching the motor on and off After the installation of the ThinkTank blaster, the engine is switched off after power up by default. You can change the state of the engine as follows: - HL-Tanks without S&S and proportional radio: move the left lever to the left upper position.
Need help?
Do you have a question about the ThinkTank Blaster and is the answer not in the manual?
Questions and answers