Advertisement
Quick Links
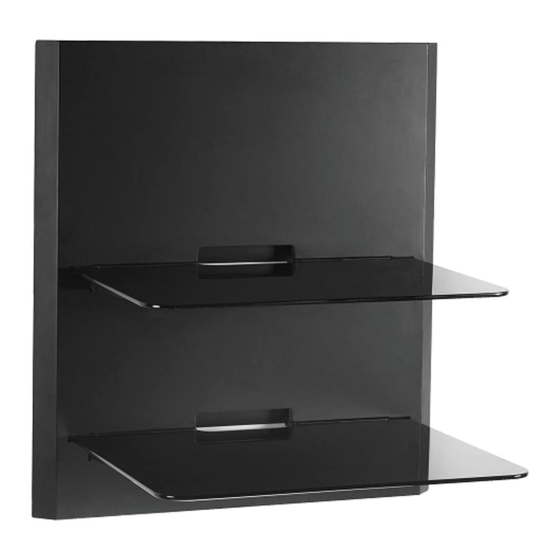
OBWF2
MODULAR WALL FURNITURE
Single Stud
Max weight 25 lbs – 11.3 KG
16" on Center Stud
Max weight 35 lbs – 15.8 KG
CAUTION: DO NOT EXCEED MAXIMUM
CAUTION: DO NOT EXCEED MAXIMUM
LISTED WEIGHT CAPACITY. SERIOUS
INJURY OR PROPERTY DAMAGE MAY
!
OCCUR
ISSUES/QUESTIONS?
STOP
PARE
¿PREGUNTAS?
/
Before you return this product to Sam's Club,
please let us help you. You can reach us by
phone 24/7 at 877.PLUGD.IN (877.758.4346).
Antes de devolver este producto al Sam's Club, por
favor, déjenos ayudarle. Usted puede contactarnos por
teléfono 24/7 llame al 877.PLUGD.IN (877.758.4346).
Instruction Manual
HAVE A SMARTPHONE?/
Scan this QR code with your Smartphone to see
a short installation video. This installation video
is for demonstration purposes only. Please refer
to this manual for complete instructions.
to this manual for complete instructions.
Escanear este codigo QR con su teléfono inteligente para
ver un corto video de instalación. Este video de instalación
es con proposito de demostracion. Consulte el manual
para completar las instrucciones.
OBWF2 = L2-OM1100252-CON-020112vA
/
Manual de Instrucciones
VERSION
Reduce.Reuse.Recycle
¿TIENES UN TELEFONO INTELIGENTE?
A
Advertisement

Subscribe to Our Youtube Channel
Related Manuals for Omnimount OBWF2


Summary of Contents for Omnimount OBWF2
- Page 1 OBWF2 MODULAR WALL FURNITURE OBWF2 = L2-OM1100252-CON-020112vA Instruction Manual Manual de Instrucciones VERSION Reduce.Reuse.Recycle HAVE A SMARTPHONE?/ ¿TIENES UN TELEFONO INTELIGENTE? Single Stud Max weight 25 lbs – 11.3 KG Scan this QR code with your Smartphone to see 16” on Center Stud a short installation video.
- Page 2 If not, the surface must be reinforced to meet this standard. The installer is responsible for verifying that the wall structure/surface and the anchors used in the installation will safely support the total load. Do not use this product for any application other than those specified by OmniMount. This product may contain moving parts. Use with caution.
- Page 3 CONTENTS / CONTENIDO SCREW / HARDWARE PACK FOR PRODUCT TORNILLOS/ HARDWARE DE LA PANTALLA OM1100252vA Screws / Hardware for Product (OM1100252vA) Part # Description WASHER NYLOCK NUT M4 PHILLIPS SCREW WASHER NYLON NUT M4 SCREW COVER SCREW OPEN WRENCH COVER SCREW (two extra) OPEN WRENCH SCREW / HARDWARE PACK FOR WALL MOUNTING TORNILLOS/HARDWARE PARA EL MONTAJE EN LA PARED...
- Page 4 STEP 1: Screw cover clip (Part P-D) into cover (Part #6). Do not over tighten. Set aside until later installation PASO 1: Entornille el clip de la cobertura (Parte P-D) en la cobertura (Parte #6). No ajuste en forma excesiva. Coloquelo a un costado para la instalacion posterior.
- Page 5 This wall furniture has been designed to allow multiple mounting configurations. Please choose your installation option from the list below. For double wall shelf installation, the second wall shelf is sold separately. Esta repisa de pared ha sido diseñada para diferentes configuraciones de montura. Escoja su configuracion de la lista mostrada abajo. Para instalacion de doble repisa de pared, la segunda repisa de pared debera ser comprada por separado.
- Page 6 SINGLE WOOD STUD INSTALL INSTALACION EN UNA SOLA VIGA STEP 3: Locate and mark the edge of one stud in the desired wall furniture location using a stud finder and level (not included). You may verify the outside edge of the stud by tapping a thin nail through the drywall until the edge of wood stud is located.
- Page 7 SINGLE WOOD STUD INSTALL INSTALACION EN UNA SOLA VIGA STEP 4A: Level and mark three mounting holes using your wall frame (Part #1). STEP 4B: Drill three pilot holes using a 1/8” wood drill bit. STEP 4C: Level and mount the wall frame (Part #1) with mounting hardware (Part W-A). PASO 4A: Utilizando el marco de pared (Parte #1) nivele y marque los tres agujeros de montaje.
- Page 8 16” ON CENTER WOOD STUD INSTALL INSTACION ENTRE VIGAS SEPARADAS 16” STEP 3: Locate and mark the edge of two studs 16” apart in the desired wall furniture location using a stud finder and level (not included). You may verify the outside edge of the studs by tapping a thin nail through the drywall until the edge of wood stud is located.
- Page 9 16” ON CENTER WOOD STUD INSTALL INSTACION ENTRE VIGAS SEPARADAS 16” STEP 4A: Level and mark six mounting holes using your wall frame (Part #1). STEP 4B: Drill six pilot holes using a 1/8” wood drill bit. STEP 4C: Level and mount the wall frame (Part #1) with mounting hardware (Part W-A). PASO 4A: Utilizando el marco de pared (parte #1) nivele y marque los seis agujeros de montaje.
- Page 10 SOLID CONCRETE INSTALL / CONCRETO SOLIDO STEP 4A: Level and mark six mounting holes using your wall frame (Part #1). STEP 4B: Drill six pilot holes using a 5/16” concrete drill bit. STEP 4C: Level/mount the wall frame (Part #1) with mounting hardware (Part W-A & W-B). PASO 4A: Nivele y marque los seis agujeros de montaje utilizando el marco de pared como guia (Parte #1).
- Page 11 STEP 5: Install glass shelves (Part #3 and Part#4) on top of glass support shelves (Part #2) . Do not overtighten. PASO 5: Instale la repisa de vidrio (Parte #3) encima del soporte de la repisa de vidrio (Parte #2). No aplique ajuste excesivo.
- Page 12 STEP 6: Partially attach wall frame cover (Part #6). PASO 6: Instale parcialmente la cobertura del marco de pared (Parte #6) STEP 7: With wall frame cover (Part #6) partially installed, route cables as needed. PASO 7: Con la cobertura del marco de pared (Parte #6) instalada parcialmente, guie los cables necesarios.
- Page 13 STEP 8: Press wall frame cover (Part #6) against the wall and your installation is complete. PASO 8: Presione la cobertura del marco de pared (parte #6) contra la pared para completar la instalacion.
- Page 14 PAGE LEFT BLANK INTENTIONALLY Page Left Blank Intentionally Esta página se dejó en blanco intencionalmente...
- Page 15 877.PLUGD.IN (877.758.4346). Deberá proporcionar el recibo original. Si fuera necesario enviar el producto a OmniMount para revisarlo, los gastos de envío correrán por su cuenta. El producto de reemplazo que se le envíe se le devolverá con los gastos de envío pre-pagados.
- Page 16 100% satisfecho con este producto o tiene alguna pregunta, por favor, póngase en contacto con nosotros 24/7 al 877.PLUGD.IN (877.758.4346) para poderlo ayudar. All trademarks are the property of their respective companies. OmniMount is a registered trademark of OmniMount Systems, Inc. © 2011 ISSUES/QUESTIONS? ¿PREGUNTAS?
Need help?
Do you have a question about the OBWF2 and is the answer not in the manual?
Questions and answers