Advertisement
Quick Links
VKB Gunfighter Mk.II Quick
Guide
Content:
Pg. 2-7: Hardware (dry clutch, gimbal, cams and springs)
●
Pg. 8-12: Software (flash, reset, and calibration)
●
For additional support, please visit the official VKB forum:
http://forum.vkb-sim.pro/viewforum.php?f=24
1
Advertisement

Related Manuals for VKB Gunfighter Mk.II

Summary of Contents for VKB Gunfighter Mk.II
- Page 1 VKB Gunfighter Mk.II Quick Guide Content: Pg. 2-7: Hardware (dry clutch, gimbal, cams and springs) ● Pg. 8-12: Software (flash, reset, and calibration) ● For additional support, please visit the official VKB forum: http://forum.vkb-sim.pro/viewforum.php?f=24...
- Page 2 Guide NOTE: VKB HQ tightened the frictioner of the dry clutch (aka damper) to prevent it from loosening during shipping. So before you go flying, you will need to adjust the dry clutches for both pitch and roll axes accordingly, otherwise you might find that your Gunfighter does not perfectly return to center by itself (see pg.
- Page 3 VKB Gunfighter Mk.II Quick Guide - HARDWARE All Gunfighters come with the following cams in the box: • #10 - soft center detent (factory installed) • #30 - hard center detent All Gunfighters come with the following springs in the box: •...
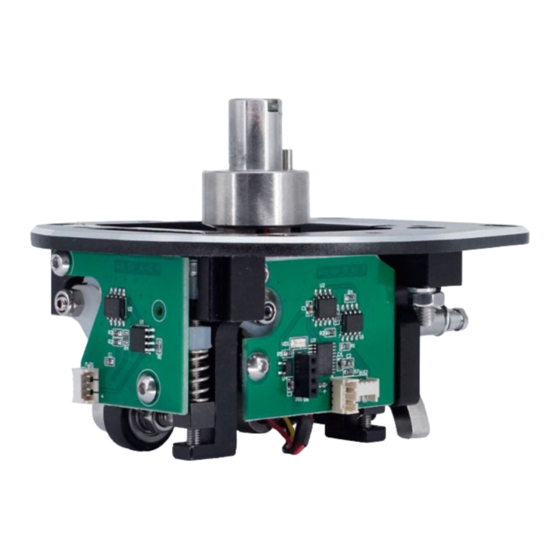
- Page 4 VKB Gunfighter Mk.II Quick Guide - HARDWARE Accessing the Gunfighter gimbal (e.g., to replace cams or change springs): 1. Disconnect the grip. 2. Unscrew the 5 screws on the dust cover ring. 3. Remove the ring and rubber dust cover.
- Page 5 VKB Gunfighter Mk.II Quick Guide - HARDWARE Gunfighter Dry Clutch damper adjustment: (Refer to pg. 4, Step 1-3 on how to remove the dust cover) 1. Using the provided hex key, rotate the vertical nuts (see image) to adjust the damper force per axis* (left = more loose, right = more tight) 2.
- Page 6 VKB Gunfighter Mk.II Quick Guide - HARDWARE Replacing the standard strength spring (#20) – do this for each axis: (Refer to pg. 4 on how to access the gimbal) 1. Use needle-nose pliers to install or remove the spring for each axis.
- Page 7 VKB Gunfighter Mk.II Quick Guide - HARDWARE Replacing/Installing cams – do this for each axis: (Refer to pg. 4 on how to access the gimbal) 1. Remove the springs. 2. Unscrew the M4 nut and detach the cam from the gimbal.
- Page 8 3. Download the latest (by date) BlackBox firmware for Gunfighter ( http://ftp.vkb-sim.pro/Firmware/BlackBox/) (usually identified by BB_GF_version) and extract the firmware (*.vkb) from either the KG12, MCG or MCG PRO archive respectively, and put it into the same folder where your VKBdevCfg app already is.
- Page 9 3. From the Tools tab, click on the "Bootloader" icon; this should close VKBdevCFG and automatically start ZBootloader-C (if you have it in the same folder). 4. Point ZBootloader-C to the extracted *.vkb file and update the firmware of your BlackBox by clicking "Flash It".
- Page 10 VKB Gunfighter Mk.II Quick Guide - SOFTWARE After Flashing, you need to Reset your Gunfighter’s BlackBox to factory default: 1. Launch VKBdevCfg-C. 2. In the top panel, click on the "VKBsim Gunfighter..." name to select it. 3. From the Tools tab, click on the "Default" button in the top-left corner.
- Page 11 VKB Gunfighter Mk.II Quick Guide - SOFTWARE After resetting, you need to Calibrate your Gunfighter: Note: Don’t use the native Windows calibration utility! Use VKBDevCfg as you have up to this point already. 1. Flip the foldable trigger to the “up” position (MCG PRO only), and then squeeze the trigger fully, and then let go of it to determine its middle position (MCG PRO only).
- Page 12 Guide - SOFTWARE (continued from the previous page) 10.If you have VKB T-Rudders are connected to the Gunfighter’s BlackBox – move the T-Rudder axis through its full range as well. 11.Click the ‘End Calibr’ button; the BlackBox will restart (VKBdevCfg may be closed manually if desired).
Need help?
Do you have a question about the Gunfighter Mk.II and is the answer not in the manual?
Questions and answers