
Summary of Contents for Primex PXU Series
- Page 1 USER MANUAL PXU Network Switch Series PXU-1G08 | PXU-1G44 | PXU-1G80 www.primex.com...
-
Page 2: Package Contents
PACKAGE CONTENTS Thank you for purchasing a Primex PXU 8-port Network Switch. The table below shows the models and their configurations. The PXU Network Switch box should contain the following items: Model Name P/N PoE+ Ports Network Power Adapter 802.3at... -
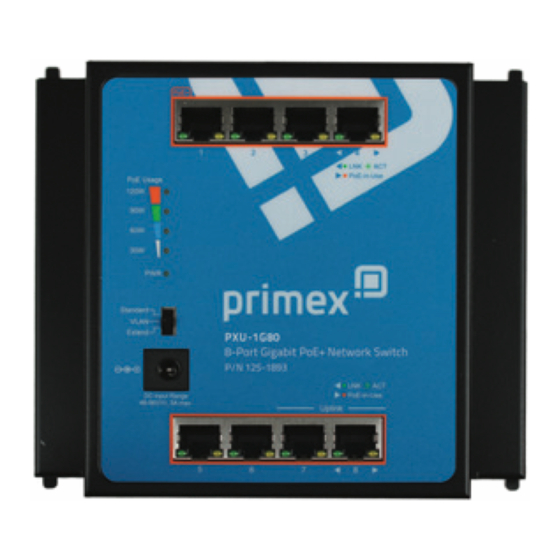
Page 3: Hardware Description
HARDWARE DESCRIPTION Switch Front View The front panel of the PXU Network Switch consists of 8 Auto-Sensing 10/100/1000Mbps Ports. LED Indicators are also located on the RJ45 ports that indicate operation status. PXU Switch Front View (PXU-1G44 shown) 1. Easy-to-read PoE+ power monitoring selection switch. 2. -
Page 4: Led Indicators
LED Indicators System and Ports Color Function Green Indicates that the switch has power. LNK/ACT Green Indicates the link through that port is successfully established. Blinks: Indicates that the switch is actively sending or receiving data over that port. PoE-in- Amber Indicates the port is providing DC in-line power. -
Page 5: Dip Switch
PoE Power Usage of PXU-1G80 125-1893 (Unit: Watt) Color Function Amber PoE usage is less than 14W. Blinks PoE usage is around 15W to 29W. Lights PoE usage is over 30-watt PoE power budget. Amber Blinks PoE usage is around 45W to 59W. Lights PoE usage is over 60-watt PoE power budget. - Page 6 DIP Switch The front panel of the PXU Network Switch provides one DIP switch for Standard, VLAN and Extend mode selections. Standard: all ports connect to the same local network. PXU-1G80 8-Port Gigabit PoE+ Network Switch P/N 125-1893 12 V VLAN VLAN isolates these ports from each other...
-
Page 7: Physical Dimensions
Physical Dimensions W x D x H: 6.2 x 1.6 x 5.6 in PXU-1G80 Shown Page 7... -
Page 8: Installation
INSTALLATION SOHO Pro™ Media Panel Installation To install the PXU Network Switch within a Primex SOHO Pro™ media panel, simply follow these steps: Step 1: Locate where in the SOHO Pro™ media panel you would like to install. Ensure location allows for unobstructed cabling runs. - Page 9 Step 2: Insert to the top two hooks of the PXU Network Switch into the mounting holes of the SOHO Pro™ media panel as shown. Visit primex.com/resources/videos/ for full installation video. Page 9...
- Page 10 Step 3: Engage the bottom hooks of the PXU Network Switch by pushing up on the unit slightly, slotting in the bottom hooks, then lowering into locking position. Visit primex.com/resources/videos/ for full installation video. Page 10...
- Page 11 Step 4: Connect cabling and select mode as required. Example 1 (PXU-1G44 shown, 4-Port PoE+/4-Port Network): PoE IP Camera PoE IP Camera PoE Wireless PoE IP Phone Access Point Smart TV Network Video Gigabit Gateway Recorder (NVR) Visit primex.com/resources/videos/ for full installation video. Page 11...
- Page 12 Example 2 (PXU-1G08 shown, 8-Port Network): Smart TV Smart TV Smart TV Network Video Gigabit Gateway Recorder (NVR) Visit primex.com/resources/videos/ for full installation video. Page 12...
-
Page 13: Troubleshooting
Energy Saving Note of the Device – AC Adapter This powered device does not support Standby mode operation. To save energy, disconnect the AC adapter when not in use. Without removing the AC Adapter, the device will still consume power from the power source. -
Page 14: Appendix: Product Specifications
APPENDIX: PRODUCT SPECIFICATIONS Model PXU-1G44 PXU-1G80 PXU-1G08 Hardware Specifications Network 8-port RJ45 for 10/100/1000BASE-T Connector Auto-negotiation and auto MDI/MDI-X PoE Inject Port Power 48~56V DC, 48~56V DC, 3A 12V DC, 0.5A Requirements 1.5A max. max. max. Power 70 watts/ 137 watts/ 3 watts/ Consumption 239 BTU... - Page 15 FCC Part 15 Class A, CE Compliance Environment Operating Temperature: -20 ~ 60 degrees C Relative Humidity: 5 ~ 95% (non-condensing) Storage Temperature: -20 ~ 70 degrees C Relative Humidity: 5 ~ 95% (non-condensing) The PXU Series of network Switches are RoHS Compliant. Page 15...
-
Page 16: Customer Support
Product Information CUSTOMER SUPPORT E-mail: info@primex.com Phone: 877-881-7875 3 Year Manufacturer’s Defect Warranty Copyright © Primex Technologies Ltd. 2021. Contents are subject to revision without prior notice.
Need help?
Do you have a question about the PXU Series and is the answer not in the manual?
Questions and answers