Table of Contents
Advertisement
Quick Links
Advertisement
Table of Contents

Summary of Contents for QCAMZ Q-VJU
- Page 2 QVJU // Qcamz User Manual Please read this user manual before using the product and keep it for future reference NOTE: Any future changes of technical specification and product appearance are instituted without further notice...
-
Page 3: Table Of Contents
Contents Product Features and Advantages ...............1 What’s in the box ..................3 Product Overview..................…4 Basic Operation……………………………………………………………….…..5 Playing back video footage on TV……………………………....…...8 Storage…………………………………………………………………………... 9 Connecting to PC or Laptop: ..……………………………………………..9 -System Requirement:………………………………………….....9 -USB Storage mode:…………………………………………………....9 -PC Camera……………………………………………….....…..10... - Page 4 Changing the lenses…………………………………………………..………...11 Power Supply……………………………………………………………………….13 LED Indicator……………………………………………………………..…...14 Technical Specifications…………………………………………………………..15 Trouble Shooting……………………………………………………………..……..17 Safety and Warning…………………………………………………………..….19 Announcement……………………………………………………………………...22 Warranty………………………………………………………………………..23...
-
Page 5: Product Features And Advantages
Product Features and Advantages Unique Design • Slim & elegant design to fit human body characteristics. • High quality materials for comfort and durability of the frame. • Higher curve and flexible design suits different faces - smaller and bigger. •... - Page 6 1.8mm Quality Polarized Lens: The quality polarized lens of 1.8mm exceeds optical requirements of ANSI Z80.3 standards. Blocks out 100% of all UVA, UVC and harmful blue light up to 400nm protection. Lightweight, shatter-proof and impact-resistant tough material - fully certified for eye protection. All our lenses meet AS/NZS - 1067, EN 1836, ANSI Z80.3 standards for optical and mechanical performance.
-
Page 7: What's In The Box
What‘s in the box Carrying Case User guide Cleaning Cloth Neck Strap Carrying Bag USB TV out Cable Extra different color Soft sleeves /nose pads(option) -
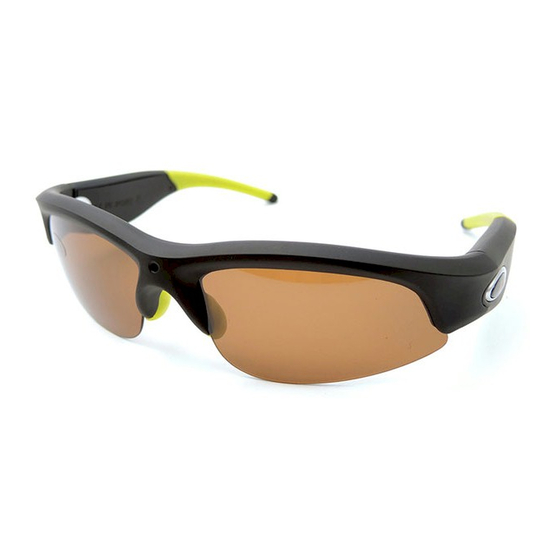
Page 8: Product Overview
Product Overview... -
Page 9: Basic Operation
Basic Operation 1. Turning on/ Start the video recording To turn on the video-glasses, simply press the ON/OFF/ button for 2 seconds. The green LED will turn on and the device enters into the initialization status. After 2~5 seconds, the green LED flashes fast 3 times, then flashing slowly, it begins to record automatically. - Page 10 3. Adjusting and show/hide Date and Time This device can display the current date and time in your videos. To set this function: 1. Turn the camera off and connect it to the USB port of your computer. 2. Turn on the device and enter a newly added storage drive. 3.
- Page 11 4. Quick setup time synchro with your computer current time 1) Under USB storage mode, click the folder „computer current date and time setting“ under directory and enter*Disk\ DCIM\manual and driver\computer current date and time setting. 2) Select the file "time.bat", double-click left button of your mouse. 3) Back to the root directory , there is a file namely "time.txt"...
-
Page 12: Playing Back Video Footage On Tv
5. Auto shut-off When battery is low or the memory space is exceeded, the green LED will blink very fast for approx 30 Seconds. The recorder stops recording and then shuts off. Playing back video footage on TV Turn on the device, connect to video input port and audio input port of TV by using one end of the AV cable provided. -
Page 13: Storage
Storage When space is exceeded, device will start data saving and then shut off. Connecting to PC/Laptop 1. System Requirement 1.1 CPU 500MHz or higher 1.2 Operating system: Win2000/XP/Vista/Win7 1.3 USB port 1.4 Minimum 1GB of free hard disk space 1.5 Minimum 512MB RAM 2. -
Page 14: Pc Camera
2.4 The movable disk icon will pop up in the computer after 3 seconds (depends on the memory Capacity). 2.5 The directory for saving video file is *Disk\ DCIM\100DSCIM. 2.6 You can then copy or cut and save to your local hard drive 2.7 When finished, click the movable device management icon at the right lower corner to remove the storage disk safely;... -
Page 15: Changing The Lenses
3.6 Run program en-188.exe on your desktop. 3.7 You are now able to use the device as the PC camera. 3.8 If your computer has another camera pre-installed or embedded, disable it before you can use this device as a PC camera. Changing the lenses Note: Remove the protective film on the lenses before wearing the sunglasses. - Page 16 To insert the lens, start on the nose side and plug it into the guides. (See below)
-
Page 17: Power Supply
Power Supply 1. For optimum use and battery health, charge the battery for 8-12 hours for the first three times. DO NOT charge for more than 12 hours! 2. Thereafter to maximize the storage capacity of the battery, continue to charge for 30 minutes to 1 hour after the red LED light goes off after every charge. -
Page 18: Led Indicator
LED Indicator Operation Mode LED Indicator Status Turn ON Green LED on, after 5 seconds, the green LED flashes rapidly 3 times; Turn OFF All LED off Video recording Green LED blinks slowly Memory full Green LED blinks fast for approx 30 seconds, then shuts off. Low battery Green LED blinks fast for approx 30 seconds, then shuts off. -
Page 19: Technical Specifications
Technical Specifications Dimensions 152*60*42mm (folded) Physical weight Video Resolution 1280*720P Video format Aspect Ratio 16:9 Audio 16 bit data sample Interface USB2.0+TV output (PAL/NTSC) Memory built in 4GB, up to 64 GB optional Power supply high-capacity lithium polymer battery, rechargeable Power adapter 5V DC/500mAh Power duration... - Page 20 Operating temperature 0°C - 70°C Storage temperature -20°C - 80°C Player Common media players, or Mainstream audio and video media players Operating System Win me, Win2000, Win 2003, Win XP, vista, Win7...
-
Page 21: Trouble Shooting
Trouble shooting Symptom Possible reason Solution Failing to start Flat battery Recharge battery Device jam Reset, then start again Auto shut-off Low battery Recharge battery Memory full Remove files from memory Power auto off after start Low battery Recharge battery Memory full Delete unwanted files No TF card loaded... - Page 22 Symptom Possible reason Solution Can‘t recognize when Main board does not Update main-board driver connected to PC / laptop support USB port PC system Jam Reboot PC Recordings not saved Memory full Delete unwanted files The device no respond Wrong operations reset the device for more than 1 minute...
-
Page 23: Safety And Warning
Safety and Warning Application Abide strictly to relevant regulations and laws. This product should not be used for any illegal purposes. The user is fully responsible for its operational use. Proper use of eyewear Warning: Although the lenses are impact resistant, it does not make the lenses shatterproof. Impact resistant lenses may break or shatter under certain conditions. - Page 24 WARNING: Do not attempt to dismantle the device. Any attempt to alter or repair the unit, except by the original manufacturer or an Authorized Service Facility, will void the limited warranty. Recycling Please contact your local corporate office for recycling/disposal information for this product. Do not dispose with household waste.
- Page 25 Operating temperature: 0—70°C. To extend the unit’s lifespan it is best used at room temperature. Do not expose to excess moisture. WARNING: Although the device features a water resistant design, operation can be affected in excessively humid environments – it is not completely waterproof. Cleaning Avoid using it in excessively dusty environments.
-
Page 26: Announcement
ANNOUNCEMENT We reserve the rights to upgrade or improve the product without any prior notice, the content of which can be obtained from our website notice or salesperson. The product design, configuration and or specifications mentioned are protected by pertinent copyright and patent laws. -
Page 27: Warranty
Warranty This product is covered by a Limited Warranty on parts and labour from the date of original pur- chase. The warranty period depends on the legislation of the country you reside in. The warranty covers defects in workmanship and materials. The warranty does not apply to units which have been damaged or abused intentionally or unintentionally.
Need help?
Do you have a question about the Q-VJU and is the answer not in the manual?
Questions and answers