Table of Contents
Advertisement
Quick Links
Advertisement
Table of Contents

Related Manuals for Convex RT Series

Summary of Contents for Convex RT Series
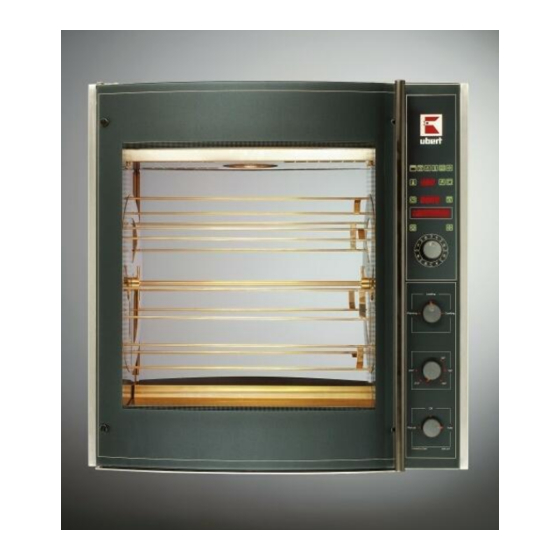
- Page 1 Service Manual Rotisseries „CONVEX“ RT - Series...
-
Page 3: Table Of Contents
Contents 1 Contents Contents ........................... 3 Important References........................ 5 Fundamental Safety Notes ....................5 Warranty and Liabilities ...................... 6 Symbols and Notes ......................6 Copyright ..........................6 Special safety references ....................7 Product Information ........................9 Introduction ......................... 9 Special Features......................... 9 Operation Methods ...................... - Page 4 Contents Exit ........................... 58 Error Diagnostics convex ..................... 59 printed: 03/2012 Subject to change! ConvexServiceManual.docx...
-
Page 5: Important References
2.1.4 Possible risks Rotisseries „CONVEX“ are built state of the art and in acknowledgement of all safety related rules. Nevertheless it is possible that danger for body and life of the user and/or third and/or impairments at the unit or at other real values merge. -
Page 6: Warranty And Liabilities
Important References 2.2 Warranty and Liabilities Fundamentally our "General terms of sale and delivery" are valid. These are known to the operator at the latest since signing of the contract. Claims to warranty and liability at persons- and property damages are impossible, if they are to be led back to one or several of the following causes: Non due use of the unit. -
Page 7: Special Safety References
Important References 2.5 Special safety references 2.5.1 Safety devices • Before operating the unit all protective devices as well as all removable parts must be installed correctly and be fully workable. • Protective devices may only be removed: • After stand still and •... - Page 8 Important References 2.5.8 Service and maintenance, trouble shooting • Prescribed adjustment, service and inspection work is to be accomplished timely by the manager or if necessary by an authorized service technician. • The operating staff is to be informed before the beginning of the maintenance and service work.
-
Page 9: Product Information
3.3.3 Manual Grilling 3.3.4 Holding a) The Holding phase of CONVEX Rotisseries allows avoiding the products from drying out. This is achieved by still heating. In this phase the machine stops the circulating air. A sepa- rate cooling motor is started in order to cool down the technical components of the unit au- tomatically. - Page 10 Product Information 3.4.1 Dimensions (all measures in [mm]) RT 506 CC: printed: 03/2012 Subject to change! ConvexServiceManual.docx...
- Page 11 Product Information RT 512 CC: printed: 03/2012 Subject to change! ConvexServiceManual.docx...
- Page 12 Product Information RT 508 CC: printed: 03/2012 Subject to change! ConvexServiceManual.docx...
- Page 13 Product Information RT 516 CC: printed: 03/2012 Subject to change! ConvexServiceManual.docx...
- Page 14 Product Information 3.4.2 Weight Type Net weight (in kg) RT 506 CC ca. 136,5 RT 512 CC ca. 273,0 RT 508 CC ca. 216,5 RT 516 CC ca. 433,0 3.4.3 Electrical Values, Power etc. Type Electrical connection [EA] Power RT 506 CC 400V, 3/N, 50Hz 6.0kW RT 512 CC...
-
Page 15: Installation And Starting The Operation
Take care of the following points: • The Rotisserie „CONVEX“ (with or without stand) has to be placed on a horizontal level. Use a spirit level if necessary. -
Page 16: Preparation Of Operation / Starting Up
4.5 Preparation of Operation / Starting up Before you can operate the Rotisserie „CONVEX “ you have to clean the unit and all removable parts (e. g. spits, discs etc) carefully with a grease solvent detergent. Afterwards you have to dry all surfaces. -
Page 17: Operation
Operation 5 Operation Following position and function of all components are specified and explained, which are important for the operation of CONVEX Rotisseries. 5.1 Operating Switches and Controls printed: 03/2012 Subject to change! ConvexServiceManual.docx... -
Page 18: Description Of Displays, Keys And Rotary Knob
Operation 5.2 Description of displays, keys and rotary knob Following the structure and function of all displays, keys and rotary knob on the display panel for automatic operation are explained. printed: 03/2012 Subject to change! ConvexServiceManual.docx... - Page 19 Operation 5.2.1 Full Load Grilling The mode Charge (full load) Grilling is activated by pushing the key charge grilling and the charge program which has been used last time appears on the clear-type display (5.2.14). 5.2.2 Revolving Grilling The mode Revolving Grilling is activated by pushing the key Revolving Grilling and the Revolving Grilling program which has been used last time appears on the clear-type display (5.2.14).
- Page 20 Operation 5.2.12 Time Display Display of actual- and desired time respectively. 5.2.13 Start Time The start time input is activated by pushing the key Start Time. This is only possible if the option start time has been programmed. 5.2.14 Clear-type Display In the first line of the clear-type display the cur- rent program is shown.
-
Page 21: Description Of The Operation Mode-, Selection Switch And Thermostat
Operation 5.2.19 Function state of keys Following displays are showing the function state of keys for automatic operation. Light-emitting diode off Key cannot be selected (function is not available). Light-emitting diode green Key can be selected (function is available). Light-emitting diode red Key has been selected (function is selected and active). -
Page 22: General Functions
Manual mode. For this you have to set the selection switch on position “Auto” or “Manual”. When the machine is switched on in automatic mode, in the first line of the clear-type display (5.2.14) the words “Ubert Convex” appear and in the second line the current software version, e.g. “Version 0.25”. -
Page 23: Operation In Automatic Mode
The rotation is running as long as the key Start is pushed. 5.5 Operation in automatic mode For operating the Convex Rotisserie in automatic mode the grilling programs Full-Load Grilling, Revolving Grilling and Manual Operation are available. - Page 24 Operation 5.5.2 Revolving Grilling The unit has to be started as described under point 5.4.1 Automatic Mode. The mode Revolving Grilling is activated by pushing the key Revolving grilling and the revolving program which has been used last time appears on the clear-type display (5.2.14). Now there is the opportunity to start the program by pushing the key Start (5.2.16) or to choose another Revolving grilling program by the rotary knob.
- Page 25 Operation 5.5.3 Manual Grilling The unit has to be started as described under point 5.4.1 Automatic Mode. The mode Manual Grilling is activated by pushing the key Manual grilling (5.2.3) and the data for time, and temperature which has been used last time appear on the displays (5.2.10 + 5.2.12). Now there is the opportunity to change temperature, time and steam by push and hold of the cor- responding key (5.2.7, 5.2.11, and 5.2.9) while rotating the rotary knob (5.2.17).
- Page 26 Operation 5.5.4 Holding The unit has to be started as described under point 5.4.1 Automatic Mode. The mode Holding is activated by pushing the key Holding (5.2.4) and the holding program which has been used last time appears on the clear-type display (5.2.14). Now there is the opportunity to start the program by pushing the key Start (5.2.16) or to choose another holding program by the rotary knob (5.2.17).
- Page 27 Operation 5.5.5 Cleaning The unit has to be started as described under point 5.4.1 Automatic Mode. The mode Cleaning Mode is activated by pushing the key Cleaning (5.2.5) and the cleaning pro- gram which has been used last time appears on the clear-type display (5.2.14). Now there is the opportunity to start the program by pushing the key Start (5.2.16) or to choose another cleaning program by the rotary knob (5.2.17).
- Page 28 Operation 5.5.6 Entering programming level The unit has to be started as described under point 5.4.1 Automatic Mode. By pushing and holding of the programming key (5.2.6) for at least 3 seconds you enter the pro- gramming level and in the first line of the clear type display occurs CODE 127. By using the rotary knob (5.2.17) choose the user Password for programming (default is 110) and confirm by pushing the start key (5.2.16).
- Page 29 Operation 5.5.7 Setting a new program (PROG. NEW) The unit has to be started as described under point 5.4.1 Automatic Mode. Enter the programming level as described in 5.5.6. After choosing the mode: CHARGEGRILLING; REV. GRILLING; HOLDING; CLEANING and con- firmation by the enter key (5.2.16) PROG.
- Page 30 Operation g) HOLDING N/Y Choose whether or not you want to set a holding phase. By use of the rotary knob you can choose between N (No) and Y (Yes). If you choose Y a holding temperature can be set; if you choose N STORE DATA appears on the clear type display and you return to the basement of programming level.
- Page 31 Operation n) TEMPERATURE Adjust the temperature By use of the rotary knob you can choose a temperature. (Temperature Display 5.2.10); confirmation by the enter key (5.2.16) o) TIME Adjust the time. By use of the rotary knob you can choose a time. (Time Display 5.2.11); confirmation by the enter key (5.2.16) p) STEAM N/Y Choose whether or not you want to activate steam injection.
- Page 32 Operation To leave the programming level choose LEAVE and confirm with the start key or push the Stop key while in the basement of programming level. printed: 03/2012 Subject to change! ConvexServiceManual.docx...
- Page 33 Operation 5.5.8 Changing an existing program (PROG. CHANGE) The unit has to be started as described under point 5.4.1 Automatic Mode. Enter the programming level as described in 5.5.6. After choosing the mode: CHARGEGRILLING; REV. GRILLING; HOLDING; CLEANING and con- firmation by the enter key (5.2.16) PROG.
-
Page 34: Manual Operation
Operation 5.5.9 Delete a program (PROG. DELETE) The unit has to be started as described under point 5.4.1 Automatic Mode. Enter the programming level as described in 5.5.6. After choosing the mode: CHARGEGRILLING; REV. GRILLING; HOLDING; CLEANING and con- firmation by the enter key (5.2.16) PROG. NEW appears in the first line of the Clear type display. By use of the rotary knob choose PROG. -
Page 35: Rotisserie Assembly For Operation
Operation To unload the unit, rotate the knob (5.3.1) to LOADING. Open the door and unload the spits. By either closing the door or pushing the door switch you can rotate the disks to the next spit position. The unit is switched off completely by rotating the selection switch (5.3.3) to the OFF position 5.7 Rotisserie assembly for operation •... - Page 36 Operation Flat in disk Holes mounts line up Holes line up Flat in disk mounts 5.7.2 Spit assembly into rotisserie 5.7.2.1 Angle Spit For mounting chickens horizontally and without piercing chicken. Mount spit into holes as shown below. Be sure recessed rings on end of shafts drop into hole in disk.
-
Page 37: Product Mounting And Loading
Operation Bend in support brack- et toward centre of disk Position shaft recess into disk holes 5.7.2.3 Rack and Basket Position racks or baskets into holes as shown below. Be sure recessed rings on end of shafts drop into hole in disk as shown below. Position shaft recess into disk holes Place basket in holes near... - Page 38 Operation 5.8.2 Double spits for mounting chickens vertically Lock chicken wings down by tucking under the legs When piercing the chicken hold the spit with the support angle down and the chicken breast Lock the wings down by tucking under the legs and then pierce just below wing with spit and pierce leg just under the bone as shown in the picture below.
-
Page 39: Maintenance
Maintenance 6 Maintenance Following we will show you some advices concerning maintenance, care, trouble shooting and service for your Rotisserie „CONVEX“. 6.1 Safety advices Before you start to clean and care switch off the appliance and disconnect it from the mains. -
Page 40: Trouble Shooting
Only these two companies are allowed to carry out service work and replacement of defect parts. If you do not observe this note or in case of manipulation of a third party any claims for guarantee will become invalid! Check list of your Rotisserie „CONVEX“: Trouble Possible reason remedy 1. - Page 41 Maintenance tate. service! Doors are not closed (RT307 only) Close the doors! 6. Rotisserie does not Electrical supply is not o.k. Check the fuse box! reach the required temperature. Heating elements are defect. Call the service! Fan defect. See point 2 or call the service! Thermostat defect.
-
Page 42: Wiring Diagrams
Maintenance 6.3 Wiring Diagrams RT 506 CC printed: 03/2012 Subject to change! ConvexServiceManual.docx... - Page 43 Maintenance RT 508 CC printed: 03/2012 Subject to change! ConvexServiceManual.docx...
-
Page 44: Spare Parts
Maintenance 6.4 Spare Parts Defect parts are to be replaced only by original spare parts of UBERT GASTROTECHNIK GMBH; the replacement is to be carried out only by their service staff or by your authorized service companies. If you do not observe this note or in case of manipulation of a third party any claims for guarantee will become invalid! Also all certifications (CE, UL, NSF and the like) become invalid! 6.4.1 Spare Part Lists... - Page 45 Maintenance RT506 CC Description Part. No. Amount Bearing accommodation Brass 380618 Main heating element 2000W 343139 Lamp socket for Q1000 340410 Quarzlamp 1000W Q1000 High limit switch 342221 342237 Fan assy. 344112 Fan wheel 344110 Gear motor 380103 Door switch 341150 Strain relief 338112...
- Page 46 Maintenance 6.4.2 Replacement of Quartz Heater Lamps Warning: Remove all electrical power supplied to the unit by unplugging the power cord or electrical shock could result. If the unit is permanently wired, the circuit breaker must be used to disconnect power. 1.
-
Page 47: Service
After the update you have to delete all pro- grams and then you have to enter them again, to guarantee proper function of the CONVEX. Disconnect the CONVEX from the mains! Remove the 4 screws on the right hand side and then remove the side cover. - Page 48 DELTET PROG. N. Turn the encoder until it reads DELTET PROG. Y and push the start key to confirm. Hereby you maintain a proper function of the CONVEX. Once you have deleted all programs you can leave the parameter level. After leaving the parame- ter level the CONVEX starts again and then changes into the stand-by-mode.
-
Page 49: Service Mode
To enter the service mode, switch the CONVEX to Auto. In the clear type display UBERT CONVEX VERSION appears and the release of the installed soft- ware, e.g. 1.31. Then INITIALIZE is shown on the display. After the initialization the CONVEX automatically turns into the stand-by mode. -
Page 50: Calibration Of The Temperature Sensors
To enter the Test-mode for MODE further evaluation and testing of all components in CONVEX 8.1 Calibration of the temperature sensors If you do not want to calibrate, leave the inquiry on “N” and confirm via start button. Within the clear type display appears CALIBRATE? N. To calibrate the temperature sensor to CH1 and CH2 switch the “N”... - Page 51 Service Mode In the clear type display POINT 1 for the cali- bration is requested. Adjust the temperature of the first resistor in the temperature display using the encoder. Wait until the number that occurs in the time display does not change any more and con- firm the setting by pushing the start button.
-
Page 52: Accuracy Of Temperature Probe
Calibration of CH1 is complete. Remove the resistor that belongs to POINT 4. Re-connect the CONVEX temperature probe to the left plug-in termination on the CPU-board. Repeat the whole procedure for CH2. -
Page 53: Serial Number
In the first line of the clear type display appears now TYPE? Here adjust the general control to the type of device “ROFRY / CONVEX”. Select via the encoder the type CONVEX in the second line of the clear type display. Confirm this with the start button. -
Page 54: Temperature Unit
Depending on the location of the CONVEX it makes more sense to keep the light at the operator’s side always on (e.g. the CONVEX is standing in front of a wall) or the customer’s side (e.g. Convex is placed on middle counter). Make sure the end customer has the best possible illumination from his point of view. -
Page 55: Deletion Of The Programs
Service Mode 8.16 Deletion of the Programs In the clear type display appears DELETE PROGRAMS? With this function all programs can be de- leted except the cleaning programs. This function should be activated when new software is in- stalled to avoid fragments of the old software remaining in the memory. All user-defined programs and adjustments should be written down prior to deletion!. -
Page 56: Test Mode
OFF / ON Check for proper Push to open, push to close the water supply to steam valve. Turn the encoder the CONVEX jump to the next test. LAMPS OFF / ON Check both infra- Push to switch on, push red lamps switch off the lamps. - Page 57 Test Mode locking system. tion of the micro switches. Turn the encoder to jump to the next test. EXIT Exit test mode Push to exit test mode. (All compo- nents will be switched off in any case) 9.1.1 Test LED and Keys In the clear type display TEST LEDS+KEYS appear.
- Page 58 Test Mode In the clear type display the special character for the encoder and the word SP.ENGINE appear in the first line. In the second line OFF is shown above the “stop” key and ON is shown above the “start” key. Via using the start key the MOTOR will be activated. Now the LED 6 light up at the power board.
- Page 59 Error Diagnostics convex 10 Error Diagnostics convex Power Board printed: 03/2012 Subject to change! ConvexServiceManual.docx...
Need help?
Do you have a question about the RT Series and is the answer not in the manual?
Questions and answers