
Related Manuals for DIY L905

Summary of Contents for DIY L905
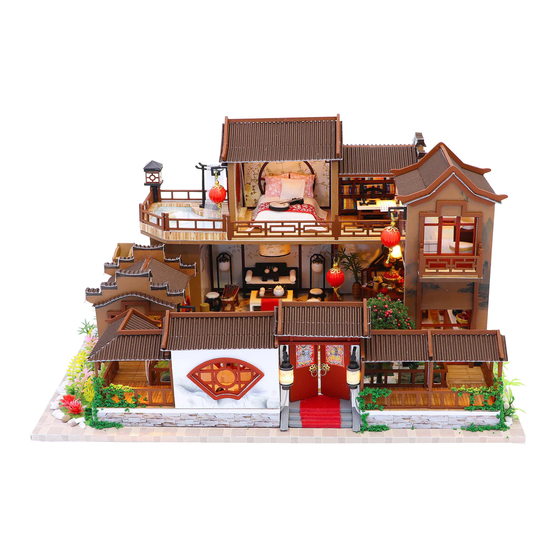
- Page 1 DIY mini house kits– DIY mini house kits– A Splendid Family A Splendid Family L905 Instruction manual L905 Instruction manual...
- Page 2 Tips for assembling Testing on LED function 1.Picures shown on the package may be slightly different from the actual product. Be sure to test the LED lights before making the lighting, 2.All the materials are taken in the operation step, put the remaining materials back into note that the LED white wire to the negative, gray wire the original pocket until the installation is completed.(Avoid material loss during installation) to the positive reference to the following figure...
- Page 3 Thumbnail of material list( reference only) details of minature kit stairs C bag+template paper+printing paper Material package Name A bag+D bag+L bag+printing paper Bag A-A25(All printing and template papers little house printing paper are shown on A25 paper ,total 2 pieces A3 +template paper and 2pieces A4) A bag+D bag+L bag+printing paper...
- Page 4 (8pieces) M02 M02 M02 M02 (need (4pieces) 4 pieces) Tie a knot at 1cm L15:5cm(4pieces) L10:2cm M23 M23 L10:2cm A25-1 L10:2cm (need 2 pieces) (need 3 pieces) A25-2-2 A25-2-1 Use some tools to make a small outdoor light 1 hole in the printing paper. outdoor light 2 Living Room Chandelier A25-3...
- Page 5 (mahjong mahjong mahjong chairs) chairs chairs (mahjong chairs) mahjong chairs (need 4 pieces) mahjong chairs (mahjong (mahjong (mahjong (mahjong chairs) chairs) chairs) chairs) mahjong chairs (mahjong (mahjong (mahjong (mahjong chairs) chairs) chairs) chairs) (need 4 pieces) Before making, cut out L02, L03 and L08 according to the template. A25-5-1 A25-5-2 A25-5-2...
- Page 6 L02(stool) L02(stool) L02(stool) (need 3 pieces) L03(stool) G03(15pieces) L08(stool) L08(stool) L03(stool) L03(stool) L03(stool) L08(stool) L08(stool) Before making, cut out L02, L03 and L08 according to the template. (need 3 pieces) (need 3 pieces) 2.1cm A25-6 L10:2.1cm 2.2cm 2.5cm 2.6cm 2.7cm 2.7cm L10:1.5cm L10:1.2cm...
- Page 7 L03(dining chair) L02(dining chair) L08(dining chair) L02(dining (8pieces) chair) L02(dining L02(dining chair) chair) L08(dining L08(dining L03(dining L03(dining chair) L03(dining chair) chair) L03(dining L08(dining chair) chair) L08(dining chair) chair) chair) (need Before making, cut out L02, L03 and L08 according to the template. 4pieces) L11:0.8cm L10:1cm...
- Page 8 L10:3.2cm L09(gas cooker) 0.5cm L12:3cm L08(gas cooker) Cut out L08 and L09 according to the template and glue them together. fold back on fold it L10:2cm as shown. both sides A25-10 A25-8-2 A25-12-1 A25-12-4 A25-8-1 A25-12-3 A25-12-2 A25-12-3 A25-12-5 A25-14 A25-13 A25-15 A25-13...
- Page 9 L02(chair) L03(chair) L08(chair) L08(chair) L02(chair) L03(chair) Sharpen the toothpick Darken the front Cut out 1cm of J23. on the front. with a black pen. Before making, cut out L03 and L08 according to the template. A25-16 A25-18 A25-17 J18 J18 J19 L02(quilt) L02(pillow) L01(bed)
- Page 10 L05(pillow) A25-19 L02(pillow) L05(pillow) As shown in the picture, cut out L05 Finally, glue the gap according to the pillow cloth, and Fold in the right amount L05(pillow) in place. then apply the glue on the dotted of cotton L07. line.
- Page 11 A25-22-2 A25-22-1 L13:5cm A25-22-2 L13:5cm L13:5cm L13:5cm A25-22-1 L03( wooden basin L03(wooden basin) Tie K03 with 2 lengths Before making, cut out L03 of L13 3cm long. according to the template. A25-23-1 A25-23-2 L08(stair hanging picture) L08(stair hanging picture) Before making, cut out L08 according to the template.
- Page 12 (big steps) (small steps) (small steps) (big steps) Before making, cut out L01 Glue a led lamp N11 according to the template. on the roof as shown. (gate roof) Make a mark on the red Make a mark on the red dotted line with a knife.
- Page 13 A25-27-1 A25-27-2 (Spa pool) Cut out A23 according to the template and stick it on the underside. A25-27-3 A25-27-4 A25-28-2 A25-28-1 (turn it over) A25-29...
- Page 14 A25-30-1 (roof of bedroom) A25-30-2 Cut out A24 according to the (turn it over.) template and stick it as the shown. A25-31-1 A25-31-2 L14:3.2cm L14:3.2cm L14:3.2cm L14:3.2cm L14:3.2cm (turn it over) mirror cupboard kitchen ventilator A25-33 A25-32 A25-35 A25-34 stairs...
- Page 15 A25-36 A25-37 L08(wall deco) Cut out L08 according to the template and stick it on the bottom. Use a knife to make a gap in the upper right corner A25-38 3.8cm 10cm small chandelier living room chandelier 2.8cm 3.4cm A25-39 (roof of bedroom) (study room roof) (roof of bedroom )
- Page 16 A25-42-2 A24(eaves of a small house3) A24(eaves of a A25-42-1 A25-41 A25-42-1 A24(eaves of a small house2) small house2) A25-42-1 A24(eaves of a small house1) A25-42-1 A25-42-3 A24(eaves of a small house1) A24(eaves of a small house1) A24(eaves of a small house2) A24(eaves of a small house2) A24(eaves of a small house3) Cut out A24 according to the template...
- Page 17 Glue a led lamp N11 on the roof as shown. A25-46-1 A25-47 A25-46-2 A25-46-2 A25-46-2 A25-46-2 A24(Study eaves 1) A25-46-3 A24( Study eaves 1 A24(Study eaves 2) A24(Study eaves 3) Cut out A24 according to the template before making. A24(study eaves 3) A24(study eaves 2) A25-43-3 A24(study eaves 2)
- Page 18 (bedroom roof) Make a mark on the red dotted line with a knife. (bedroom roof) small chandelier Fold it along the fold. Before making, cut out A24 according to the template. Make a mark on the red dotted line with a knife. The roof of bathroom (bathroom roof) small chandelier...
- Page 19 b droom roof washing table closetool Glue the wire to the dotted line. bathtub A23(bathroom window) bathroom roof Run the roof wires through the diagram. plant small house mahjong table and chair Thread the electrical wiring of the small house onto the floor. outdoor light spa pool...
- Page 20 Cut out A24 (right corridor roof) according to Make a mark on the the template red dotted line with before making. Fold it along the fold. a knife. Cut out A24 according to the template before (left corridor (left corridor making.
- Page 21 (left corridor roof1) (left corridor roof2) (left corridor roof2) Make a mark on the Make a mark on the (left corridor roof1) red dotted line with red dotted line with a knife and fold it a knife and fold it over the fold.
- Page 22 A25-49 A25-49 Glue A25-49 along the Concentrate all the wires on the small hole in the lower right corner. edge of A02. Poke a small hole in the map with an awl. A25-49 Glue the gate on. Thread the thread of the gate lantern over the hole and glue it on. Poke a small hole in the map with an awl.
- Page 23 3. Twist the following wire together: (I) BLACK wire from the battery box with the WHITE wire How to assemble the battery holder from LED bulb. (II) RED wire from the battery box with the GREY wire from Statement: the lamp wires cannot be inserted into LED bulb.
- Page 24 chessboard table and chair Lay stones around the tree. lantern lantern lantern lantern Attention: Please keep the instruction for future enquires after installation.
Need help?
Do you have a question about the L905 and is the answer not in the manual?
Questions and answers