
Summary of Contents for Opticstar EQ1300-GT
- Page 1 Opticstar EQ1300-GT Equatorial Mount Instruction Manual © Opticstar Ltd 2013-2016...
- Page 2 Never look at the Sun through your telescope, the telescope’s finder or the mount’s Polar scope as this will cause blindness. Observing the Sun directly, even for a very short period, without the appropriate protection can cause serious damage to your eyes. © Opticstar Ltd 2013-2016...
- Page 3 Always handle and dispose batteries with care. Never heat up or throw batteries into a fire as this can cause an explosion. Opticstar Ltd 87 Washway Road, Sale, Greater Manchester, M33 7TQ. United Kingdom Web: www.opticstar .com – Email: info@opticstar.com © Opticstar Ltd 2013-2016 © Opticstar Ltd 2013-2016...
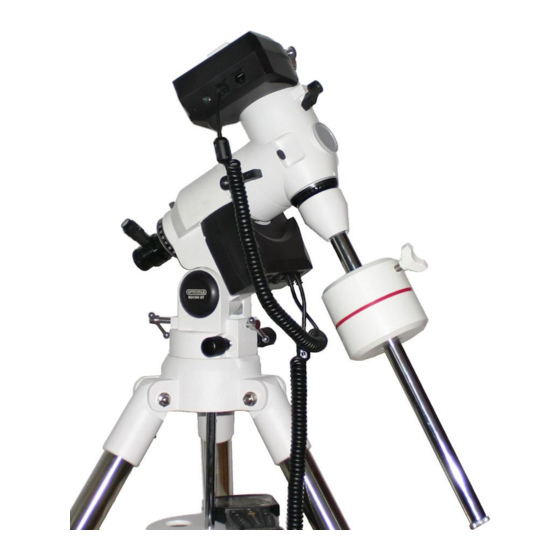
- Page 4 Opticstar EQ1300 GT Overview Telescope mounting saddle Polar scope illuminator Azimuth adjustment knobs DEC motor housing Polar scope Tripod platform DEC locking lever R.A. motor housing Handset cable Polar Scope cap Counterweight shaft & locking nut Tripod tension bolt RA locking lever...
- Page 5 Opticstar EQ1300 GT Handset & Motors Red LED torch Handset LED display LED torch Switch + & - Keys Arrow Keys Confirm key Alpha-numeric keypad Help key Mini USB port (n.a.). RJ-45 handset port RJ-22 Port 12VDC power socket LED power light...
- Page 6 To partially collapse the tripod for storage first remove the telescope and counterweights, loosen the tension knob (24) enough so that you can freely rotate the leg spreader to partially collapse the legs. There is no need to remove the tripod shaft unless you intend to completely collapse the tripod. © Opticstar Ltd 2013-2016...
- Page 7 Use the second coiled cord to connect the two DEC Motor Cable ports found on the RA and DEC motor control panels respectively (page 4). ATTENTION Only use original cables supplied with the mount, incorrectly wired cables can cause serious damage to the mount. © Opticstar Ltd 2013-2016...
- Page 8 Polar scope. Tighten the hand-wheel bolt and thumb screw (1). The mount is supplied with a 4.5Kg counterweight but you may need an additional counterweight for heavy equipment. Never overload the mount beyond its maximum 13Kg payload (excludes counterweights). © Opticstar Ltd 2013-2016...
- Page 9 Preparing your Mount and Telescope for Observation The following figure shows a fully assembled telescope consisting of an Opticstar EQ1300 GT mount and 127mm Opticstar-Ascension 127mm apochromatic triplet refractor. POLAR HOME POSITION Latitude Levelled mount Front Tripod leg is aligned North under the counterweight rod The telescope is in Home Position and ready to Star Align via the mount’s handset.
- Page 10 Arrow keys and typing in the values using the numeric pad on the handset. Once finished, press the oval Confirm key to proceed. Daylight Saving Use the Up/Down Arrow keys to select Daylight Saving time by selecting the status (ON/OFF). Press the Confirm key to proceed. © Opticstar Ltd 2013-2016...
- Page 11 23’ N 28’ W Inverness Sheffield 04’ N 10’ E 54’ N 24’ W Ipswich Southampton 48’ N 33’ W 37’ N 57’ W Leeds Swansea 24’ N 59’ W 58’ N 06’ W Liverpool York © Opticstar Ltd 2013-2016...
- Page 12 In certain situations, the mount may not offer all three alignment stars. It is still possible to add a third or fourth star once you have completed the alignment process. This can be done at any point following Star Alignment via the Target Sync command (page 13) and is recommended when imaging or following a mount Meridian flip. © Opticstar Ltd 2013-2016...
- Page 13 The telescope is tracking the last star the star in the scope, press Confirm GOTO commands while waiting for your commands In two and three Star alignment you will need to repeat steps A, B and C twice or three times respectively. © Opticstar Ltd 2013-2016...
- Page 14 Time, Date and Daylight Saving Please note that the telescope will not remember the Time, Date and Daylight Saving values. These need to be entered every time you switch on the telescope. © Opticstar Ltd 2013-2016...
- Page 15 15) until Polaris fits into the small circle between the 40’ and 60’ markings in the viewfinder. 5. Once Polaris is in position loosen the R.A. Setting circle locking thumb-screw, during normal operation this thumb-screw should be loosened. © Opticstar Ltd 2013-2016...
- Page 16 Setup Menu: Language Select a language i.e. English, German, French, Italian, Spanish. Setup Menu: Reset Reset handset to factory settings. This will erase any data stored in the handset by the user. © Opticstar Ltd 2013-2016...
-
Page 17: Appendix I: Monthly Sky Watch
A large and bright galaxy with two spiral arms that are visible in larger telescopes. Virgo M104 The Sombrero Galaxy is virtually an edge-on galaxy that has a large bright core. A dark lane runs across its length cutting the galaxy splitting it in two. © Opticstar Ltd 2013-2016... - Page 18 Well resolved globular cluster. Large and bright globular cluster. Globular cluster. Globular cluster at least three fast rotating stars in its centre known as pulsars. M107 Globular cluster possibly obscured by interstellar dust. 10.0 IC4665 Open cluster. © Opticstar Ltd 2013-2016...
- Page 19 A 6" telescope at x100 magnification will reveal a slightly bluish disk. Cassiopeia Star cluster with hundreds of stars. 10.7 Pegasus NGC7320 This galaxy is the brightest member of the so-called Stephan’s Quintet. 16.8 © Opticstar Ltd 2013-2016...
- Page 20 A bright emission nebula in the constellation of Orion, in reality part of the M42. It takes magnification well to reveal faint stars in the nebula and detail at its edges. NGC1981 Open cluster in Orion with around 40 stars. Lepus Globular cluster. © Opticstar Ltd 2013-2016...
-
Page 21: Appendix Ii: Handset Menu Structure
• Star Speed • Solar Speed • Moon Speed • Customize Speed • Guiding Speed • Speed 1: x0.125 Aggresiveness • Speed 2: x0.250… Aggresiveness • Language Change language • Telescope Model • Reset Reset to factory settings © Opticstar Ltd 2013-2016... -
Page 22: Appendix Iii: Troubleshooting
The Red part of the needle points North. North? magnetic North. The bubble level has several Let the bubble level rest for a few minutes, the smaller bubbles and not a single smaller bubbles will reform into a single larger large one. bubble. © Opticstar Ltd 2013-2016... - Page 23 Never look at the Sun through your telescope, the telescope’s finder or the mount’s Polar scope as this will cause blindness. Observing the Sun directly, even for a very short period, without the appropriate protection can cause serious damage to your eyes. © Opticstar Ltd 2013-2016...
- Page 24 Opticstar Ltd 87 Washway Road, Sale, Greater Manchester, M33 7TQ. United Kingdom Web: www.opticstar .com – Email: info@opticstar.com © Opticstar Ltd 2013-2016...
Need help?
Do you have a question about the EQ1300-GT and is the answer not in the manual?
Questions and answers