Table of Contents
Advertisement
Available languages
Available languages
Advertisement
Table of Contents

Summary of Contents for studio casa DIVA DE LUXE
- Page 1 DIVA DE LUXE ESPRESSOR AUTOMAT CAFEA AUTOMATIC ESPRESSO MACHINE...
- Page 2 MASURI DE PRECAUTIE IMPORTANTE Inainte de a utiliza aparate electrocasnice electrice, respectati intotdeauna urmatoarele masuri de precautie de baza: 1. Cititi toate instructiunile. 2. Inainte de utilizare, verificati daca tensiunea prizei de perete corespunde cu tensiunea marcata pe placuta cu caracteristici. 3.
- Page 3 Nu introduceti degetele in rezervor / vas cafea in timpul utilizarii acestuia sau atunci cand lichidul este fierbinte, exista riscul unei accidentari grave. Folosirea de accesorii care nu sunt recomandate sau vandute de catre producator pot cauza incendiu, soc electric sau ranire.
- Page 4 Rasnita de cafea incorporata se utilizeaza doar pentru macinarea boabelor de cafea. Este interzisa utilizarea pentru macinarea altor materii prime. Puteti utiliza functia de obtinere apa fierbinte neintrerupt pentru golirea maxima a unui rezervor de apa. Pastrati aceste instructiuni. ACEST PRODUS ESTE DESTINAT NUMAI PENTRU UZ CASNIC SI NU SE VA FOLOSI IN SCOP INDUSTRIAL.
- Page 5 grija ca in interiorul rasnitei sa nu fie introduce obiecte care ar putea bloca si/sau deteriora sistemul de rasnire. Componentele cafetierei se pot încălzi foarte tare în timpul utilizării! Băuturile si aburul eliberat sunt foarte fierbinti! Respectati următoarele măsuri de sigurantă pentru a evita arsurile sau opărirea dvs.
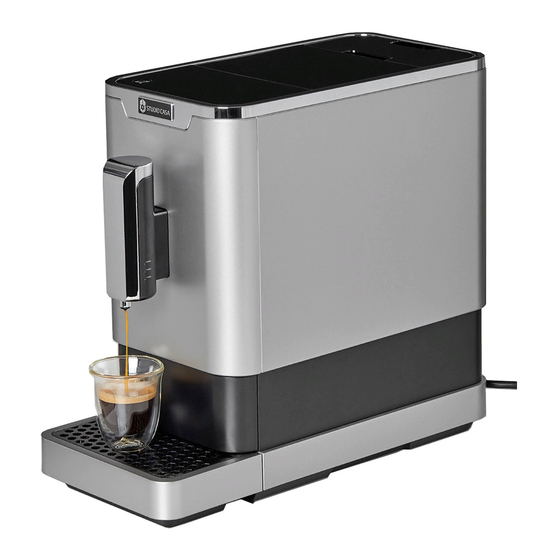
- Page 6 manual de utilizare sunt actualizate la data tipăririi lui si se bazează pe informatiile cele mai bune posibil obtinute prin prisma experientei si expertizei. DESCRIEREA APARATULUI / PANOULUI DE COMANDA 1 – Tavita scurgere externa 8 – Rezervor apa 2 – Tavita scurgere interna 9 - Infuzor 3 –...
- Page 7 cafea 5 – Panou comanda 12 – Perie curatare 6 – Recipient boabe cafea 13 – Material textil curatare panou comanda 7 – Capac recipient boabe 14 – Plic agent curatare cafea NOTA: În cutie sunt incluse trei pachete de agenti de curătare pentru procesul de autocurătare.
- Page 8 Semnalizeaza ca unitatea de infuzare nu este introdusa sau nu pozitionata corect (luminare continua) sau usa de acces este deschisa sau montata gresit (luminare intermitenta) In cazul in care acest indicator luminos functioneaza continuu este necesara o operatiune de decalcifiere. Functionarea intermitenta semnaleaza ca procesul de curatare-decalcifiere este in curs.
- Page 9 2.Amplasati automatul de cafe ape o suprafata plana, uscata si stabila. Respectati instructiunile de amplasare descrise imaginea alaturata. Recomandam pastrarea unei distante de min 15 cm fata de orice alt obiect situat proximitatea automatului de cafea. 3.Introduceti corect tavita colectare exterior respectand instructiunile...
- Page 10 5. Ridicati capacul rezervorului de boabe cafea si introduceti boabe cafea. Asezati capacul si inchideti corespunzator. 6. Desfasurati cablul de alimentare si conectati-l corect la portul situat in partea spate automatului de cafea. UMPLEREA REZERVORULUI CU APA In cazul in care indicatorul luminos se aprinde intermitent trebuie sa verificati rezervorul de apa.
- Page 11 NOTA! Este absolut interzisa introducerea in rezervor a apei utilizand alte vase, exista riscul major de electrocutare in cazul in care apa ajunge in aparat si nu in rezervor. In rezervorul de apa nu se va introduce decat apa curata rece, nu se vor introduce lichide calde, lapte sau apa minerala carbogazoasa.
- Page 12 Functia APA FIERBINTE Aparatul este dotat cu o functie ce permite generarea de apa fierbinte. Apasati pe butonul dedicate acest functii si indicatorul luminos se va aprinde si va confirma ca aparatul incalzeste apa. In momentul in care acest indicator luminos se va stinge apa fierbinte va curge in ceasca.
- Page 13 5. Apasati butonul usitei de acces conform imagine si apoi trageti usor de usita pentru a o putea extrage din locasul sau. 6. Apasati butoanele laterale pentru putea elibera infuzorul. Dupa apasarea butoanelor laterale puteti extrage in exterior infuzorul. 7.Spalati cu apa calda infuzorul si apoi lasati la uscat. 8.
- Page 14 Montati tava scurgere exterioara conform imagine. OPRIREA APARATULUI Puteti opri aparatul prin simpla apasare a butonului PORNIT – OPRIT. OPRIREA AUTOMATA A APARATULUI Aparatul este dotat cu o functie ce permite oprirea automata. Oprirea automata se poate face la intervale diferite de timp, intervale ce depind de tipul de setari facute.
- Page 15 scurte, fapt ce confirma ca volumul a fost memorat pentru utilizare ulteriora. SETAREA GRANUZOLITATII DE MACINARE Puteti selecta gradul de granuzolitate a cafelei macinate prin rotirea butonului situat in compartimentul boabe cafea. 1. In timpul procesului de macinare cafelei puteti roti acest buton crescand sau scazand granuzolitatea cafelei...
- Page 16 Pentru o cafea cu gust deplin folositi boabe de cafea proaspat prajite. Termenul maxim de depozitare pentru cafea proaspat prajita este de 3 saptamani de la data prajirii. Pastrati boabele de cafea intr-un recipient etans, recipient depozitat intr-un loc racoros, uscat si intunecos. SELECTAREA REGIMULUI DE FUNCTIONARE Aparatul poate fi setat pentru functionare in mai multe regimuri: ECO (regim economic) / regim rapid / regim standard setat din...
- Page 17 Buton Buton apa Buton espresso fierbinte espresso scurt lung Regim ECO Lumineaza Lumineaza Lumineaza intermitent intermitent Regim rapid Lumineaza Lumineaza Lumineaza intermitent intermitent Regim initial Lumineaza Lumineaza Lumineaza intermitent intermitent 1. Apasati butonul “apa fierbinte” pentru regimul ECO, “espresso lung” pentru regimul rapid si “espresso scurt” pentru setare regim fabrica (reglari initiale).
- Page 18 aceasta functie de auto curatare cel putin o data pe luna. Urmati in acest sens pasii: 1. Umpleti rezervorul cu apa la nivelul maximal urmand pasii descrisi anterior in manual. 2. Adaugati un pachet de agent de curatare (pachet furnizat in cutie impreuna cu produsul) in rezervorul de apa.
- Page 19 Indicatorul luminos se va stinge si aparatul va continua sa ruleze programul de auto curatare. 9. In momentul in care programul de auto curatare se finalizeaza aparatul se va inchide in mod automat. B.Curatarea si golirea circuitului intern Curatarea si golirea circuitului intern este recomandata inainte de transport in alta locatie sau la departamentul service sau atunci cand decideti ca nu veti folosi aparatul pentru o perioada mai lunga de timp.
- Page 20 1. Cand aparatul se afla in regimul stand-by apasati si tineti apasat butoanele (buton apa fierbinte) pentru 5 secunde. 2. Indicatorii luminosi (scurt) / (lung) se vor stinge. Prin duza de evacuare va curge o cantitate redusa de apa fierbinte. NOTA: Apa evacuata este fiebinte si exista riscul de ranire, recomandam atentie in timpul acestui proces de curatare.
- Page 21 1.Apasati conform imagine pentru acces camera infuzor. 2.Dupa apasare trageti usor de usa . 3.Apasati butoanele laterale pentru a putea elibera infuzorul. 4.Dupa apasarea butoanelor laterale puteti extrage exterior infuzorul. 5.Utilizati periuta livrata impreuna cu aparatul pentru curatarea cafelei macinate care blocheaza zonele de evacuare.
- Page 22 GHID REZOLVARE PROBLEME Problema Cauza Solutie Aparatul nu Aparatul nu este Conectati la retea si functioneaza. conectat la reteaua apasati butonul de electrica. pornire. Verificati cablul si racordul la port alimentare aparat. Aparatul nu Aparatul este afectat Deconectati reactioneaza sau de bruiaj aparatul de la reactioneaza cu...
- Page 23 Prima ceasca de Unitatea de infuzare Aruncati prima cafea nu este nu are suficienta cafea cafea si reluati gustoasa procesul de preparare espresso. Cafeaua nu are Boabele de cafea nu Inlocuiti boabele de spuma sunt proaspete cafea cu unele proaspete sau alta marca.
- Page 24 Indicatorul lipsa Rasnita de cafea este Curatati in boabe lumineaza blocata permanenta intermitent dar in aparatul conform recipient sunt indicatiilor din suficiente boabe de manual cafea Atentie: Nu incercati repararea aparatului in cazul in care acesta nu mai functioneaza, urmati pasii descrisi anteriori si in cazul in care problema persista apelati la service autorizat.
- Page 25 FISA PRODUSULUI Marca comerciala a STUDIO CASA producatorului: Modelul de fabricatie: DIVA DE LUXE Tipul aparatului Espressor cafea complet automat Importator SC M&N Italy Trading SRL Putere nominala: 1235 – 1470W Capacitate rezervor apa 1.1 L Capacitate container 150 grame...
- Page 26 IMPORTANT INFORMATION For safety purpose you should read the instructions carefully before using the appliance for the first time. Save the instructions for future reference. The appliance is designed for domestic use and may only be operated in accordance with these instructions for use. Always handle with care and warn other users the potential danger.
- Page 27 Before removing any parts from the appliance or restoring any parts on the appliance. Before cleaning or maintenance. When the appliance is not working correctly. After using the appliance. Empty the water tank when the appliance is not used for a long period of time.
- Page 28 Do not leave the cord hanging over the edge of a kitchen table, work top or touch hot surfaces. Do not let children play with the appliance. To protect against fire, electric shock and injury, do not immerse the appliance, power cord or plug in water or other liquids.
- Page 29 TO KNOW YOUR COFFEE MACHINE General description Coffee Machine Brewer External drip tray Service door Internal drip tray Power cord Coffee grounds container Accessories Adjustable coffee spout Cleaning brush Control panel Cleaning cloth (for control Coffee bean container panel) Coffee bean container lid Cleaning agent x 3 packs Water tank...
-
Page 30: Control Panel
CONTROL PANEL... -
Page 31: Machine Installation
Note: Touch-sensitive area is located at the lower part of icons. Press the touch-sensitive area firmly in front of the appliance. MACHINE INSTALLATION 1. Remove protective films, stickers and other packaging materials from the appliance. 2. Place the appliance safe stable surface with an easily reachable power supply and... - Page 32 3. Insert the external drip tray, make sure it is inserted correctly. 4. Fill the water tank with water. 5. Fill the coffee bean container with coffee beans.
-
Page 33: First Time Use
6. Unwind straighten power cord insert the socket into the back of the machine. Insert the plug into a wall socket with suitable power voltage. FIRST TIME USE Press hot water button to clean inner parts of the coffee machine before first use. Note: Press the hot water button anytime to stop cleaning and start coffee making. -
Page 34: Filling The Water Tank
According to your preference, press Espresso button or Lungo button once. The button will flash after pressed. It will then light up to indicate that the appliance is preparing the coffee. When the appliance resumes to standby condition, the coffee is ready to serve. FILLING THE WATER TANK When is flashing, water level in the water tank is too low... - Page 35 2. Rinse the water tank with fresh water and fill the tank to “MAX” level. Place it into the machine and make sure it is fully inserted. Important: Never fill the water tank with warm, hot, sparkling water or any other liquids which can damage the water tank and the machine.
-
Page 36: Filling The Coffee Bean Container
FILLING THE COFFEE BEAN CONTAINER When is flashing, the appliance needs to be filled with coffee beans. 1. Remove the bean container lid. 2. Slowly pour in the coffee beans. 3. Place the bean container lid to its original position. Important: Fill the coffee bean container with coffee beans only. - Page 37 1.Remove the external drip tray 2.Drain the drip tray over sink and wash it with fresh water. Dry it afterwards. 3.Pull out the internal drip tray and the coffee grounds container.
- Page 38 4.Empty the coffee grounds container and wash it with fresh water. Dry it afterwards. Note: When lights up, empty the coffee grounds container. 5.Push the recess area of service door. 6.Remove service door.
- Page 39 7.Press release buttons firmly. 8.Remove the brewer. 9.Wash the brewer with fresh water. afterwards.
- Page 40 10.Insert the brewer to its original position install the service door to its original position. Note: When lights up stably, it indicates that the brewer missing installed improperly. When flashes, it indicates that the service door is missing or installed improperly.
-
Page 41: Turning Off The Machine
12.Place the external drip tray to its original position. TURNING OFF THE MACHINE Switch off the appliance by pressing the Power ON/OFF button. AUTO-SHUT OFF The Appliance is equipped with auto-shut off function (see FURTHER SETTING – MODE SELECTION). The default auto-shut off time varies with the mode selected. -
Page 42: Grinding Adjustment
GRINDING ADJUSTMENT You can adjust the grind size to suit your coffee taste by turning the knob in the coffee beans container: Only turn the knob for adjustment when grinder is in operation. Caution: Never adjust the grinding when the grinder is not operating. -
Page 43: Cleaning & Maintenance Descaling
When the machine is in standby condition, press hold for 5 seconds. will flash and the following buttons will have the following indications in different settings : Press the hot water button for ECO mode, Espresso button for Speed mode and Lungo button for Default setting. Two beep sounds will be heard which indicates that the mode is selected. - Page 44 Note: The complete descaling process will take approximately 30 minutes. Do not switch off the appliance or unplug during the process. Fill the water tank to “MAX” level. Add one pack of cleaning agent into the water tank. Important: Do not use vinegar or other cleaning agents to do descaling for this appliance.
-
Page 45: Manual Rinsing
10. When the descaling process completes, the appliance will switch off automatically. EMPTY SYSTEM FUNCTION It is recommended to use the empty system function before storing or before taking to repair agent. Switch on the appliance. Press and hold the button and Lungo button simultaneously for 5 seconds. -
Page 46: Cleaning The Appliance
The hot water button , Espresso button Lungo button will go off. The coffee spout will dispense a small amount of water. Danger: Hot water will be dispensed from the spout into the external drip tray. Be careful to avoid scalding yourself. After rinsing, the appliance will resume to standby condition. - Page 47 Push the recess area of service door. . Remove the service door. Press the release buttons firmly.
- Page 48 . Remove the brewer. Wash the brewer with fresh water. Use cleaning brush to clean the grounds outlet. 7. After completing all cleaning processes, replace all units to original position.
-
Page 49: Troubleshooting
TROUBLESHOOTING Issue Possible cause Solution appliance The appliance is not Plug in and press does not work. connected Power mains supply ON/OFF button. Check the cord and the plug. No or delayed Appliance is under Unplug response electromagnetic appliance. several trials of interference. - Page 50 brewing unit. Coffee Coffee beans are not - Use fresh coffee cream. fresh. beans. appliance Excessive scale has -Descale takes long time to built up. appliance. heat up. There is no alert - The area near the - Wipe the water when the water water tank connector around the water...
- Page 51 RECYCLING YOUR ELECTRICALS At the end of the electrical products useful life, it should not be disposed of with household waste. Please arrange to take this appliance to recycling points set up around the country. Technical specs: Bean to cup espresso ...
Need help?
Do you have a question about the DIVA DE LUXE and is the answer not in the manual?
Questions and answers