Advertisement
Available languages
Available languages
Quick Links
Advertisement

Related Manuals for Steren MTR-100


Summary of Contents for Steren MTR-100
- Page 2 IMPORTANTE Antes de utilizar su nuevo Kit C Antes de utilizar su nuevo Kit de instalación de antena aérea, por favor lea las siguiente recomendacion. • Siempre utilice un paño suave, limpio y seco para limpiarlo. CARACTERISTICAS • El nuevo kit de instalación para antena aérea, le permite hacer una instalación rápida profesional y segura, ya que cuenta con todos los accesorios indispensables para fijar y anclar correctamente cualquier antena aérea de TV.
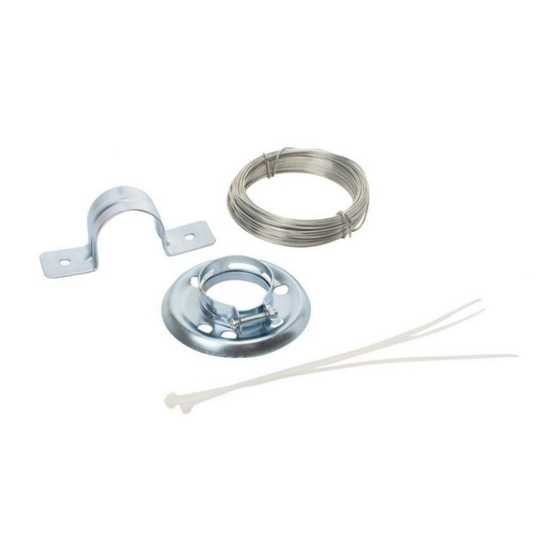
- Page 3 CONTENIDO 4 armellas de 1 3/4” 3 abrazaderas omega de 1 1/2” 1 brida abrazadera de súper presión para sujeción 10 taquetes 8 cinchos de 19 cm 6 tornillos 4 rollos de alambre de 1 1/2” galvanizado de 15m ESPAÑOL-03...
-
Page 4: Instalación
INSTALACIÓN 1.- Localice el lugar donde desea instalar la antena. 2.- Tome una de las abrazaderas y colóquela en la pared donde va a instalar la antena, de tal forma que pueda marcar –con un plumón- dónde va a realizar la perforación para sujetarla (Fig. 1). 3.- Una vez que marcó... - Page 5 4.- Posteriormente, inserte los taquetes en los agujeros. Utilice un martillo para poder colocarlo firmemente (Fig. 3). 5.-. Coloque un lado de la abrazadera sobre el agujero con el taquete, y utilice uno de los tornillos para asegurar ese lado, firmemente (FIg. 4). Fig.
- Page 6 6.- Ahora, tome el tubo que sujeta la antena, e inserte la abrazadera de la brida, como muestra las figura 5 y 6. Fig. 5 Fig. 6 ESPAÑOL-06...
- Page 7 7.- Después, inserte la brida, y junte ambas piezas (Fig. 7 y 8). 8.- Una vez que la brida abrazadera esté en posición, utilice un desarmador para ajustar la abrazadera de tal forma que quede firme (Fig. 9). Fig. 7 Fig.
- Page 8 9.- Inserte el tubo de la antena a través de la abrazadera que había colocado en la pared. 10.- Sujételo firmemente utilizando un tornillo (Fig. 10). Fig. 10 11.- Localice un punto en el piso, donde desea colocar la base de sujeción de la antena.
- Page 9 12.- Marque con un plumón el lugar donde va a realizar el agujero, y utilice un taladro para perforar de acuerdo al tamaño de los taquetes. 13.- Después de perforar, coloque un taquete, utilizando un martillo para colocarlo firmemente. (Fig. 11 y Fig. 12) 14.- Utilice una de las armellas, y colóquela en el taquete.
- Page 10 15.- Tome uno de los rollos de alambre e inserte una de las puntas en la brida. Asegúrelo como se muestra en la figura (Fig. 14 y 15). Fig. 14 Fig. 15 ESPAÑOL-10...
- Page 11 16.- Estire el alambre hasta donde está localizada la armella. Inserte la punta a través de la armella y con el alambre completamente estirado, enróllelo, de tal forma que quede firmemente sujetado (Fig. 16, 17 y 18). Fig. 16 Fig. 17 Fig.
- Page 12 17.- Coloque el cable de la antena a un costado del tubo de la antena, para sujetarlo, utilice los cinchos suministrados (Fig. 19). 18.- Repita los pasos 2 al 17 para colocar las abrazaderas y las 3 armellas restantes de tal forma que la antena quede firmemente sujetada al techo (Fig.
-
Page 13: Póliza De Garantía
1.- Para hacer efectiva la garantía, presente ésta póliza y el producto, en donde fue adquirido o en Electrónica Steren S.A. de C.V. 2.- Electrónica Steren S.A de C.V. se compromete a reparar el producto en caso de estar defectuoso sin ningún cargo al consumidor. Los gastos de transportación serán cubiertos por el proveedor. - Page 14 Biólogo MaximIno Martínez No. 3408 Int. 3 y 4, San Salvador Xochimanca, México, D.F. 02870, RFC: SPE941215H43 ELECTRONICA STEREN DEL CENTRO, S.A. DE C.V. Rep. del Salvador 20 A y B, Centro, 06000, México. D.F. RFC: ESC9610259N4 ELECTRONICA STEREN DE GUADALAJARA, S.A.
- Page 16 IMPORTANT Before using your new TV aerial mounting kit, please read the following recommendation. • Clean only with a soft, dry cloth. FEATURES • The new TV aerial mounting kit allows you to make a professional, safe and quick installation. This kit includes all the necessary accessories to fix and anchor all kind of TV aerial.
- Page 17 CONTENT 4 eye bolts (1 3/4”) 3 omega brackets (1 ½”) 1 bridle (ultra pressure for attaching) 10 plastic wall anchor 8 cable clips (15cm each) 6 screws (1 ½”) 4 rolls of annealed wire (15m each) ENGLISH-03...
-
Page 18: Installation
INSTALLATION 1.- Locates the place where you want to install the antenna. 2.- With one of the brackets, mark - over the wall – a hole, in the place where you want to install the bracket (Fig. 1). 3.- After marking the holes, use a drill to make the holes (Fig. 2). Fig. - Page 19 4.- Then, insert a wall anchor inside of the hole. Use a hammer in order to place the wall anchor in a correct position (Fig. 3). 5.- Place the bracket over the hole and then screw it on tightly (only one side) (Fig.
- Page 20 6.- Place the bracket of the bridle in the tube (Fig. 5 & 6). Fig. 5 Fig. 6 ENGLISH-06...
- Page 21 7.- Then, insert the bridle through the tube and put together both pieces (bracket and bridle) (Fig. 7 & 8). 8.- Once the bracket is in the right position, use a screwdriver in order to adjust the size of the bracket (Fig. 9). Fig.
- Page 22 9.- Place the tube through the bracket in the wall. 10.- To fasten in, put a second screw in the bracket (Fig. 10). Fig. 10 11.- Locates a specific area to place the eye bolt, in order to fasten in the tube.
- Page 23 12.- After located the area, use a marker to indicate where you need to drill (Fig. 11). 13.- Insert a plastic wall anchor inside of the hole. Use a hammer to place it correctly (Fig. 12). 14.- Then, use one of the eye bolts an screw it in the wall anchor. Fasten it tightly (Fig.
- Page 24 15.- Take one of the wire rolls and insert one of the ends and insert it in one of the holes of the bridle. Then twist it as in the figure (Fig. 14 & 15). Fig. 14 Fig. 15 ENGLISH-10...
- Page 25 16.- Extend the wire until you reach the eye bolt, with the end of the wire, insert it across the eye bolt, roll it and twist it tightly to fasten the tube (Fig. 16, 17 & 18). Fig. 16 Fig. 17 Fig.
- Page 26 17.- Put the cable from the antenna aside of the tube. In order to fasten it, use the included cable clips (Fig. 19). 18.- Finally, repeat steps from 2 to 17, to place the rest of the brackets and the eye bolts, after the process, the antenna will be placed firmly (Fig.
-
Page 27: Warranty
Part number: MTR-100 Brand: Steren WARRANTY This Steren product is warranted under normal usage against defects in workmanship and materials to the original purchaser for one year from the date of purchase. CONDITIONS 1.- This warranty card with all the required information, invoice or purchase ticket, product box or package, and product, must be presented when warranty service is required. - Page 28 RETAILER INFORMATION Name of the retailer Address Product Brand Part number Serial number Date of delivery In case your product fails or have questions, please contact your nearest dealer. If you are in Mexico, please give a call to our Call Center. Call Center 01 800 500 9000...
Need help?
Do you have a question about the MTR-100 and is the answer not in the manual?
Questions and answers