Advertisement
Quick Links
INSTRUCCIONES DE MANEJO Y MONTAJE /
DOMINO 1100 RC
DOMINO 11XX, RC y otros modelos /
Sensor captador de movimientos para la detección de objetos incorporado en puertas automáticas.
Radar motion sensor unit for the detection of objects for automatic gates.
ADVERTENCIAS DE SEGURIDAD /
La unidad sólo se podrá utilizar con
tensión baja de protección, que
cumpla los requisitos Extra Low
Voltage (SELV) basados en los estándares de
seguridad recogidos en IEC 60950. La instala-
ción y el mantenimiento de la unidad sólo los
podrá realizar personal técnico cualificado.
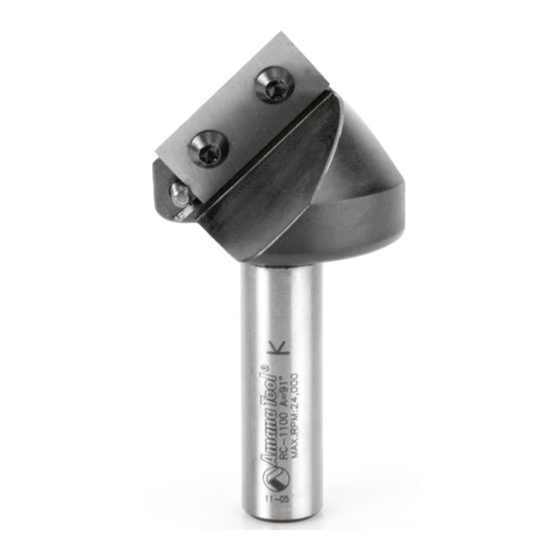
1. MONTAJE /
FITTING
1.1 APERTURA DE LA UNIDAD DEL SENSOR /
1.2 TALADRADO /
DRILLING
Pegar la plantilla que perfora en lugar y
perforar según las instrucciones
Stick the drilling template in place and drill
according to the instructions.
1.3 FIJACIÓN Y CONEXIÓN /
FASTENING AND CONNECTING-UP
1
2
3
1.4 OTROS MONTAJES POSIBLES /
OTHER INSTALLATION OPTIONS
Opción del programa de accesorios 4tec. Montaje
en el techo con soporte o montaje mural con
visera de protección contra la intemperie.
Optional accessory out of the accessory range.
Ceiling-mounting with mounting bracket or wall
fastening with weather-cap set.
1.5 AJUSTAR EL SENSOR /
SETTING UP THE RADAR SENSOR UNIT
1. Encender la unidad y esperar 10 segundos
(el LED parpadea rojo/verde) encastre
1. Switch on the unit and wait 10 seconds
(LED flashes red/green)
10 Sek./sec.
FITTING AND OPERATING INSTRUCTIONS
DOMINO 110X, other versions
SAFETY INFORMATION
The unit is only to be operated
with voltages that comply with the
Safety Extra-Low Voltage (SELV)
requirements in safety standards based on IEC
60950. This unit is only to be installed and
maintained by trained, qualified personnel.
OPEN THE RADAR MOTION SENSOR
Desde delante, tras el montaje!
Do not open the cover from top!
1 Alimentación CA/CC marrón
2 Alimentación CA/CC verde
3 relé principal
4 relé principal
Relé de vehículos
Relé de vehículos
1 Power supply AC/DC brown
2 Power supply AC/DC green
3 Main relay
4 Main relay
Vehicle relay
Vehicle relay
Fijar la placa base con los tornillos que se encuen-
tran en la carcasa, Para extraer y montar la electró-
nica, obsérvese el punto 2.4
Fasten the base plate with the screws contained in
the housing, to remove and insert the electronics,
observe the instructions in point 2.4
2. Ajustar el sensor / Comprobar los ajustes
sobrepasando el alcance ajustado
2. Adjust the radar sensor unit / Check
the setting by pacing out the distance
1.6 CERRAR LA UNIDAD DEL SENSOR /
Introducir la cubierta desde la parte superior y presionar hasta que
Insert the cover from the top and press until it clicks in place
1
2. AJUSTES /
SETTINGS
2.1 MANDOS /
OPERATING ELEMENTS
1) Antena
2) Receptor de infrarrojos
3) LED de emisión (IR)
4) Relé principal
5) Terminal de rosca (alimentación/relé principal)
6) Tecla / MENÚ
7) Tecla / VALOR
8) LED
1) Antenna
2) IR-Receiver
3) IR-Transmitter
4) Terminal (power supply / main relay)
5) Terminal (vehicle relay)
6) Button / Menu
7) Button / Value
8) LED
blanco
amarillo
2.2 ALCANCE DE LA DETECCIÓN
gris
DIMENSION OF THE DETECTION AREA
rosa
Altura de montaje /
Fitting height: 5m
white
yellow
grey
pink
2.3 SUSTITUCIÓN DE LA ANTENA /
Opción del programa de accesorios 4tec.
Simplemente sustituyendo la antena se puede
modificar el alcance de detección. Para sustitu-
irla se extraerá con precaución utilizando
dos dedos y seguidamente se montará la
antena nueva.
To change the antenna, withdraw it carefully
with two fingers and then insert the new
antenna.
Componentes sensibles
a la electroestática.
Static sensitive devices.
No se deben utilizar metálicas para
sustituir la antena.
To change the antenna
do not use any metallic tools!
CLOSING THE RADAR SENSOR UNIT
2
1
2
4
Ángulo de inclinación 30°
Altura de montaje /
Fitting height: 7m
y sensibilidad máx.
Detection area angle 30°
Sensitivity max.
CHANGE OF THE ANTENNA
ESPAGNOL
ENGLISH
3
click
3
5
8
7
6
Advertisement

Summary of Contents for Domino 1100 RC
- Page 1 ESPAGNOL ENGLISH DOMINO 1100 RC DOMINO 11XX, RC y otros modelos / DOMINO 110X, other versions Sensor captador de movimientos para la detección de objetos incorporado en puertas automáticas. Radar motion sensor unit for the detection of objects for automatic gates.
- Page 2 Gate control unit 1) Relé principal main relay 2) Relé de vehículos vehicle relay Domino 1100 RC adelante (hacia el sensor) atrás (alejándose del sensor) forwards (towards the radar sensor unit) backwards (away from the radar sensor unit) - la persona se aproxima person approaches Ignorancia del tráfico transversal / Passing traffic...
- Page 3 3. AJUSTE CON TECLAS PROGRAMABLES / CONFIGURATION WITH PROGRAMMING BUTTONS 3.1 Modo de programación / Programming mode En el modo de programación se puede ajustar el sensor por medio de dos teclas. Los posibles The programming mode allows to adjust the radar sensor unit with two push buttons. All settings ajustes y valores pueden consultarse en la tabla de programación.
- Page 4 Domino 102X RC address 2 output hold time output hold time output hold time output hold time El sensor el dominó 1100 RC eligen Domino 105X RC Domino 105X RC address 3 Domino 105X RC La dirección eligen address 3...
-
Page 5: Fault Rectification
Cross traffic will be fade out. The settings low, medium and high allow to set the sensor accurate according to the localization. 4 TEC AG 4 TEC AG Domino 1100 RC 4 TEC AG Domino 1100 RC Domino 1100 RC... - Page 6 8. VOLUMEN DE SUMINISTRO / SCOPE OF DELIVERY 9. ACCESORIOS OPCIONALES / OPTIONAL ACCESSORIES - Domino 1100 - Domino 1100 - Soporte para el montaje en el techo - Ceiling-mounting bracket - Cable de conexión - Connecting cable - Juego de visera de protección contra la...
Need help?
Do you have a question about the 1100 RC and is the answer not in the manual?
Questions and answers