
Summary of Contents for Avital 6276
- Page 1 Avital 6276 Blood Glucose Monitoring System No Coding Required Model:6276 USER GUIDE Rev.date:06/2016 6276ET-M01A4...
- Page 2 Please refer to safety-related notes in the manual accompanying this instrument. Consult instructions for use. Keep away from sunlight. Authorised representive in the european community. Manufacturer Important Notice to Reader of this Manual This manual is written for the Avital 6276 meter...
-
Page 3: Table Of Contents
1. Contents Section Topic Page 1.Table of Contents 2.Introduction 3.Appearance and Key Functions of the meter 4.A lternate Site Testing 5. Safety Information 6. Quick Testing Instructions Preparing for Testing 7.Installing the Battery 8.S ettings (Date/Time/Alarm/ 11-14 Memory Deletion /Voice volume) 9.Running a Control Solution Test 15-16 Blood Testing... -
Page 4: Introduction
The Avital 6276 Blood Glucose Monitoring System is not intended for the diagnosis of or screening for diabetes mellitus, nor for use with neonates. - Page 5 You may purchase any control solutions that you need from your system provider. The Avital 6276 Glucose Meter uses Avital 6276 Glucose Test Strips. Neither the meter nor the test strips will work when used with any other brand of glucose products.
-
Page 6: Appearance And Key Functions Of The Meter
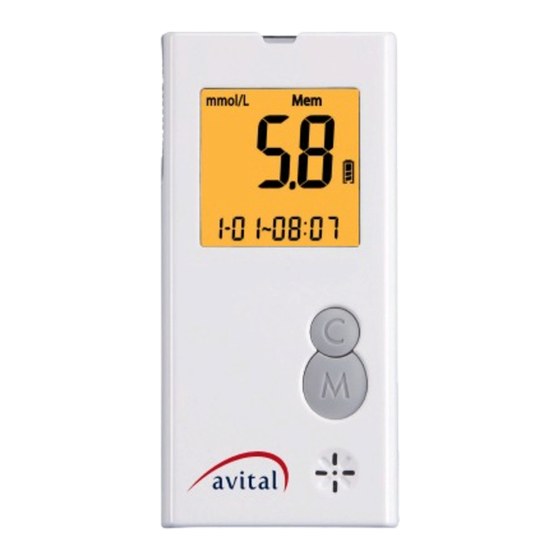
3. Appearance and Key functions of the meter 1.Test strip slot - When the strip is inserted into the slot, the meter will automatically turn on. 2. LCD Display - Guide you through the test using symbols and simple messages. 3. -
Page 7: A Lternate Site Testing
4. Alternate Site Testing (AST) What is AST? AST is the sampling from anatomical sites (parts of the body) other than the fingertip (i.e. palm) to check the blood glucose levels. This system allows you to test on the palm with the equivalent results to fingertip testing. - Page 8 Testing Procedure for AST 1.Please unscrew the lancing device by turning the end cap counter clockwise. A clear cap will come with the package of a meter kit or a lancing device. The clear cap on the lancing device will make it easy for you to get a drop of blood for AST.
- Page 9 6.Massage the selected area gently to increase blood flow to the puncture site. Clean the test location with an alcohol wipe or with soap and water. 7.O pen the test strip vial. Take one test strip out of the vial and quickly cover the vial to keep air out.
-
Page 10: Safety Information
5. Safety Information Please use this device only for the intended use described in this user guide. Before using this system to test your blood glucose please read the instructions carefully and practice the test when you first use this system. Do a quality check on the system following the instructions and consult with your healthcare professionals for questions or problems. -
Page 11: Quick Testing Instructions
6. Quick Testing Instructions (For detailed instructions start on page 15 for Control Solutions and page for Blood Testing.) 1. With the meter turned off, insert a new test strip into the meter. A blinking blood icon will be displayed on the screen. 2. -
Page 12: Installing The Battery
7. Installing the battery 1. Turn off the meter by pressing the “M” button and hold for 2 seconds before replacing the batteries. Slide down the battery cover on the back of the meter by pushing the cover in the direction of the arrow and put the cover aside. -
Page 13: Settings
8. Settings ( Date / Time / Alarm / Memory Deletion / Voice Volume) The LCD screen will show as below: (1)Measurement Units (2)Memory (3)Setting (5)Blood drop icon (6)Battery Symbol (7)Day Average (4)Test flag cotr (8)Alarm Reminder (9)Month (12)Minute (10)Day (11)Hour 1.Appears with the test result or in mmol/L. - Page 14 Set the Year - To go into the “Setting Mode” you must press and hold down the M Button. Then release the M Button and the first number on the screen will be the year. Press C key to adjust the year until the desired year is displayed and then press the ...
- Page 15 Set the Hour - Press C key to adjust the hour until the desired hour appears on the screen and then press the M key to confirm the setting. You will then see the minute segment is flashing on the screen. Set the Minute - Press C key to adjust the minute until the desired minute appears on the screen and then press the M key to...
- Page 16 Delete Memory - Press C key to toggle between a flashing “dEL” for memory deletion or a non-flashing “dEL”. If you want to delete all memory, press M key while the “dEL” is flashing. If you do not want to delete all memory, press M key when the“dEL”...
-
Page 17: Running A Control Solution Test
9. Running a Control Solution Test IMPORTANT: Always make sure you press C key for Control Solution test, otherwise the control solution test result will be stored in the memory, and affect your“AVG”results. 1. Insert a strip into the meter. A blinking blood icon will be displayed on the screen. - Page 18 Control Solution mode.(If you perform the blood test in Control Solution mode, the test result will not be stored in the memory.) 2. Use only SuperCheck2 Control Solution with Avital 6276 Glucose Meter. 3. SuperCheck2 Control Solutions are used to check that the meter and the test strips are working together as a system and that you are performing the test correctly.
-
Page 19: Running A Blood Glucose Test
10.Running a Blood Glucose Test 1. Please unscrew the lancing device by turning the end cap counter clockwise. 2. Insert a new lancet firmly into the lancet holder. 3. Twist off the protective cover of the lancet. 4. Replace and twist the adjustable depth cap onto the body of the lancing device until you hear the click. - Page 20 6. Open the test strip vial. Take one new test strip out of the vial and recap the vial quickly and firmly. 7. While the meter is off, insert a new test strip into the meter's strip slot with the contact bars facing upwards.
- Page 21 9. Apply a small blood drop to the front edge of the test strip, and the blood should be pulled into the confirmation window before the meter begins to count down. Do not push your finger against the test strip or try to apply a smeared blood sample.
-
Page 22: Recalling The Memory And Viewing The Average
11. Recalling the Memory and Viewing the Average A. Using the Meter Memory Your blood sample test result will be automatically stored in the meter's memory. The meter can store up to 500 of the most recent test results. You can also view the average of test results for various periods of 7, 14, 28, 60 and 90 days. - Page 23 C. Viewing the Average (AVG) of Test Data in Memory 1. To display the average (AVG) test result, please turn the meter off. Press C and M keys at the same time and hold for about 2 seconds, wait for the AVG to be displayed on the screen, then release the two buttons.
-
Page 24: Expected Values
Before eating < 5.6 mmol/L < 7.8 mmol/L Two hours after meals Avital 6276 meter gives plasma equivalent results. 13.Performance Evaluation Data System Accuracy (method comparison) Avital 6276 Capillary blood study: In a study conducted with the... -
Page 25: Transmitting Results
14.Transmitting Results Note: Avital 6276 Glucose Meter allows you to transfer the test results stored in its memory to your personal computer. However, you will need to order software and a Data Download Cable separately from your distributor. The software and its data download procedure available at distributor and on internet. -
Page 26: Troubleshooting
16.Troubleshooting : The following is a summary of all the Error Messages. These messages help to identify certain problems, but do not appear in all cases when a problem has occurred. Improper use may cause an inaccurate result without producing an error message or a symbol. In the event of a problem, refer to the information in the table under Solution. - Page 27 Problem Possible Cause Solution The meter is operating Repeat the test after the in an ambient The meter displays meter and strip are placed in temperature below a warmer environment and an E_1 error or 50 which is °C °F allow the meter to warm up message.
-
Page 28: Customer Service
17. Customer Service If you need assistance with your Avital 6276 Glucose Monitoring System, please contact: E.T.T.M Ltd 2151 Fot Vadas dulo 85/d Tel: +36 30-8820-601 Email: ettminfo@gmail.com For questions related to your health condition, please call your doctor or healthcare professional... -
Page 29: Limitations
18. Limitations 1. Do not use for neonatal blood glucose testing. 2.Hematocrit in the range of 32~60 % does not affect the glucose results. If you do not know your hematocrit level, consult your healthcare professional. 3.Hemoglobin levels of 3.13 mmol/L (20 g/dL) did not interfere with blood glucose test results. -
Page 30: Specifications
60 seconds if there is no strip inserted. Traceability of glucose monitoring system: The accuracy of Avital 6276 Blood Glucose System was assessed by comparing blood results obtained by patients with those obtained using a YSI Model 2300 Glucose Analyzer, which is calibrated by YSI calibrator solution, refer to NIST SRM (standard reference material) # 917A Clinical Dextrose. -
Page 31: Ordering Supplies
E.T.T.M Ltd 2151 Fot Vadas dulo 85/d Tel: +36 30-8820-601 21. Warranty Information Your Avital 6276 Glucose Meter is warranted to be free of defects in materials and workmanship for one year from the date of the original purchase. This warranty does not cover device failure due to owner misuse or negligence, or normal wear and tear. - Page 32 Avital 6276 Sistem de testare a glicemiei Nu necesită codare Model:6276 GHID DE UTILIZARE Data reviziei:06/2016 6276ET-M01A4...
- Page 33 Vă rugăm să respectați indicațiile de siguranță din ghidul de utilizare. Citiți instrucțiunile de utilizare. A se păstra ferit de lumina soarelui. Reprezentant autorizat în Comunitatea Europeană. Producător Anunţ important către cititorii acestui ghid Acest Ghid de utilizare descrie utilizarea corespunzătoare a glucometrului Avital 6276...
- Page 34 1. CUPRINS Capitol Titlu Pagină 1.CUPRINS 2.FAMILIARIZAREA CU SISTEMUL DE TESTARE A GLICEMIEI 3.ASPECTUL EXTERIOR AL GLUCOMETRULUI ȘI PRINCIPALELE FUNCŢII ALE ACESTUIA 4. TESTAREA EFECTUATĂ PE LOCURI ALTERNATIVE DE PE CORP (AST) 5. INFORMAŢII DE SIGURANŢĂ 6. INSTRUCŢIUNI PRIVIND TESTAREA RAPIDĂ Pregătirea Pentru Testare 7.INTRODUCEREA BATERIEI 11-14...
-
Page 35: Familiarizarea Cu Sistemul De Testare A Glicemiei
2. Familiarizarea cu sistemul de testare a glicemiei Utilizare/ Măsuri de precauţie privind utilizarea Glucometrul Avital 6276 a fost conceput pentru măsurarea cantitativă a glicemiei în sângele total capilar proaspăt pentru probe prelevate din deget și antebraţ. Este destinat utilizării de către personalul medical și de către persoanele cu diabet (autotestare la domiciliu) având scopul... - Page 36 Setul iniţial al Sistemului de testare a glicemiei Avital 6276 cuprinde următoarele: 1.Glucometru Avital 6276 + 2 baterii AAA 2.Ghid de utilizare 3.Husă 4.Benzi de testare a glicemiei Avital 6276 5.Lanţete pentru prelevare probe 6.Dispozitiv pentru înţepare 7.Instrucţiuni de utilizare pentru benzile de testare „Setul glucometru”...
-
Page 37: Aspectul Exterior Al Glucometrului Și
3. Aspectul exterior al glucometrului și principalele funcţii ale acestuia 1. Fanta pentru teste – La introducerea în orificiu a benzii de testare, glucometrul va porni automat. 2. Afișaj LCD – Vă ghidează prin procesul de testare utilizând simboluri și mesaje simple. 3. -
Page 38: Testarea Efectuată Pe Locuri Alternative De Pe Corp (Ast)
4. Testarea efectuată pe locuri alternative de pe corp (AST) Ce este AST? AST înseamnă prelevarea de probe pe locuri anatomice, altele decât degetele (adică pe antebraţ), în vederea testări glicemiei. Acest sistem de testare permite realizarea testării pe antebraţ, rezultatele fiind echivalente cu cele obţinute în urma testării pe degete. - Page 39 Testarea cu metoda AST 1. Răsuciţi capacul dispozitivului de înţepare, în direcţia acelor de ceasornic.. În interiorul capei se va vedea un spaţiu gol unde trebuie introdusă lanţeta pentru prelevarea probei. Aceasta va ușura prelevarea probei pentru procedura AST. 2.Introduceţi noua lanţetă în suportul pentru lanţete.
- Page 40 6. Masaţi ușor zona selectată pentru a stimula circulaţia sanguină. Ștergeţi suprafaţa cu un tampon umectat cu alcool sau spălaţi cu apă și săpun. 7. Desfaceţi folia care conţine banda de testare. Scoateţi o bandă și reînchideţi etanș folia de protecţie. 8.
-
Page 41: Informaţii De Siguranţă
5. Informaţii de siguranţă Folosiţi dispozitivul doar în scopurile prevăzute și detaliate în ghidul de utilizare. Înainte de utilizarea acestui sistem de testare a glicemiei, citiţi cu atenţie instrucţiunile de utilizare și exersaţi utilizarea glucometrului înainte de prima utilizare. Efectuaţi o evaluare a calităţii sistemului urmărind instrucţiunile în acest sens. -
Page 42: Instrucţiuni Privind Testarea Rapidă
6. Instrucţiuni privind testarea rapidă (Începeţi cu instrucţiunile detaliate la pagina 15 cu Soluţiile de control și la pagina 17 cu Testul de sânge.) 1.Împingeţi o bandă de testare înglucometrul . Imediat va apărea simbolul intermitent picătură. 2.Înţepaţi-vă degetul și lăsaţi să se formeze o picătură... -
Page 43: Introducerea Bateriei
7. Introducerea bateriei 1.Opriţi glucometrul prin apăsarea butonului „M” și menţineţi-l așa timp de 2 secunde înainte de înlocuirea bateriilor. Glisaţi în jos capacul compartimentului bateriilor prin apăsarea acestuia în direcţia săgeţii. Îndepărtaţi-l. 2.Înlăturaţi cele două baterii folosite. 3.Introduceţi 2 baterii noi respectând marcajele +/-. -
Page 44: Setări
8. Setări (Limba/ Data / Ora / Alarma / Unitate de măsură / Golirea memoriei / Volum) Afișajul LCD arată următoarele: (1) Unitatea de măsură (2) Memorie (3) Setări (5)Pictograma picătură (6)Simbolul bateriei (7)Media zilnică (4)Indicator al testului cotr (8)Alarma de reamintire (9)Luna (12)Minut... - Page 45 Apăsaţi și ţineţi apăsat butonul M pentru 2 secunde pentru a porni aparatul.Setarea anului – Pentru setarea anului apăsaţi butonul C până când apare anul dorit. Pentru a salva opţiunea selectată apăsaţi butonul M. La apăsarea butonului C aveţi ...
- Page 46 Setarea orei – Pentru setarea orei apăsaţi butonul C până când apare ora dorită. Pentru a salva opţiunea selectată apăsaţi butonul M. Apoi, pe ecranul LCD va lumina intermitent segmentul „minut”. Setarea minutului – Pentru setarea minutului apăsaţi butonul C până când apare minutul dorit.
- Page 47 Golirea memoriei – Pentru golirea memoriei apăsaţi butonul C pentru schimbarea între „dEL” intermitent și „dEL” afișat încontinuu. În eventualitatea în care doriţi să ștergeţi întreaga memorie apăsaţi butonul M atunci când semnul „dEL” este afișat intermitent. Dacă nu doriţi ștergerea întregii memorii apăsaţi butonul M când semnul „dEL”...
- Page 48 9. Efectuarea testului de verificare IMPORTANT: Asiguraţi-vă că pentru efectuarea testului control apăsaţi întotdeauna tasta C, altfel rezultatul se stochează în memorie și influenţează rezultatele medii AVG. 1.Introduceţi o bandă de testare în aparat și pe ecran apare simbolul picăturii de sânge cu afișare intermitentă.
- Page 49 în modul de testare control, pentru că rezultatul nu se va stoca în memoria dispozitivului. 2.Folosiţi doar soluţii de control Supercheck 2 împreună cu aparatul Avital 6276 pentru măsurarea glicemiei. 3.Supercheck 2 se folosește doar pentru verificarea funcţionării aparatului și a benzilor de testare.
-
Page 50: Realizarea Testării Nivelului De Glucoză Din Sânge
10.Realizarea testării nivelului de glucoză din sânge 1. Desșurubaţi lansatorul și scoateţi capacul 2. Puneţi o lansetă în lansator 3. Desfaceţi capacul de protecţie al lansetei 4. Înșurubaţi pe lansator capacul conform garficului până auziţi un click. Când capacul este fixat corespunzător, săgeata și butonul de acţionare sunt aliniate. - Page 51 6. Deschideţi flaconul cu benzile de testare. Închideţi imediat capacul flaconului după scoaterea benzii de testare. 7. Introduceţi o bandă în zona de testare a glucometrului aflat în stare oprită. Glucometrul va porni împreună cu afișaj complet. Imediat va apărea simbolul intermitent picătură.
- Page 52 9. Aplicaţi o picătură de sânge pe partea superioară a benzii de testare. Sângele trebuie tras în căsuţa de verificare înainte ca aparatul să înceapă numărătoarea inversă. Nu apăsaţi cu degetul pe bandă și nu utilizaţi o probă de sânge cu impurităţi. 10.
-
Page 53: Accesarea Memoriei Și Vizualizarea Valorilor Medii
11. Accesarea memoriei și vizualizarea valorilor medii A.Utilizarea memoriei glucometrului Salvarea imediată a rezultatelor testării în memoria glucometrului. Glucometrul poate stoca cele mai recente 500 rezultate. Puteţi consulta și media rezultatelor dumneavoastră pentru ultimele 7, 14, 28, 60 și 90 zile. Rezultatele testului cu soluţia de control nu sunt salvate în memorie. - Page 54 C.Vizualizarea mediei (AVG) rezultatelor de testare din memorie. 1. Pentru afișarea mediei (AVG) rezultatelor de testare opriţi aparatul. Menţineţi apăsate simultan butoanele C și M timp de aproximativ 2 secunde și așteptaţi până ce apare semnul AVG pe afișaj. Apoi eliberaţi butoanele. Glucometrul va fi în modul medie afișând semnul „AVG”.
-
Page 55: Intervalul De Valori Standard¹
13.DATE PRIVIND PERFORMANŢA Acurateţea sistemului: (comparaţia metodelor) Test din sânge capilar: Testarea cu soluţia control Avital a dus la obţinerea următoarelor rezultate la pacienţi: Valori individuale: Datele din întregul interval raportabil au întrunit criteriile de acceptabilitate cu >95% dintre valorile individuale fiind încadrate în ±0,83 mmol/L (±15 mg/dL) din valorile de referinţă... -
Page 56: Transferul Rezultatelor
14.Transferul rezultatelor Observaţie: „Glucometrul Avital 6276 permite transferul rezultatelor de teste stocate în memorie către un calculator personal. Pentru acest lucru trebuie comandat software-ul special împreună cu un cablu de transfer de date de la distribuitor.” Software-ul și procedura de descărcare a datelor sunt disponibile la distribuitor si pe internet. -
Page 57: Depanare
16. Depanare În cele ce urmează veţi găsi un rezumat al tuturor mesajelor de eroare. Aceste mesaje ajută la identificarea anumitor probleme, însă acestea nu vor apărea de fiecare dată când există o problemă. Folosirea necorespunzătoare poate duce la rezultate imprecise fără ca pe ecran să apară un mesaj sau simbol de eroare. - Page 58 Problema Cauza posibilă Soluţie Repetaţi testarea după ce Glucometrul este folosit la o temperatură glucometrul și banda de testare Glucometrul de sub 10°C sau 50°F, vor fi duse într-un mediu mai afișează mesajul aceasta fiind pragul cald, și lăsaţi ca aparatul să se de eroare E_1.
-
Page 59: Serviciul Pentru Clienţi
17. Serviciul pentru clienţi Dacă aveţi nevoie de ajutor cu privire la sistemul de testare a glicemiei Avital 6276, contactaţi importatorul: E.T.T.M LTD 2151 FOT VADAS DULO 85/D Ungaria Tel: +36 30-8820-601 Email: ettminfo@gmail.com În ceea ce privește nelămuririle privind starea dumneavoastră... -
Page 60: Restricţii
18. Restricţii 1.Aparatul nu poate fi folosit la nou-născuţi. Nu folosiţi aparatul pentru testarea glicemiei la nou-născuţi. 2.Numărul de hematocrite: Hematocritele cu o valoare de 32–60% nu influenţează rezultatul testării glicemiei. Dacă nu vă cunoașteţi nivelul de hematocrite adresaţi-vă unui cadru medical. 3.Valorile hemoglobinei Valorile de hemoglobină... -
Page 61: Specificaţii
20 secunde când nu este introdusă o bandă de testare. Posibilitatea de monitorizare a sistemului de testare a glicemiei: Precizia Sistemului de testare a glicemiei Avital 6276 a fost evaluată în urma comparaţiei rezultatelor obţinute de la pacienţi care au folosit un glucometru de tip YSI, modelul 2300, calibrat cu soluţia de... -
Page 62: Comanda Accesorii
E.T.T.M LTD 2151 FOT VADAS DULO 85/D Ungaria Tel: +36 30-8820-601 21. Informaţii privind garanţia Pentru Glucometrul Avital 6276 garantăm lipsa defectelor de material și de fabricaţie timp de un an de la data cumpărării iniţiale. Această garanţie nu acoperă defecţiunile cauzate de folosirea necorespunzătoare sau neglijentă... - Page 63 Avital 6276 Vércukor Ellenőrző Rendszer Nincs szükség kódolásra Modell:6276 FELHASZNÁLÓI ÚTMUTATÓ Átdolgozás időpontja:06/2016 6276ET-M01A4...
- Page 64 Kérjük nézze meg a biztonsághoz kapcsolódó megjegyzéseket a műszerhez tartozó kézikönyvben. Nézze meg a használati utasítást. Tartsa napfénytől távol. Megbízott képviselő az Európai Közösségben. Gyártó Fontos közlemények a kézikönyv olvasójának Ez a használati útmutató az Avital 6276 vércukorszintmérő készülékhez készült...
- Page 65 1. TARTALOM Bekezdés Téma Oldal 1.TARTALOM 2.BEVEZETÉS A RENDSZERBE 3.A MÉRŐMŰSZER KÜLSŐ MEGJELENÉSE ÉS LEGFONTOSABB FUNKCIÓI 4. ALTERNATÍV HELYEN VÉGZETT TESZTELÉS (AST) 5. BIZTONSÁGI INFORMÁCIÓK 6. GYORSTESZTRE VONATKOZÓ UTASÍTÁSOK ELŐKÉSZÜLETEK VÉRCUKORSZINTMÉRÉSHEZ 7.AZ ELEM BESZERELÉSE 11-14 8. BEÁLLÍTÁSOK 9 ELLENŐRZŐOLDAT TESZT VÉGZÉSE 15-16 Vércukorszint mérés 17-19...
-
Page 66: Bevezetés A Rendszerbe
2. Bevezetés a rendszerbe Tervezett felhasználás / Figyelmeztetések a felhasználásra vonatkozóan Az Avital 6276 Vércukor Ellenőrzőrendszert az ujjból és alkarból vett friss, teljes hajszálérvérben található vércukor mennyiségi mérésére tervezték. Egészségügyi szakemberek és cukorbeteg emberek otthoni használatára tervezték a cukorbetegség ellenőrzési program hatékonyságának figyelemmel kísérésének segítésére. - Page 67 Az Avital 6276 Vércukor Ellenőrző rendszer indulókészlete a következőket foglalja magában: 1.Avital 6276 vércukormérő 2db AAA elemmel 2.Felhasználói Útmutató 3.Hordozótok 4.Avital 6276 vércukormérő tesztcsíkok (10db) 5.Lándzsák 6.Ujjbegyszúró eszköz 7.Melléklet a tesztcsíkokhoz Nem található ellenőrzőoldat a „Mérőműszer készletben”. Ha Önnek szükséges ellenőrzőoldat, akkor megvásárolhatja a forgalmazótól.
-
Page 68: A Mérőműszer Külső Megjelenése És Legfontosabb Funkciói
3. A mérőműszer külső megjelenése és legfontosabb funkciói 1. Tesztcsík nyílás – Amikor a csíkot behelyezi a nyílásba, a mérőműszer automatikusan bekapcsol. 2. LCD kijelző – Végigvezeti Önt a teszten szimbólumokat és egyszerű üzeneteket használva. 3. M billentyű – Teljesítménykapcsoló (Be/Ki), a memória visszahívó... -
Page 69: Alternatív Helyen Végzett Tesztelés (Ast)
4. Alternatív helyen végzett tesztelés (AST) Mi az AST? Az AST az ujjhegyen kívüli (azaz alkar) anatómiai helyekről (testrészekről) történő mintavétel a vércukorszint ellenőrzéséhez. Ez a rendszer lehetővé teszi, hogy a tesztet az alkaron végezze el,mely egyenértékű eredményeket ad az ujjhegyen végzett teszteléssel. Az AST esetén fontos korlátok állnak fenn. - Page 70 Teszteljárás AST esetén 1.Kérjük csavarja el az ujjbegyszúró készülék záró sapkáját, az óramutató járásával megfelelő irányban. Egy jól látható üres rész lesz látható a sapka belsejében, ahova a vérvételi lándzsát kell behelyezni. Ez megkönnyíti a mintavételt az AST eljáráshoz. 2.Helyezze be az új vérvételi lándzsát a lándzsatartó...
- Page 71 6.A kiválasztott területet finoman masszírozza meg, hogy jobban beinduljon a vérkeringés a szúrási résznél. Alkoholos fertőtlenítő kendővel vagy szappanos vízzel törölje át. 7.Nyissa ki a tesztcsíkot tartalmazó fiolát. Vegyen ki belőle egyet és ezt követően azonnal zárja vissza légmentesen zárható tesztcsík fiolát.
-
Page 72: Biztonsági Információk
5. Biztonsági információk Csak a felhasználói útmutatóban részletezett, tervezett használatra alkalmazza az eszközt. Mielőtt a vércukorszintje ellenőrzésére használja ezt a rendszert, alaposan olvassa el az utasításokat és gyakorolja a tesztet, amikor először használtja a rendszert. Végezzen minőségellenőrzést a rendszeren követve az utasításokat, és beszélje meg a kérdéseit és problémáit egy egészségügyi szakemberrel. -
Page 73: Gyorstesztre Vonatkozó Utasítások
6. Gyorstesztre vonatkozó utasítások (A részletes utasításokat kezdje az Ellenőrzőoldatokkal és a Vérteszttel). 1.Kikapcsolt mérőműszernélhelyezzen új tesztcsíkot a mérőműszerbe, ekkor egy villogóvércseppikon jelenik meg aképernyőn. 2.Szúrja meg az ujját és hagyja, hogy vércsepp képződjön. 3.Vigye a vércseppet a tesztcsík elülső szélére, amikor a vércsepp ikon még mindig villog a mérőműszeren. -
Page 74: Az Elem Beszerelése
7. Az elem beszerelése 1.Kapcsolja ki a mérőműszert az „M” gombot megnyomva és tartsa úgy 2 másodpercig az elemek cseréje előtt. Csúsztassa le az elemet takaró burkolatot a mérőműszer hátán a burkolatot a nyíl irányába tolva, és tegye félre a burkolatot. 2.Távolítsa el a két használt elemet. -
Page 75: Beállítások
8. Beállítások (Nyelv / Dátum / Idő / Riasztás / Mértékegység / Memóriatörlés / Hangerő) Az LCD képernyő az alábbiakat mutatja: (1) Mértékegységek (2) Memória (3) Beállítás (5)Vércseppikon (6)Elem szimbólum (7)Napi átlag (4) Tesztjelző cotr (8)Figyelmeztető emlékeztető (9)Hónap (12)Perc (10)Nap (11)Óra 1. - Page 76 Az év beállítása – Tartsa lenyomva az M- gombot 2 mp-ig a készülék bekapcsolásához. Nyomja meg a C billentyűt az év állításához, amíg a kívánt év meg nem jelenik, és aztán nyomja meg az M billentyűt az évbeállítás jóváhagyásához. ...
- Page 77 Az óra beállítása - Nyomja meg a C billentyűt az óra állításához, amíg a kívánt óra meg nem jelenik, és aztán nyomja meg az M billentyűt az órabeállítás jóváhagyásához. Aztán a perc szegmensét látja villogni a képernyőn. A perc beállítása - Nyomja meg a C billentyűt a perc állításához, amíg a kívánt perc meg nem jelenik, és aztán nyomja meg az M billentyűt a percbeállítás jóváhagyásához.
- Page 78 Memória törlése – Nyomja meg a C billentyűt a villogó „dEL” vagy a nem villogó „dEL” közötti váltáshoz a memóriatörléshez. Amennyiben az egész memóriát törölni akarja, nyomja meg az M billentyűt, miközben a „dEL” villog. Amennyiben nem az egész memóriát akarja törölni, nyomja meg az M billentyűt, amikor a „dEL”...
-
Page 79: Ellenőrzőoldat Teszt Végzése
9. Ellenőrzőoldat teszt végzése FONTOS: Mindig győződjön meg róla, hogy a C billentyűt nyomja meg az ellenőrzőoldat teszthez, különben az ellenőrzőoldat teszt eredményét a memóriában tárolja, és befolyásolja az „AVG” (átlag) eredményeket. 1. Helyezzen egy csíkot a mérőműszerbe és egy villogó vércseppikon jelenik meg a képernyőn. - Page 80 üzemmódban. (Ha a vérvizsgálatot ellenőrzőoldatot üzemmódban végzi, a teszteredményt nem tárolja a memóriában.) 2. Csak Supercheck 2 ellenőrzőoldatot használjon az Avital 6276 vércukormérőhöz. 3. A Supercheck 2 ellenőrzőoldatokat használjuk annak ellenőrzésére, hogy a mérőműszer és a tesztcsíkok együtt működnek-e egy rendszerként, és megfelelően végzi-e a tesztet.
-
Page 81: Vércukorteszt Végzése
10.Vércukorteszt végzése 1. Csavarja szét az ujjbegyszúró eszközt és húzza le zárósapkát. 2. Helyezzen szilárdan egy új lándzsát a lándzsatartóba. 3. Csavarja le a lándzsa védőkupakját. 4. Csavarja rá az ujjbegyszúróra a zárósapkáját az ábra szerint kattanásig. Amikor a zárósapka megfelelően rögzült a nyíl és a kioldó... - Page 82 6. Nyissa ki a tesztcsíkok fioláját. Vegyen ki egy új tesztcsíkot az üvegből, és zárja gyorsan és biztosan vissza a fiolát. 7. Miközben a mérőműszer ki van kapcsolva, helyezzen egy tesztcsíkot a mérőműszer tesztcsík nyílásába a megfelelő irányban. A mérőműszer bekapcsol teljes képernyőkijelzéssel.
- Page 83 9.Vigyen egy kis vércseppet a tesztcsík elülső szélére, és a vért a ablakocska behúzza, mielőtt a mérőműszer megkezdi a visszaszámlálást. Ne nyomja az ujját a tesztcsíknak, és ügyeljen rá , hogy a vérminta ne szennyeződjön be. 10. A mérőműszer elkezd visszaszámolni 6 másodpercről, és a teszteredmény megjelenik a képernyőn.
-
Page 84: A Memória Visszahívása És Az Átlag Megtekintése
11. A memória visszahívása és az átlag megtekintése A.A mérőműszer memóriájának használata A vérminta teszteredményeit a készülék automatikusan a memóriába tárolja. A mérőműszer max. 500 legújabb teszteredményt tudja tárolni, Megnézheti a teszteredmények átlagát is különböző 7, 14, 28, 60 és 90 napos időszakokra. Az ellenőrzőoldatos teszteredményeket nem tárolja a memóriába. - Page 85 C. A memóriában található tesztadatok átlagának (AVG) megtekintése 1. Az átlagos (AVG) teszteredmény megjelenítéséhez kapcsolja ki a mérőműszert. Nyomja meg a C és M billentyűket egyszerre és tartsa úgy kb. 2 másodpercig, várjon, amíg az AVG megjelenik a képernyőn, aztán engedje fel a két gombot. A mérőműszer átlag üzemmódban lesz az „AVG”-t mutatva.
-
Page 86: Várható Értékreferencia¹
A Avital 6276 mérőműszer plazma-ekvivalens eredményeket ad. 13.Teljesítmény értékelési adatok Rendszer pontosság: (módszer összehasonlítás) Kapilláris vér teszt: Az Avital kontrol oldat betegeken való tesztelése során az alábbi eredményeket kaptuk.Az mért adatok fekvése megegyezik a mérési szempontok által alátámasztott skálának. Az egyedi értékek: >95 % ±0,83 mmol/L (±15mg/dL) közé... -
Page 87: Az Eredmények Továbbítása
14.Az eredmények továbbítása Megjegyzés: „Az Avital 6276 Vércukormérő lehető teszi a memóriában tárolt teszteredmények átvitelét a személyi számítógépre. Ehhez azonban külön rendelni kell egy szoftvert és adatletöltő kábelt a forgalmazótól.” A szoftver és az adatletöltési eljárás a forgalmazónál és az interneten áll rendelkezésre. -
Page 88: Hibaelhárítás
16. Hibaelhárítás Az alábbiakban az összes hibaüzenet összegzését találja. Ezek az üzenetek segítenek azonosítani bizonyos problémákat, de nem minden esetben jelennek meg, amikor probléma fordul elő. A nem megfelelő használat pontatlan eredményt okozhat anélkül, hogy hibaüzenet vagy szimbólum keletkezne. Probléma esetén lásd a táblázatban a Megoldás címszó... - Page 89 Probléma Lehetséges ok Megoldás Ismételje meg a tesztet, miután A mérőműszer 10°C vagy 50°F alatti hőmérséklet a mérőműszer és a csík A mérőműszer E_1 alatt működik, amely az melegebb környezetbe kerül, hibaüzenetet üzemi hőmérséklet és hagyja a mérőműszert mutat. legalacsonyabb értéke. felmelegedni az újabb tesztelés előtt.
-
Page 90: Ügyfélszolgálat
17. Ügyfélszolgálat Ha segítségre van szüksége az Avital Vércukor ellenőrzőrendszernél, forduljon az alábbihoz: ETTM KFT 2151 Fót Vadas Dülő 85/d Tel :+36 30-88-20-601 Email: ettminfo@gmail.com Az egészségi állapotával kapcsolatos kérdések esetén hívja az orvosát vagy egy egészségügyi szakembert. -
Page 91: Korlátok
18. Korlátok 1.Nem használható újszülötteknél. Ne használja újszülöttek vércukorszint ellenőrzésére. 2.Hematokrit tartománya: az 32-60% közötti tartományban található hematokrit nem érinti a vércukor eredményeket. Amennyiben nem ismeri a hematokrit szintjét, forduljon egészségügyi szakemberhez. 3.Hemoglobin tartománya: a 3,13 mmol/L (20 g/dL) hemoglobin szintek nem zavarják a vércukor teszteredményeket. -
Page 92: Specifikációk
20 másodperc múlva, amikor nincs csík behelyezve. A vércukor ellenőrzőrendszer nyomon követhetősége: Az Avital 6276 Vércukor Rendszer pontosságát olyan páciensek által kapott véreredmények összevetésével értékeltük olyan betegekével, akik egy YSI modell 2300 Vércukorelemzőt használva kapták az eredményeket, melyet az YSI kalibráló... -
Page 93: Jótállási Információk
Ez a jótállás nem vonatkozik a tulajdonos helytelen használatából vagy hanyagságából, vagy a normál kopásból eredő eszközhibákra. Az Avital 6276 Vércukormérő szett tartalma m e g f e l e l a 98/79/EC (EGK) Direktívát honosító, az in vitro diagnosztikai eszközökről szóló 8/2003. - Page 94 Biotest Medical Corporation No. 3-2,Chien-kuo Road,TEPZ Tantzu, 427 Taichung, Taiwan ROC. E.T.T.M Ltd 2151 Fot Vadas dulo 85/d Tel: +36 30-8820-601 Email: ettminfo@gmail.com MEDNET GmbH Borkstrasse 10, 48163 Münster Germany 0537...
Need help?
Do you have a question about the 6276 and is the answer not in the manual?
Questions and answers