Table of Contents
Advertisement
Quick Links
Advertisement
Table of Contents

Subscribe to Our Youtube Channel
Summary of Contents for DigiGrid DiGiGrid Q
- Page 1 DiGiGrid Q User Guide...
-
Page 2: Table Of Contents
Manual Device Configuration ............................. 10 Automatic Device Configuration ..........................10 Device Firmware................................ 11 Identify a Device on the SoundGrid Network ......................11 DIGIGRID Q CONTROL PANEL ............................12 Clock Page ................................. 13 System Info Page and About Page ..........................15 Presets ..................................15 USING AN I/O DEVICE WITH A DAW .......................... -
Page 3: Introduction
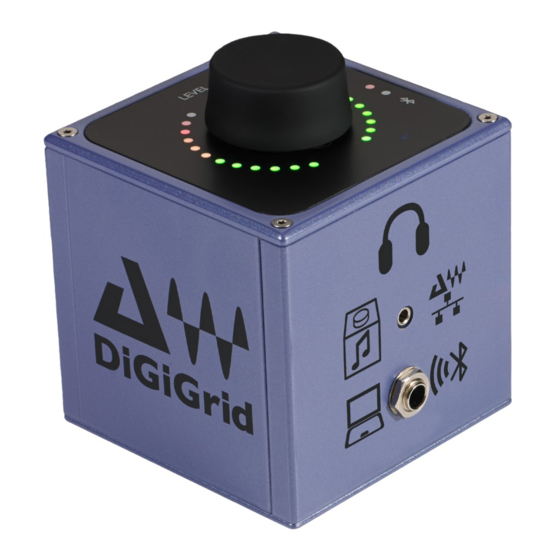
Introduction The DiGiGrid Q headphone amplifier is a high-end audio interface. Its flexible design suits any audio application where precise monitoring with very low latency is required. Q features 1/4-inch and 3.5 mm outputs, and it can accommodate all headphones up to 600 ohms. It has four input options: AES/EBU, RCA, Ethernet (SoundGrid), and Bluetooth. -
Page 4: Hardware And Connections
Headphone outputs: ¼ inch and 3.5 mm, (¼ inch BT = Bluetooth overrides 3.5mm) USB programming service port for tech support. This is not a USB audio port. Analog Line Inputs AES/EBU Inputs Reset button (on side panel) DC In SoundGrid Ethernet port DiGiGrid Q / User Guide... -
Page 5: Input Sources
When the DiGiGrid Q device appears, select it and choose to pair. You will not need to enter a passcode. When the pairing process is complete, the Bluetooth indicators on the top panel of the Q will flash blue only, which indicates successful pairing. -
Page 6: Getting Started
One I/O In this example, one DiGiGrid Q is used to connect a console to the SoundGrid host application’s SoundGrid ASIO/Core Audio driver for plugin processing and/or DAW playback/recording. The interface is connected directly to the host using a Cat 5e Ethernet cable or better. -
Page 7: Add I/Os
This moves all DSP processing from the host computer to the server, which provides a higher plugin count and enables the eMotion LV1 and ST mixers. Visit the waves.com hardware pages to learn more about SoundGrid servers. Consult your host application user guide to learn how to configure additional I/Os and servers. DiGiGrid Q / User Guide... -
Page 8: Download And Install Software
You do not need a license to use this device. However, many hosts or specific host configurations do require a license. Refer to your host’s product page for details. The SoundGrid QRec host is installed with any I/O. DiGiGrid Q / User Guide... -
Page 9: Configure The System
SoundGrid QRec SoundGrid Studio Setup Window All SoundGrid devices are configured in a very similar manner. Throughout this section, we show DiGiGrid IOS as an example. DiGiGrid Q / User Guide... -
Page 10: Manual Device Configuration
If later you add, remove, or swap a device; Auto-Config will reconfigure your inventory and re- patch. Note that SoundGrid Studio assigns the SoundGrid driver automatically. SuperRack SoundGrid and eMotion LV1 require that the SoundGrid ASIO/Core Audio driver is assigned manually. DiGiGrid Q / User Guide... -
Page 11: Device Firmware
Click on the ID button to activate a hard-to-miss LED on the front panel of the corresponding hardware device. You can also activate the front panel from the top bar of the device’s control panel. SoundGrid Studio SoundGrid QRec DiGiGrid Q / User Guide... -
Page 12: Digigrid Q Control Panel
The Clock page is used to set the clock source and monitor clock status. The About and System Info pages provide information about the unit, such as MAC address, SOE master MAC Address, firmware version, and more. DiGiGrid Q / User Guide... -
Page 13: Clock Page
SOURCE sets the clock source The DiGiGrid Q sets its clock to the sample rate of the SoundGrid Sync Over Internet network. In this mode, the device is a slave. - Page 14 CLOCK STATUS INDICATORS Three windows on the right side of the Clock control panel help you to quickly assess the network status of the DiGiGrid Q. Reports the presence or absence of sync between the Q and the SoundGrid Status network.
-
Page 15: System Info Page And About Page
Click the ID button on the right to illuminate a LED on the device. This helps to quickly identify the hardware device associated with the control panel. DiGiGrid Q / User Guide... -
Page 16: Using An I/O Device With A Daw
1. Set the DAW playback engine to “Waves SoundGrid.” The SoundGrid driver channels will now appear in the DAW I/O preferences and in the Input/Output selector in each DAW channel. 1. Route the DAW inputs and outputs to SoundGrid. DiGiGrid Q / User Guide... -
Page 17: Specifications
Height: 11.35 cm / 4.46 inches Phase Termination Point Positive (+) Tip Depth: 9 cm / 3.54 inches Device Weight: 0.6 kg / 1.32 lbs Negative (-) Ring Package Weight: 1.81 kg / 4 lbs Signal Ground Sleeve DiGiGrid Q / User Guide... -
Page 18: Resetting The Unit
If after an unsuccessful firmware update the DiGiGrid Q is not recognized by the SoundGrid Host Application (the DiGiGrid Q does not appear in the Inventory panel), use the Reset button, which is on the DiGiGrid Q back panel, to try and recover the unit.
Need help?
Do you have a question about the DiGiGrid Q and is the answer not in the manual?
Questions and answers