
Related Manuals for HSS Hire PERIJA PLUS

Summary of Contents for HSS Hire PERIJA PLUS
- Page 1 ™ PERIJA PLUS Smart Acoustic Water Leak Detector USER GUIDE User Manual Ver. 1.2 PERIJA PLUS™ Embedded Software Version: P190840008 / P2011400A 2020...
- Page 2 Warranty Confirmation Warranty Confirmation Please send this document to the email address below within 60 days after the date of purchase stated on the invoice to confirm your after-sales service and product warranty. Email: sales@highsensesolutions.ca NAME: COMPANY NAME: ADDRESS: POSTAL CODE: CITY: PROVINCE: TEL:...
- Page 3 Terms of use, copyright notice, warranty and after-sales services Terms of use, copyright notice, warranty, and after-sales services disclaimer for HIGH SENSE SOLUTIONS Inc. products Please read the following terms and conditions carefully before using the equipment and software applications of HIGH SENSE SOLUTIONS Inc. The provisions of the present document apply to all the hardware devices, casings, hardware and screen designs, OS-level codes, Windows, web-based, and other software applications, in addition to all accessories produced by HIGH SENSE SOLUTIONS Inc.
- Page 4 Terms of use, copyright notice, warranty and after-sales services For further information, or in case you have questions or need consultation, please contact our sales department or legal office at the following: HIGH SENSE SOLUTIONS Inc. 46 Long point Dr. Richmond Hill, Ontario, L4E 3W8, Canada www.highsensesolutions.ca sales@highsensesolutions.ca Tel: +1 (905) 597 2341...
- Page 5 Important Safety Information IMPORTANT SAFETY INFORMATION The hardware manufacturing machines only function properly within the ranges defined in their technical specifications such as electrical parameters, temperature, humidity, etc. Therefore, do not operate them outside their working range or for undefined applications. When connected to AC power, the device’s battery chargers must always be plugged into grounded outlets to ensure maximum safety.
- Page 6 Features and Specifications FEATURES AND SPECIFICATIONS 1. Amplification 59.0dB ± 3dB HPF (100 Hz, 200 Hz, 400 Hz) 2. Filters LPF (600 Hz, 800 Hz, 1200 Hz) 3. filteROT™ Each filter runs for 5 seconds; filter selection using the MUTE key Function 5”...
-
Page 7: Table Of Contents
3.8.2 Connecting to the Last Paired Device ..............20 Global Positioning System (GPS) ..................20 3.10 About the PERIJA PLUS™ Acoustic Leak Detector ............21 3.10.1 System Info ......................21 3.10.2 Leak Detection ......................22 3.10.3 Contact Us ....................... 22 3.10.4 User Guide ...................... - Page 8 Key Facts about Water Leak Noise ................. 26 Disruptive Noise Sources Generating Sounds like Leak Noises ........26 Standard Procedure of Leak Detection Survey .............. 26 Transferring Data from PERIJA Plus™ to HSS-APP Application ..........29 Transferring Single Project ..................... 30 Transferring All Projects ....................36 Deleting Single Project ....................
-
Page 9: Introduction
The following user manual introduces the acoustic leak detection device PERIJA Plus™ whose current embedded software version is P2011400A. PERIJA Plus™ is an extremely accurate and sensitive water leak detector developed based on acoustic technology which is used to detect leaks in all types of water pipe networks under pressure. -
Page 10: Perija Plus™ Standard Accessories
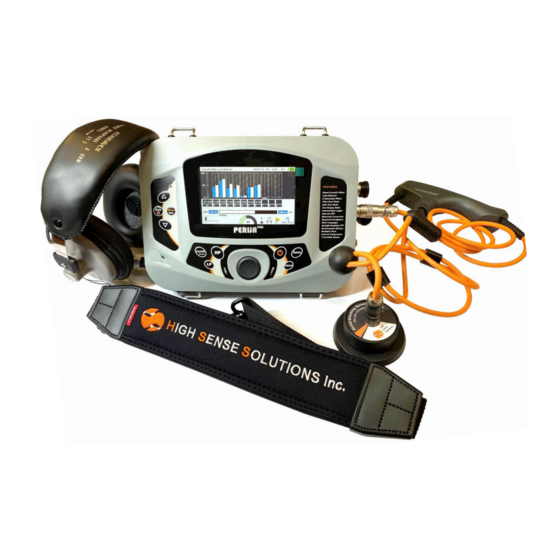
Introduction 1.2 PERIJA PLUS™ Standard Accessories • Main Unit of PERIJA PLUS™ • Hand Switch and Pick-Up Sensor • Stereo Headphone • Li-ion Battery Pack Fast Charger • Main Unit Shoulder Strap • Hard Carrying Case NANUK 930 • HSS Water Leak Detection (Android APP) •... -
Page 11: Hardware Overview
Introduction 1.4 Hardware Overview 1- 5” Full Color TFT, Sunlight Readable 2- Senor for Adjusting the TFT light with Environment 3- Main Unit Shoulder Strap Retaining clip 4- Sensitivity Volume 5- 7 Pins Connector for Battery Charger and Programmer 6- 6 Pins Connectors for Hand Switch 7- Stereo Headphone Jack 8- UP Key (Main Page Pointer Control/Arrow Key) 9- EXIT or MARK Key (Exit from Pages/Return from Submenu/Marking Leak Point in... - Page 12 Introduction 19- Wind Noise Reducer 20- Pick-Up Sensor 21- Cable length Adjusting Loop 22- MUTE Key 23- Hand Switch Push Fit Connector...
-
Page 13: Getting Started
Getting Started 2 GETTING STARTED Please operate the device using the shoulder strap included in the package; this enables you to work with both hands which is necessary in order to be safe and have freedom of action. Press and hold the ON/OFF key for about 2 seconds until you hear the second beep (the device should turn on and enter the main menu of leak detection function). - Page 14 Getting Started screen. At the same time, a red bullet appears on the right side of the screen (the red bullet symbol indicates that the system has not yet been able to measure the mean and minimum signal strength during the time the MUTE key has been held. If the MUTE key is pressed and held, after about 2 seconds, the red bullet will turn green, which indicates the system is ready to display the mean and minimum received signal strength during the time the MUTE key is held.)
- Page 15 Getting Started bottom right by default. If you want the GPS information to be stored in the system memory along with the other information, take the device outdoors and wait for it to receive and display the GPS data before starting the process of leak detection. Please note that, in default settings, the GPS function is automatically activated when the device is turned on unless the user turns it off.
-
Page 16: Graphical User Interface (Gui)
“Battery is low! Please plug in the charger” for when the battery life is below 15%. “Battery is low! PERIJA Plus will turn off soon” for when the battery life is below 10%. “Memory is about to full” for when the free space of the memory is less than 2%. -
Page 17: Acoustic Water Leak Detector
However, in this case, the device only displays the Bluetooth® headphones symbol on the screen as it has been given a higher priority in the device’s system. The PERIJA PLUS™ leak detector is equipped with an ultrahigh-speed microcontroller and thus has proportionally fast processing and data transfer... - Page 18 possible that, due to the limitations of this technology, the sound may be received with a slight delay of about 0.1 seconds. 3- Leak Detection Cursor: Normally, it indicates the place of the ongoing measurements. Every time the MUTE key is pressed and released, the minimum and mean signal data are displayed in the form of bar or line-graphs at that point.
- Page 19 Marking the leak points improve the data organization in the device as well as HSS-Application. 11- High Pass Filter (HPF) Cut-off Frequency: This version of PERIJA Plus has been equipped with three HPF with cut-off frequency of 100 Hz, 200 Hz, and 400 Hz. Item 11 indicates the selected HPF cut-off frequency, and the user can change it using the HP key.
-
Page 20: Main Menu
98% of its capacity and the memory capacity alarm is ON, the device will inform the user. 18- Line-graphs: PERIJA PLUS™ includes a SWAP key on its key panel which allows the user to alter the way the data are presented. The user, for instance, may want to see line-graphs rather than bar-graphs. -
Page 21: Time & Date Settings
The main menu should look like the following image: As a rule, all the pages of the main menu can be navigated using the arrow (UP and DOWN) keys, while the SET key selects the highlighted item. Press the EXIT key at each menu to go back one level. -
Page 22: Display
As the leak detection and performance information of the device is saved to the memory along with respective dates and times, please ensure that the system’s date and time are correct immediately after turning on the device. If the system’s date and time are completely reset every time the device is turned off and generic values are displayed when the device is turned on again, please refer to the Troubleshoot menu or contact the technical support team of an official HIGH SENSE SOLUTIONS Inc. -
Page 23: Language
SET keys to select the desired language. 3.6 File Management The PERIJA Plus™ Leak Detector device can save the data resulting from user’s projects automatically. The device stores projects based on their date and time characteristics. It can store 20 projects (with the capacity of 2000 points) in each day. The total capacity of its memory is 30 days (i.e. - Page 24 Upon entering the File Management menu, the environment should look like the following image where folders are listed in rows and each folder is assigned with a specific creation date. The unused spaces of the memory are shown as <EMPTY>. The downward arrow in the right bottom corner of the screen means you can scroll down to reach other folders.
-
Page 25: Options
3.7 Options In the Options menu, the user can turn system features on or off. In default settings, all the features are deactivated except for the battery optimization technology (Smart Power Management) as shown in the figure below. The features of the Options menu include the following: 3.7.1 Inside Temperature Violation Alarm If this feature is turned on, in case of an extreme drop or rise in temperature in a way that violates the device’s operating temperature range (-10°C to 50°C), the system initially warns... -
Page 26: Memory Capacity Alarm
3.8 Bluetooth® The PERIJA Plus™ acoustic leak detector is equipped with a Dual Bluetooth® System which makes it possible to transmit sound to Bluetooth® headphones and to transfer data from the device’s memory to data-receiving systems. -
Page 27: Connecting To A New Device
When you turned the Bluetooth on, there are two options: 1) connecting to a new device, and 2) connecting to the previous used headphones. 3.8.1 Connecting to a New Device If the device you are looking for is not already on the list, please select the option Search for New Device to connect to your headphones. -
Page 28: Connecting To The Last Paired Device
PERIJA Plus™ device is equipped with a highly accurate and responsive GPS feature. The device GPS is on by default. To save more energy, turn off the GPS feature through the GPS menu whenever you do not need to record the geographical location information. -
Page 29: About The Perija Plus™ Acoustic Leak Detector
This edition of PERIJA Plus™ and its software version, as introduced in this manual (P190840008), can only display data in Type I and does not display the GPS data in other display units. -
Page 30: Leak Detection
3.10.2 Leak Detection This section presents the specifications and relevant information about the device’s analog part. Please note that the listed specifications may change according to the product’s edition and software version, and further information on new updates and features will be communicated through the company’s official website and other media. -
Page 31: User Guide
3.10.4 User Guide A quick user manual is available on the User Guide menu. Using this menu, you can find how the device works, if you didn’t access to the user manual. -
Page 32: Leak Detection Instructions
Leak Detection Instruction 4 LEAK DETECTION INSTRUCTIONS When a pipe carrying water has a leak, water tends to spurt out of the leak point and, in general, generates the following four types of sound: Water flow sound Impact sound Friction sound Pipe vibration sound Combined, these sounds constitute the leakage sound. -
Page 33: The Relationship Between Propagation Distance And Leak Noise Intensity
Leak Detection Instruction 4.2 The Relationship between Propagation Distance and Leak Noise Intensity Pipes made of different materials have different noise propagation rates. For instance, with metal pipes, the leak noise fades after traveling a longer distance, while with a polyethylene pipe, the said distance is considerably shorter. -
Page 34: Key Facts About Water Leak Noise
Leak Detection Instruction 4.4 Key Facts about Water Leak Noise These are some known facts about water leak noise: Size of leakage: Larger → Louder Type of leakage Source: Crack → Louder than holes and faulty connections Water pressure: Higher → Louder Pipe Material: Metallic →... - Page 35 Therefore, the user tends to hear louder noises in the headphones and see larger horizontal signal bar-graphs. In the PERIJA Plus™, minimum received signals are examined and compared in different areas in order to eliminate unwanted impact noises as well as those generated by ambient sounds such as human speech, vehicles, etc.
- Page 36 Leak Detection Instruction The charger and sensor connectors plug smoothly into their respective ports and cannot fit into any other ports as they have different numbers of pins. Therefore, do not use force to plug them into the wrong ports. Always use the device in accordance with the included user guide.
-
Page 37: Transferring Data From Perija Plus™ To Hss-App Application
Note that PERIJA Plus stores projects based on their date and time characteristics. PERIJA Plus can store 20 projects (with the capacity of 2000 points) in each day. The total capacity of its memory is 30 days (i.e. it can store up to 600 projects data). -
Page 38: Transferring Single Project
Transferring Data from the Device to HSS-APP In the selected date folder, the user can either delete all/send all projects/send all projects’ marked points related to that date or select a single project existed on that date. Note that each project is determined by the time it started. 5.1 Transferring Single Project 4) To manage a single project data, using the arrows and the set keys go to the project file. - Page 39 Transferring Data from the Device to HSS-APP 6. Open HSS APP on your android device and go to PERIJA Plus from PERIJA Tools section.
- Page 40 Transferring Data from the Device to HSS-APP 7) Using “PRESS TO CONNECT” button, search for PERIJA Plus you turned on its Bluetooth before. 8) By selecting the found PERIJA Plus, the android device asks you for pairing permission. Select ok.
- Page 41 9) After the paring, both devices inform the user by an informing message. If the android device could not pair, it will inform the user too. 10) After you see “Connected. You can send file now.” on the PERIJA Plus display, select “Send project’s points”/ “Send project’s marked points”.
- Page 42 By selecting the project, you can manage the transferred data and make a report out of them. NOTE: As long as you don’t go back from PERIJA Plus tab on the application and you don’t exit File Management on PERIJA Plus, you can do any other transfer. Otherwise, you need to try...
- Page 43 Transferring Data from the Device to HSS-APP...
-
Page 44: Transferring All Projects
Transferring Data from the Device to HSS-APP 5.2 Transferring All Project In order to send all projects/send all projects’ marked points, after step 3, by selecting “Send all project”/ “Send all project’s marked points” follow the steps 4-12 told in the previous section. -
Page 45: Deleting All Projects
Transferring Data from the Device to HSS-APP 5.4 Deleting All Projects After step 3, if you wish to delete all the data existed in the selected date folder, select “Delete all” and confirm the action. The result will appear on the display. -
Page 46: Troubleshoot And Maintenance
Troubleshoot and Maintenance 6 TROUBLESHOOT AND MAINTENANCE Always monitor the device’s battery life and keep the batteries full and ready for operation. Please only use the charger included in the packaging to prevent damages to the batteries and the device. Using third-party chargers automatically renders the guarantee null and void. - Page 47 Troubleshoot and Maintenance Please contact the company’s technical support team in case the device’s date and time settings are reset each time the device is turned off, as this means that the dedicated onboard battery has run out of power. If recharged and looked after regularly, the device’s batteries have a useful life of 3 to 5 years.
- Page 48 HIGH SENSE SOLUTIONS Inc. 46 Long point Dr. Richmond Hill, Ontario, L4E 3W8, Canada www.highsensesolutions.ca sales@highsensesolutions.ca Tel: +1 (905) 597 2341 Tel: +1 (647) 588 6020...
Need help?
Do you have a question about the PERIJA PLUS and is the answer not in the manual?
Questions and answers