Advertisement
Available languages
Available languages
Quick Links
Advertisement

Summary of Contents for Artistry ASA-30X
- Page 2 Components Main Body with Lens (ASA – ARTISTRY Skin Analyzer) Rechargeable Battery Adaptor USB cable cradle Pouch Sebum/Oil indicator Cleaning Hand strap Instruction (50ea) cloth booklet A. Components...
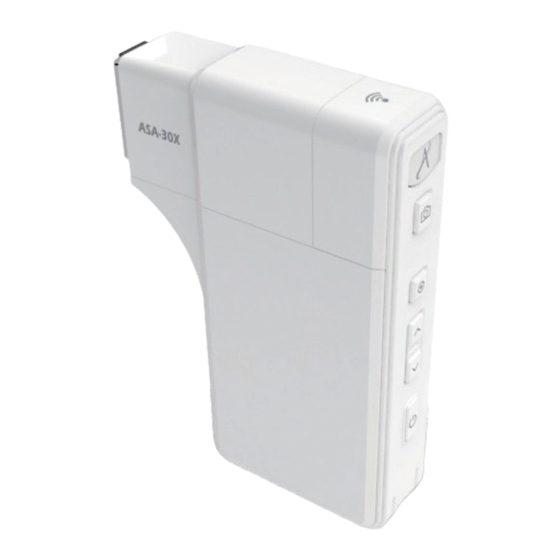
- Page 3 Device Hardware Parts Description Wi-Fi Indicator Charge Indicator Blue: Fully charged / Red: Low battery Capture Button Start, Analysis, Result Button Up Mode Button Down Mode Button Power On/Off Hydration / Elasticity Sensor Camera Optical Part Lens Module Release Button Battery Cover USB &...
- Page 4 Device Hardware Settings To Insert Battery To open the battery cover, press and slide the cover downwards. Insert the battery and gently press the battery into place. Close the cover. To Switch On Device Press and hold power button, until the blue light on the charger indicator comes on.
- Page 5 2.0 Artistry Tablet device or smartphone user Skin Analyzer iOS : Go to “App Store” and search for “2.0 Artistry Skin Analyzer” to download the program. Android : Go to “Google Play Store” and download “2.0 Artistry Skin Analyzer”. How to connect device to software application Turn on the ARTISTRY Skin Analyzer, and keep the battery cover open.
- Page 6 System Settings Download & Install How to connect device to software application Connecting Skin Analyzer to ASA 2.0 app on devices with iOS 13 and Above. Tap on the Wi-Fi button Open the cover of your Enter the SSID and While connecting, you on the Home menu.
- Page 7 Device Certification and product recommendation download are only available when your mobile device (PC/Tablet/Smartphone) is connected to the Internet (mobile data, Wi-Fi, etc.). Please disconnect the ARTISTRY Skin Analyzer’s Wi-Fi and connect to the Internet (mobile data, Wi-Fi, etc.). On the main menu,...
- Page 8 “Settings” page appear stating that the “Settings” page of your the Skin Analyzer’s and click on the “Scan” ARTISTRY Skin Analyzer mobile device (PC/ WI-FI. button. You will see will be automatically Tablet/Smartphone). the selected Wi-Fi disconnected and reboot.
- Page 9 Application Customer Before you start To create a new profile, Select “Agree” on the Input the customer’s to analyse, it is select the “+” icon on privacy policy. details such as name, recommended that the top right corner. age, gender, email, you create a customer skin type, memo, etc.
- Page 10 Application Video / Start Analysis / Lifestyle Survey Video Start Analysis Lifestyle Survey Introduction video on the ARTISTRY Skin Select “Analysis” to start. At the beginning of Analyzer. the analysis, there are 17 questions about the customer’s lifestyle. Please mark the answer to complete the questionnaire.
- Page 11 Skin Measurement Hydration To start, press the Analysing... The result will appear “Capture” button on the when the analysis is device or application complete. To proceed screen. When you hear with the next analysis, the “beep” sound, place press the following the sensor onto the skin.
- Page 12 Skin Measurement Pore Press the button to Place the camera onto The result will appear. If you click the “Compare” activate the camera the skin and press the Select the “Compare” button, the customer’s mode. button to capture button to check the image and three sample the image.
- Page 13 Skin Measurement Radiance The result will appear when If you click the “Compare” Select the button to Place the camera onto the analysis is completed. button, the customer’s activate the camera mode. the skin and select the Select the “Compare” image and three sample button to capture button to compare the...
- Page 14 Skin Measurement Wrinkle Place the camera onto The result will appear. Press the button to If you click the “Compare” the skin and press the Select the “Compare” activate the camera button, the customer’s button to capture button to check the mode.
- Page 15 Skin Measurement Sensitivity The result will appear when If you click the “Compare” Press the button to Place the camera onto the analysis is completed. button, the customer’s activate the camera the skin and press the Select the “Compare” image and three sample mode.
- Page 16 Application View Mode In the view mode, the The user can select the In one screen, you The user can mark the device is able to take analysis parameter to can see a maximum defect or concern on pictures with the “Capture” take a picture.
- Page 17 How to Import Data from ASA 1.0 to ASA 2.0 iOS Version Exporting Data from ASA 1.0 app Before you begin exporting/importing data, please ensure the following are available: - The latest version of iTunes. - The latest version of Windows 7 or later. - An iPhone or iPad with the latest version of iOS.
- Page 18 Version Copying ASA 1.0 files from iOS app to your computer In iTunes, select the “ARTISTRY Skin Analyzer” app from the list in the File Sharing section. Drag and drop files from the documents list to a folder or window on your computer to copy them to your computer.
- Page 19 How to Import Data from ASA 1.0 to ASA 2.0 iOS Version Copying ASA 1.0 files from your computer to the ASA 2.0 iOS app In iTunes, select the ASA 2.0 app. Drag the ASA 1.0 files that you saved on your computer to the ASA 2.0 documents list.
- Page 20 How to Import Data from ASA 1.0 to ASA 2.0 Android Version Exporting Data from the ASA 1.0 App Go to your ASA 1.0 app, select “Settings” > Select “General Settings” > Select “Export” You may rename the folder name and press “OK”. Your customers’ data has been successfully transferred.
- Page 21 Importing Data from ASA 1.0 to ASA 2.0 Go to your ASA 2.0, select “Settings” > Select “General Settings” > Select “Import” On your device, go to “Files”/“My Files” > Select “Artistry” > Select “Solutionist” > Select the .db file to import.
- Page 22 How to Import Data from ASA 1.0 to ASA 2.0 Windows Version Exporting Data from ASA 1.0 App On the Home Menu, go to “Settings” > Select “General Settings” > Select “Export” H. How to Import Data from ASA 1.0 to ASA 2.0 - Windows Version...
- Page 23 How to Import Data from ASA 1.0 to ASA 2.0 Windows Version Importing Data from ASA 1.0 to ASA 2.0 App On the Home Menu, go to “Settings” > Select “General Settings” > Select “Import” > Open the .db file > exporting progress is completed. H.
- Page 24 I can’t switch on the device. Please check the battery level. Connect and charge the device (or the battery) using the adaptor provided by the manufacturer. (The battery charging status will be shown on the software application main page.) I can’t switch on the device after the battery is fully charged. The battery may be dislocated in the device.
- Page 25 Warranty The device undergoes strict quality control and a high standard of inspection process during production before delivery to markets. In the case of any malfunction or operational defect under normal use condition within 10 days of purchase, the manufacturer will absorb all repair cost or even provide replacement for a new device. Device warranty period: 12 months from the date of purchase.
- Page 26 组件 附镜头主机体 (ASA – ARTISTRY 肌肤测试仪) 充电支架 电池 适配器 USB 电缆 袋子 油脂测纸 抹布 手挽带 指示手册 (50 张) 组件...
- Page 27 设备硬体 部件说明 Wi-Fi 显示灯 充电显示灯 蓝色: 充满电 / 红色: 电力低 拍摄按钮 开始、分析、结果按钮 向上模式按钮 向下模式按钮 开机 / 关机 水润度 / 弹性感应器 相机的光学部分 镜头模组释放按钮 电池盖 USB 和充电连接器 设备硬体 - 部件说明...
- Page 28 设备硬体 设置 如何置入电池 按着电池盖然后往下滑动,就能打开盖子。 置入电池,然后轻轻压进其位置里。 关上盖子。 如何开机 按着电源按钮不放, 直至蓝色的充电显示灯发亮为止。 如何关机 按着电源按钮不放, 直至充电显示灯熄灭为止。 设备硬体 - 设置...
- Page 29 (知识 > 产品资源 > 美容与个人护理 > 数码) 2.0 Artistry 平板电脑或智能手机用户 肌肤测试仪 iOS 系统 : 前往 “App Store” 搜寻 “2.0 Artistry Skin Analyzer” 以下载该程式。 Android 系统 : 前往 “Google Play Store” 下载 “2.0 Artistry Skin Analyzer”。 如何将设备衔接至应用程式软件 启动 ARTISTRY 肌肤测试仪,然后让电池盖开着。 在您的移动设备 (个人电脑/平板/智能手机) 上启动应用...
- Page 30 系统设置 下载与安装 如何将设备衔接至应用程式软件 在具备 iOS 13 及更高版本的设备上将肌肤测试仪衔接至 ASA 2.0 应用程式。 点击主页选项单上的 打开肌肤测试仪的盖子, 在这里输入 SSID 和 在衔接时,您将会看到 Wi-Fi 键。 您将看到 SSID 和密码。 此信息,点击 “OK”。 密码。 当您成功衔接时,您将会 您接着将被导向主页, 看到此信息,点击 “OK”。 并可马上前往使用应用 程式。 系统设置 – 下载与安装 / 如何将设备衔接至应用程式软件...
- Page 31 请选择 English (SEA)、 参数。 伺服器下载产品清单。 时,检查目前的版本 简体中文 (SEA) 或 以及有无更新的版本。 Bahasa Malaysia。 设备授权 首次对设备和应用程式软件/程式的衔接进行设置时,需要设备授权。 注 唯有当您的移动设备 (个人电脑/平板/智能手机) 连接至互联网 (移动数据、Wi-Fi 等) 时, 才能下载设备授权与产品建议。 请断开ARTISTRY 肌肤测试仪的 Wi-Fi ,然后连接到互联网 (移动数据、Wi-Fi 等)。 在主要选项单上点选 在选项单上,请选择 含有序列代码的设备型 设备授权已完成。 “设置” 。 “设备激活” 。 号名称。请点选“获得 请点选“OK”键, 授权”,以便在程式里 然后前往"产品下载" 注册该设备。...
- Page 32 选择“设置”。 选择“一般设置”。 下拉并选择“扫描/搜 将出现备有的 Wi-Fi 寻”。 信号清单。连接最强 的 Wi-Fi 信号,输入 Wi-Fi 密码。 在连接过程中,一则信息 一旦您成功连接 Wi-Fi, 您的移动设备现已和 返回 ASA 应用程式, 将显现并表明 ARTISTRY 前往您移动设备(个人 肌肤测试仪的 Wi-Fi 选择“设置”页面并 肌肤测试仪将自动断线并 电脑/平板/智能手机) 连接。 点击“扫描”键。您将 重启。选择 “OK” 键。 的 “设置“ 页面。切断 看到所选 Wi-Fi 连接呈 Wi-Fi 连接并以肌肤测试...
- Page 33 应用程式 顾客 在您开始进行分析前, 欲创建新档案,选择 在隐私政策选择 输入顾客资料如姓名、 建议您创建一份顾客 右上角的“+”图标。 “同意”。 年龄、性别、电邮、 档案。 肤质、备忘录等。完成 后,在右上角选择 “Save” (iOS)/”√ ” (Android) 储存。 组织 您也能以组织来排列您 创建一个新“组织”, 的顾客。创建一个新 请选择右上角的“+” “组织”,点击右上角, 图标。 然后选择“编辑组织”。 应用程式 - 顾客 / 组织...
- Page 34 应用程式 视频/开始分析/生活方式问卷调查 视频 开始分析 生活方式问卷调查 开始进行分析时,会有 关于 ARTISTRY 肌肤测试仪的简介视频。 选择 “Analysis (分析)” 17 道关于顾客生活方式 开始。 的问题。请标出答案来 完成问卷。 或 应用程式 - 视频 / 开始分析 / 生活方式问卷调查...
- Page 35 皮肤测量 水润度 按设备或应用程式屏幕上 正在分析中... 一旦分析完成后将出现 的“拍摄”键即可开始。 结果。按以下的鍵, 当您听见“哔”声时, 即可繼續下一個分析。 就把感应器置于皮肤上。 或 水润度感应器 油脂 把油脂测纸的粉红色 一旦分析完成后将出现 把油脂测纸放在 U 区 把油脂测纸放在 T 区 (如屏幕所示) 然后按 部位对准设备的相机, (如屏幕所示) 然后按着 结果。按以下的键, 来拍摄影像 (U 区) 。 即可继续下一个分析。 着它 2-3 秒。 它 2-3 秒。拍摄油脂 测纸的粉红色部位 T 区的影像。 或...
- Page 36 皮肤测量 毛孔 按压 键来激活相机 把相机放在皮肤上, 分析结果将出现。选择 若您点选“比较”键, 然后按压 键拍摄 “比较” 键以比较样本 便可拿顾客的图像跟三 模式。 图像。 图像,如 <4> 所示。 个样本图像进行比较。 接着按压 键来进 按以下的键即可继续 或 行分析。 下一个分析。 - 好 - 正常 - 差 或 色素沉淀 按压 键来激活相机 把相机放在皮肤上,然后 分析结果将出现。选择 若您点选“比较”键, 模式。 按压 键拍摄图像。 “比较”键以比较样本...
- Page 37 皮肤测量 亮泽 一旦分析完成后将出现结 若您点选“比较”键, 把相机放在皮肤上,然后 按压 键来激活相机 果。选择“比较”键以 便可拿顾客的图像跟三 按压 键拍摄图像。 模式。 比较样本图像,如 <4> 个样本图像进行比较。 接着按压 键来进行 所示。按以下的键即可 分析。 或 继续下一个分析。 - 好 - 正常 或 - 差 弹性 按着“拍摄” 键,当您 正在分析中... 一旦分析完成后将出现 听见“哔” 声时,就把 结果。按以下的键即可 感应器置于皮肤上,等 进行下一个分析。 到您再次听见“哔”声 为止。 弹性感应器...
- Page 38 皮肤测量 皮肤测量 皱纹 把相机放在皮肤上,然后 分析结果将出现。选择 按壓 鍵来激活相機 若您点选“比较”键, 按压 键拍摄图像。 “比较”键以比较样本 模式。 便可拿顾客的图像跟三 接着按压 键来进行 图像,如 <4> 所示。 个样本图像进行比较。 分析。 按以下的键即可继续下 或 一个分析。 - 好 - 正常 或 - 差 卟啉(粉刺) 把相机放在皮肤上,然后 若您点选“比较”键, 按压 键来激活相机 分析结果将出现。选择 按压 键拍摄图像。 “比较”键以比较样本 便可拿顾客的图像跟 模式。...
- Page 39 皮肤测量 敏感度 一旦分析完成后将出现结 若您点选“比较”键, 把相机放在皮肤上,然后 按压 键来激活相机 果。选择“比较”键以比 便可拿顾客的图像跟三 模式。 按压 键拍摄图像。 较样本图像,如 <4>所 个样本图像进行比较。 接着按压 键来进行 示。按以下的键即可继续 分析。 或 下一个分析。 - 好 - 正常 或 - 差 总结 点击每个参数以得知 产品建议图像将出现。 当您连接互联网 (移动 按上端的“√ ”键。选 择“显示所有结果” 产品建议。 选择“储存及关闭” 数据、Wi-Fi 等)时, 以完成分析。...
- Page 40 应用程式 查看模式 在查看模式里,该设备 用户可选择分析参数 在一个屏幕里,您可 用户可利用笔记功能, 能够以“拍摄”键拍照 以拍摄照片。 看见最多 2 个不同的 在影像上标明缺陷或关 多次。 影像。 注事项。 电子商务 选择红色圆圈所指的 您将能直接被导往安利 图标。 选择“购物”。 网站。 应用程式 - 查看模式 / 电子商务...
- Page 41 ASA 1.0 ASA 2.0 如何从 输入数据到 版本 从 ASA 1.0 应用程式输出数据 在您开始输出/输入数据之前,请确保具备下列条件: - 最新 iTunes 版本。 - 最新 Windows 7 或之后版本。 - 具备最新 iOS 版本的 iPhone 或 iPad 。 前往 ASA 1.0 应用程式 请等待输出程序完成。 选择“ OK ”键。 设置并选择“一般设置”。 然后选择“输出”键。 在完成输出后,您可依据以下步骤前往您的个人电脑。 在您的个人电脑上开启...
- Page 42 ASA 1.0 ASA 2.0 如何从 输入数据到 版本 从 iOS 应用程式复制 ASA 1.0 文件到您的电脑上 在 iTunes ,从文件共享区的清单上选择 “ARTISTRY Skin Analyzer” 应用程式。 从文件清单拖放文件到您电脑上的一个文件夹或视窗,以便把它们复制到您的电脑上。 如何从 ASA 1.0 输入数据到 ASA 2.0 - iOS 版本...
- Page 43 ASA 1.0 ASA 2.0 如何从 输入数据到 版本 从您的电脑复制 ASA 1.0 文件到 ASA 2.0 iOS 应用程式 在 iTunes ,选择 ASA 2.0 应用程式。把储存在您电脑内的 ASA 1.0 文件拉到 ASA 2.0 文件清单内。 在您通过 iTunes 传送顾客数据后,您可返回您的设备。 前往 ASA 2.0 应用程式 请静待输入程序完成。 您能相应地重新命名文件, 当输入程序完成后,选择 > 选择“设置” 然后选择“OK”。 “OK”键。您的顾客数据已...
- Page 44 ASA 1.0 ASA 2.0 如何从 输入数据到 Android 版本 从 ASA 1.0 应用程式输出数据 前往您的 ASA 1.0 应用程式,选择“设置”> 选择“一般设置”> 选择“输出” 。 您可重新命名文件夹,然后按“OK”。您的顾客数据已成功传输。 如何从 ASA 1.0 输入数据到 ASA 2.0 - Android 版本...
- Page 45 如何从 输入数据到 Android 版本 从 ASA 1.0 输入数据到 ASA 2.0 前往您的 ASA 2.0,选择“设置”> 选择“一般设置”> 选择“输入” 。 在您的设备上,前往“文件”/“我的文件” > 选择“ Artistry ” > 选择“ Solutionist ” > 选择 .db 文件来进行输入。 您的顾客数据经已从 ASA 1.0 传输到 ASA 2.0。 如何从 ASA 1.0 输入数据到 ASA 2.0 - Android...
- Page 46 ASA 1.0 ASA 2.0 如何从 输入数据到 视窗版本 从 ASA 1.0 应用程式输出数据 在主页选项,前往“设置 > 选择“一般设置” > 选择“输出” 。 如何从 ASA 1.0 输入数据到 ASA 2.0 - 视窗版本...
- Page 47 ASA 1.0 ASA 2.0 如何从 输入数据到 视窗版本 从 ASA 1.0 应用程式输入数据到 ASA 2.0 在主页选项,前往“设置”> 选择“一般设置”> 选择“输入”> 打开.db文件 > 完成输出。 如何从 ASA 1.0 输入数据到 ASA 2.0 - 视窗版本...
- Page 48 常见问题解答 我无法开启设备。 请检查电池水平。利用制造商提供的适配器连接设备 (或电池) 来充电。 (电池的充电状态将显示于软件应用程式的主页。) 电池充满电后,我无法开启设备。 设备里的电池可能已移位。请从设备里取出电池,然后重新置入。接着再尝试重新启动。 电池没有充分地充电。 从设备里取出电池,然后重新置入。 检查设备的 USB 连接器、电池和可充电支架的衔接状况。 如果有关衔接受到妨碍,电池就无法妥善充电。请确保设备的 USB 连接器干净,并先除掉所有标签贴纸才开始充电。 电池无法耐久。 耗电量视各种情况而定,包括使用水平、时间长短和所衔接的环境。 如果没使用设备但却没完全关掉电源,它仍会消耗电力。 若有使用设备的额外功能(例如储存、发送或转输档案),耗电量将会提高。 设备启动了,但皮肤测量和其他应用程式却无法使用。 请检查设备是否妥善连接至软件应用程式。 设备布满灰尘。 利用所提供的抹布,时时确保设备干净。勿使用苯、酒精或合成清洁剂。 用设备时,屏幕没有动静,键也无法操作。 请检查电池电力水平,以及设备是否与软件应用程式/程式衔接。 确保设备已设置妥当并衔接至软件应用程式/程式。可参阅手册里的系统与程式设定。 设备无法衔接至软件应用程式/程式。 请检查设备上的 Wi-Fi 连接状态是否符合程式屏幕上的设定。 请确保设备的 Wi-Fi 密码已正确输入。 测量时我只看见黑色屏幕。 确保镜头的保护膜已除去,才开始检查皮肤,而设备也已妥善连接。 按一下拍摄键以检查相机内部 的 LED 灯。 若...
- Page 49 保用条款 在生产阶段,此设备已通过严格的品质控制和高标准的审查,然后才推出市场。 购买后的 10 天之内,在正常使用情况下,若发生任何故障或操作缺陷,制造商将吸纳所有维修成本, 甚至替换新的设备。 设备的保用期限: 从购买日期算起 12 个月。 在正常使用情况下,于保用期限内,维修成本或部件替换是受保的。 保用期限过后将征收维修费。 保用条款...
- Page 50 Komponen Bahagian Utama dengan Lensa (ASA – Penganalisis Kulit ARTISTRY) Penyangga cas Bateri Adapter Kabel USB semula Beg kecil Penunjuk Kain Tali Buku sebum/minyak pembersih tangan arahan (50 kpg) A. Komponen...
- Page 51 Perkakasan Peranti Keterangan Bahagian Penunjuk Wi-Fi Penunjuk Cas Biru: Dicas penuh / Merah: Bateri rendah Butang Tangkap Butang Mula, Analisis, Keputusan Butang Mod Atas Butang Mod Bawah Kuasa On/Off Sensor Penghidratan / Keanjalan Bahagian Optik Kamera Butang Pelepas Modul Lensa Penutup Bateri Penyambung USB &...
- Page 52 Perkakasan Peranti Tetapan Untuk Memasukkan Bateri Untuk membuka penutup bateri, tekan dan tolak penutup ke bawah. Masukkan bateri dan perlahan-lahan tekan bateri ke tempatnya. Tutup penutup. Untuk Menghidupkan Peranti Tekan dan tahan butang kuasa, sehingga cahaya biru pada penunjuk cas menyala. Untuk Mematikan Peranti Tekan dan tahan butang kuasa, sehingga penunjuk cas padam.
- Page 53 Pengguna peranti tablet atau telefon pintar Skin Analyzer iOS: Pergi ke “App Store” dan cari “2.0 Artistry Skin Analyzer” untuk muat turun program. Android: Pergi ke “Google Play Store” dan muat turun“2.0 Artistry Skin Analyzer”. Cara menyambungkan peranti ke aplikasi perisian Hidupkan Penganalisis Kulit ARTISTRY dan biarkan penutup bateri terbuka.
- Page 54 Tetapan Sistem Muat turun & Pasang Cara menyambungkan peranti ke aplikasi perisian Menyambungkan Penganalisis Kulit ke aplikasi ASA 2.0 pada iPhone menggunakan iOS 13 dan Ke Atas Ketik butang Wi-Fi Buka penutup Masukkan SSID dan Semasa menyambung, pada menu Utama. Penganalisis Kulit kata laluan di sini.
- Page 55 Pensijilan Peranti dan muat turun saranan produk hanya tersedia apabila peranti mudah alih anda (PC/Tablet/Telefon pintar) disambungkan ke Internet (data mudah alih, Wi-Fi, dll.). Sila putuskan Wi-Fi Penganalisis Kulit ARTISTRY dan sambungkan ke Internet (data mudah alih, Wi-Fi, dll.). Pada menu utama, Sila pilih “Pengaktifan...
- Page 56 Wi-Fi, pergi ke halaman dengan Wi-Fi Penganalisis “Tetapan” dan klik bahawa Penganalisis “Tetapan” peranti mudah Kulit ARTISTRY. pada butang “Imbas”. Kulit ARTISTRY akan alih anda (PC/Tablet/ Anda akan melihat diputuskan secara Telefon pintar). Putuskan sambungan Wi-Fi automatik dan but semula.
- Page 57 Aplikasi Pelanggan Sebelum anda Untuk mencipta profil Pilih “Setuju” di bahagian Masukkan butiran mula menganalisis, baru, pilih ikon “+” polisi privasi. pelanggan seperti disarankan agar di sudut kanan atas. nama, umur, jantina, anda mencipta profil e-mel, jenis kulit, pelanggan. memo, dll. Sesudah selesai, pilih ”Simpan”...
- Page 58 Video / Mula Analisis / Kaji Selidik Gaya Hidup Video Mula Analisis Kaji Selidik Gaya Hidup Video Pengenalan mengenai Penganalisis Pilih “Analisis” untuk mula. Kulit ARTISTRY. Pada permulaan analisis, ada 17 soalan mengenai gaya hidup atau pelanggan. Sila tandakan jawapan untuk melengkapkan soal selidik.
- Page 59 Ukuran Kulit Penghidratan Untuk mula, tekan butang Sedang menganalisis... Keputusan penghidratan “Tangkap” pada peranti akan muncul apabila atau skrin aplikasi. analisis selesai. Untuk Apabila anda mendengar meneruskan analisis bunyi “bip”, letak sensor seterusnya, tekan pada kulit. butang berikut. Sensor penghidratan atau Sebum Letak dan tekan kertas...
- Page 60 Ukuran Kulit Liang Tekan butang untuk Letak kamera pada Keputusan akan muncul. Jika anda klik butang mengaktifkan mod kulit dan tekan butang Pilih butang “Bandingkan” “Bandingkan”, imej kamera. untuk menangkap imej. untuk memeriksa imej pelanggan dan tiga Kemudian tekan butang sampel seperti dalam <4>.
- Page 61 Ukuran Kulit Keserian Keputusan akan muncul Jika anda klik butang Tekan butang untuk Letak kamera pada apabila analisis selesai. “Bandingkan”, imej mengaktifkan mod kulit dan tekan butang Pilih butang “Bandingkan” pelanggan dan tiga kamera. untuk menangkap imej. untuk membandingkan imej sampel boleh Kemudian tekan butang imej sampel seperti dalam dibandingkan.
- Page 62 Ukuran Kulit Kedutan Keputusan akan muncul. Jika anda klik butang Tekan butang untuk Letak kamera pada Pilih butang “Bandingkan” “Bandingkan”, imej mengaktifkan mod kulit dan tekan butang untuk memeriksa imej pelanggan dan tiga kamera. untuk menangkap imej. sampel seperti dalam imej sampel boleh Kemudian tekan butang <4>.
- Page 63 Ukuran Kulit Kepekaan Keputusan akan muncul Jika anda klik butang Tekan butang untuk Letak kamera pada apabila analisis selesai. “Bandingkan”, imej mengaktifkan mod kulit dan tekan butang Pilih butang “Bandingkan” pelanggan dan tiga kamera. untuk menangkap imej. untuk membandingkan imej sampel boleh Kemudian tekan butang imej sampel seperti dalam dibandingkan.
- Page 64 Aplikasi Mod Pandangan Dalam mod pandangan, Pengguna boleh Dalam satu skrin, Pengguna boleh peranti mampu mengambil memilih parameter anda boleh lihat menandakan gambar dengan butang analisis untuk maksimum 2 imej kecacatan atau “Tangkap” berkali-kali. mengambil gambar. berbeza. masalah pada imej dengan fungsi catatan.
- Page 65 Bagaimana Mengimport Data dari ASA 1.0 ke ASA 2.0 - Versi iOS Mengeksport data dari aplikasi ASA 1.0 Sebelum anda mula mengeksport/mengimport data, sila pastikan yang berikut tersedia: - Versi terkini iTunes. - Versi terkini Windows 7 atau yang sebelumnya. - iPhone atau iPad dengan versi iOS terkini.
- Page 66 ASA 1.0 ke ASA 2.0 - Versi iOS Menyalin fail ASA 1.0 dari aplikasi iOS ke komputer anda Di iTunes, pilih aplikasi “Penganalisis Kulit ARTISTRY” dari senarai di bahagian Perkongsian Fail. Seret dan lepaskan fail dari senarai dokumen ke folder atau tetingkap pada komputer anda untuk menyalinnya ke komputer anda.
- Page 67 Bagaimana Mengimport Data dari ASA 1.0 ke ASA 2.0 - Versi iOS Menyalin fail ASA 1.0 dari komputer anda ke aplikasi ASA 2.0 iOS Di iTunes, pilih aplikasi ASA 2.0. Seret fail ASA 1.0 yang disimpan di komputer anda ke senarai dokumen ASA 2.0.
- Page 68 Bagaimana Mengimport Data dari ASA 1.0 ke ASA 2.0 - Versi Android Mengeksport Data dari Aplikasi ASA 1.0 Pergi ke applikasi ASA 1.0 anda, pilih “Tetapan” > Pilih “Tetapan Umum” > Pilih “Eksport” Anda boleh menamakan semula nama folder dan tekan “OK”. Data pelanggan anda telah berjaya dipindahkan.
- Page 69 Mengimport Data dari ASA 1.0 ke ASA 2.0 Pergi ke ASA 2.0 anda, pilih “Tetapan” > Pilih “Tetapan Umum” > Pilih “Import” Pada peranti anda, pergi ke “Fail”/”Fail Saya” > Pilih “Artistry” > Pilih “Solutionist” > Pilih fail .db untuk mengimport.
- Page 70 Bagaimana Mengimport Data dari ASA 1.0 ke ASA 2.0 - Versi Windows Mengeksport Data dari Aplikasi ASA 1.0 Pada Menu Halaman Utama, pilih “Tetapan” > Pilih “Tetapan Umum” > Pilih “Eksport” H. Bagaimana Mengimport Data dari ASA 1.0 ke ASA 2.0 - Versi Windows...
- Page 71 Bagaimana Mengimport Data dari ASA 1.0 ke ASA 2.0 - Versi Windows Mengimport Data dari ASA 1.0 ke ASA 2.0 Pada Menu Halaman Utama, pergi ke “Tetapan” > Pilih “Tetapan Umum” > Pilih “Import” > Buka fail .db > proses pengeksportan selesai. H.
- Page 72 Soalan-soalan Lazim Saya tidak boleh menghidupkan peranti.• Sila periksa tahap bateri. Sambung dan caskan peranti (atau bateri) menggunakan adapter yang disediakan oleh pengilang. (Status pengecasan bateri akan ditunjukkan pada halaman utama aplikasi perisian.) Saya tidak boleh menghidupkan peranti selepas bateri dicas sepenuhnya. Bateri mungkin disalah letak di dalam peranti.
- Page 73 Waranti Peranti ini menjalani kawalan kualiti yang ketat dan proses pemeriksaan dengan standard yang tinggi ketika dalam fasa pengeluaran sebelum dihantar ke pasaran. Jika terdapat sebarang kegagalan fungsi atau kecacatan operasi di bawah keadaan penggunaan biasa dalam tempoh 10 hari selepas pembelian, pengilang akan menyerap semua kos pembaikan atau malah menggantikannya dengan peranti yang baru.
- Page 74 © Copyright 2020 Amway (B) Sdn. Bhd., Amway (Malaysia) Sdn. Bhd. (22062-P) AJL93010 and Amway (Singapore) Pte. Ltd. (197902465G). All rights reserved. R01/18 (11/20)
Need help?
Do you have a question about the ASA-30X and is the answer not in the manual?
Questions and answers