Table of Contents
Advertisement
Quick Links
User's Manual
Non-contact temperature measurement & facial recognition
for access control system
• Before using the product, please read this manual carefully and keep it for later.
• Image drawings and notations in this document may slightly differ from the actual product.
• The contents of this document are subject to change without notice.
⚫ Model : ASP-2000
⚫ Stand Assembly Manual
Rev.1.0
Copyright ©2020 AHA INC CO.,LTD. All Rights Reserved
English
www.ahatouch.com
Advertisement
Table of Contents

Summary of Contents for AHA smart PASS ASP-2000
- Page 1 • Image drawings and notations in this document may slightly differ from the actual product. • The contents of this document are subject to change without notice. ⚫ Model : ASP-2000 ⚫ Stand Assembly Manual English www.ahatouch.com Rev.1.0 Copyright ©2020 AHA INC CO.,LTD. All Rights Reserved...
-
Page 2: Table Of Contents
Contents 1. Smart Pass Overview.………………………………………………………………………………..…...………... 1.1 Smart Pass Introduction..…………………………..……………………………..…...………...…. 2. How to use Smart Pass...…………………………………………………………………………………………. 2.1 How to run Smart Pass.……………………………………………………………………....2.2 How to use Smart Pass.……………………………………………………………………....3. Smart Pass screen description………………..……………………………………………....………... 3.1 Initial screen...………………………………………………………………………………………..…….. 3.2 Main menu..………………………………….……………………………..………………………………. 3.3 Setting……………...……………………………………………………………........3.4 Registration of access information …………….……………….…………………………….. -
Page 3: Smart Pass Overview
1. Smart Pass Overview 1.1 Smart Pass Introduction Smart Pass is an advanced AI (Artificial Intelligence) face recognition and heat Check access control system that accurately identifies a person and measures temperature even if the mask covers part of the face or wears glasses and a mask at the same time with advanced deep learning technology. -
Page 4: How To Use Smart Pass
2.2 How to use Smart Pass -The measuring distance should be measured at 30cm. -The measuring range is 34℃ ~ 42℃. -When measuring body temperature, do not cover the main measurement areas (forehead, eyes, face) with clothes or other means. -If the body heats up due to physical activity, wait for the body heat to return to the state in which there was no physical activity after a certain period of time before measuring. - Page 5 < Screen display after measurement> At normal body temperature At high body temperature (Below the warning set value) (Over warning setting value) Body temperature is displayed Body temperature is displayed on a green background on a red background Wrong wearing a mask Not wearing a mask On a red background On a red background...
-
Page 6: Smart Pass Screen Description
3. Smart Pass screen description 3.1 Initial screen This is a screen for face recognition and temperature measurement. The current date & time are displayed at the top. When a person is detected, contextual phrases or temperature measurement results are displayed. Depending on the setting, information such as IP, company name, and version may be displayed at the bottom of the screen. - Page 7 Name Description The set device name, IP, user name, and login Status information status are displayed. Used to connect the device to a network Log In Management (not currently supported) Application settings Open the Smart Pass detailed settings menu. Capture a person's face and register it in Face registration the database.
-
Page 8: Setting
3.3 Setting This is a detailed menu for setting up a Smart Pass. (1) Name setting Set the device name and company name. Name Description You can set the device name and company name. Device name setting This is a detailed setting menu related to face recognition and Detailed setting menu body temperature measurement functions. - Page 9 (2) Inspection setting This is a detailed setting menu related to face recognition and temperature measurement. Name Description Temperature Turns the temperature test function on or off. Test It is used to calibrate the temperature when measured different from Temperature the actual temperature by the external temperature.
- Page 10 (3) Detailed recognition setting When checking whether it is a stranger or registered in the database, the accuracy and the number of identifications are set. Name Description Determines the precision of comparison with photos in the database. The lower the number, Test threshold the more precise the comparison.
- Page 11 (4) Volume setting Adjust the volume level for voice guidance and warning sounds. (5) Startup setting Change the behavior or program settings when the device is turned on. Name Description Set whether the app turns on automatically when the Auto start device is turned on.
- Page 12 (6) Application information settings Set whether to display information such as MAC address, IP, and company name on the initial screen. < Hide / Show app info setting >...
- Page 13 (7) Recognition effect display Set the change of screen or light when a person is recognized. Name Description When a person registered in the database is recognized, Recognition a picture of the person is displayed, or the name of the success person is displayed.
- Page 14 (8) Password setting This menu is for changing the password. ※ The default password value is '123456'. (9) Camera resolution setting Change the camera captured screen resolution. There are 640 * 480 resolution and 1280 * 720 resolution.
- Page 15 (10) Screen protection brightness setting Set the screen brightness when the screen is switched to the screen protection state because no person is detected for a certain period of time. (11) Restart time setting Enter the hour in the upper column and the minute in the lower column on a 24-hour basis.
- Page 16 (12) Relay setting Set relay mode and delay time Relay is a kind of switch and operates according to the mode setting as follows. Relay mode is used to operate the external door lock, warning light, alarm buzzer, etc. according to the recognition result. Maximum driving current and voltage: 2A 30VDC, 0.28A 220VAC Excessive use of the maximum drive current and voltage may cause product defects.
- Page 17 (13) Others You can configure firmware upgrade or server communication related settings. Name Description You can manually upgrade the firmware by connecting the USB containing the firmware upgrade Firmware version file. The file name should be ‘updateTemp.bin’ and it should be at the top of the USB path. If you select On, a field for entering content appears.
- Page 18 (14) Program initialization This function returns the program settings to the initial state. When the button is pressed, the above warning appears, and when the OK button is pressed, various settings are initialized and all information and records registered in the database are lost.
-
Page 19: Registration Of Access Information
3.4 Registration of access information This is a function to take a person and register it in the face database. Press the Gather button at the top to take a picture. The picture which was taken is scaled to fit the person's face. Enter ID and name, select gender and click Save to save it to the Face database. -
Page 20: Device Information
3.5 Device information Displays information about apps and devices. Information such as firmware version, memory, brightness, and volume is displayed. -
Page 21: Access Record
3.6 Access record You can see who measured your temperature with Smart Pass. This record contains name, identity , checking time, temperature and photo at the time of measurement. If the detected person is not in the face database, it is displayed as 'Stranger'. Enter the time zone you want to see and press the 'query' button to retrieve only the records for that time. -
Page 22: List Of Registrants
If the storage capacity of the device is full, use ‘Settings’-> ‘Program Reset’ to delete the old records. At the time of initialization, the record of the registrant list is also erased, and the settings are initialized, so please back up and record the contents. If the storage capacity is full due to the access record and remains below 1GB, Records of 10 days are deleted automatically in sequential order. -
Page 23: Countermeasure
4. Countermeasure 1) If the device discontinued and slows down, reboot the device. To reboot, drag the left mouse button at the bottom of the screen and drag it up to bring up the bottom menu. Press the power button on the right side of the bottom menu and select ‘Restart’... - Page 24 Go to Language preferences by selecting 'Languages' from the Language & input menu. Drag the icon on the right in Language preferences to change the order to change the device's system language. Changing the system language also changes the language of the Smart Pass. When changing the system language, it is recommended to reboot the device for better usage.
-
Page 25: Product Specification
5. Product specification Camera Resolution 2 million pixels Type Dual wide dynamic camera Aperture F2.4 White balance Auto Photo flood light WLED and IR dual photo flood light Warning light LED (red, green) Infrared array sensor Temperature measurement distance 0.3m (11.8 inches) Temperature measurement accuracy ±... -
Page 26: Product Diagram
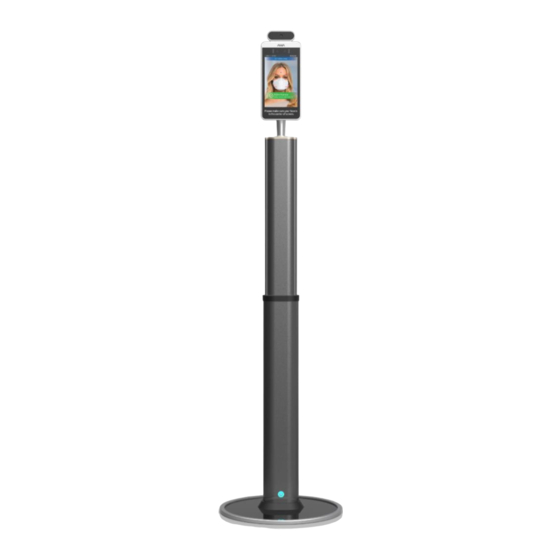
6. Product diagram... -
Page 27: Product Description
7. Product description Name Description Infrared array sensor Measure the body temperature of the subject. Auxiliary light during measurement and display the measurement Auxiliary light / alarm result (White: light, Green: if the value is in the set temperature, light Red: if the value is over the set temperature) Camera for facial recognition (shooting face, checking mask Dual Camera... -
Page 28: Connectivity Description
8. Connectivity description For installation experts and For installation experts and administrators administrators Connection and communication Name Description method External communication terminal : Wiegand communication input : Wiegand input WG IN A method to transmit a small amount (4Pin -- GND, 12V, D1, D0) of data by using two lines, Do and D1. -
Page 29: Precautions For Use And Storage Management
9. Precautions for use and storage management ※ Precautions for use • Do not take your body temperature within 30 minutes after exercising, taking a bath, or outside activities. • Measure body temperature at 30 cm to ensure accurate temperature. •... -
Page 30: Assemble Adjustable Floor Stand
10. Assemble adjustable floor stand A. How to assemble adjustable stand How to assemble the pedestal 1. Please check the direction of the floor side before assembling the product. 2. Identify the hole on the bottom of the floor to separate the top and bottom. 3. - Page 31 How to assemble stand body and pedestal <CAUTION> The power switch of the stand body and the direction of the pedestal wide side must match each other. Power Switch Power Switch Wide Side Narrow Side 1. To assemble the pedestal, place the stand body on a flat surface with an appropriate height with the knob handle facing up.
- Page 32 B. How to assemble the main unit and Height adjustable stand Disassemble the table cover Put the stand upright and remove the fixed screws (4ea) to disassemble the cover of the top of the stand with included 2.5mm wrench. Assemble the body and stand cover Insert the cable into the hole in the stand.
-
Page 33: Assemble Floor Stand
11. Assemble floor stand How to assemble the main unit and floor stand Disassemble the table cover Put the stand upright and remove the fixed screws (4ea) to disassemble the cover of the top of the stand. The main unit and stand assembly Put the cables in the hole of the stand and insert the main unit into the stand Cable connection... -
Page 34: Assemble Table Stand
12. Assemble table stand A. How to assemble the main unit and the table stand Table stand The table stand has a cover, non-slip foots (Foot x 3ea), and screws (M3 x 3ea) on the bottom surface. Disassemble the table stand Separate the foots and screws from the bottom of the table stand to dissemble the cover and table stand. - Page 35 The product dimension...
- Page 36 Tel: +82-31-997-0909 e-mail: overseas@ahatouch.com www.ahatouch.com All specifications are subject to change without prior notice to improve the product.
Need help?
Do you have a question about the smart PASS ASP-2000 and is the answer not in the manual?
Questions and answers