Advertisement
Available languages
Available languages
Advertisement
Table of Contents

Related Manuals for SKY DEVICES Elite T8

Summary of Contents for SKY DEVICES Elite T8
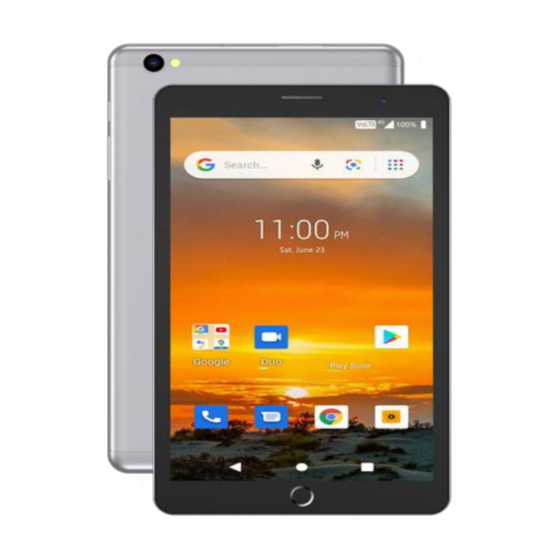
- Page 1 Elite...
-
Page 2: Points For Attention
Points for Attention Do not use the player in exceptionally cold or hot, dusty, damp or dry environments. Do not allow the player to fall down while using it. Please charge your battery when Battery power icon shows an empty icon; The system automatically shuts down and the power is soon off when you switch on the unit once again;... -
Page 3: Basic Operation
Basic Operation Power on In the shutdown state, long press " " button boots Power off In the power on state, long press the " " key seconds then pop-up device options, select " Power off " to shut down. Sleep The machine under normal operating conditions, Short press the power button, Into hibernation, Now, Screen will close. - Page 4 Inserting and Pulling out the Micro SD card Inserting: Put the Micro SD card face up (side with words), and slightly force the card into the socket of the card, i.e. connecting the unit. Under this state, you can play the content in the Micro SD card.
-
Page 5: Setting Up Your Tablet
malfunction of the portable player In many cases were caused by using inappropriate accessories, in particular the power adapter. Use the substandard power adapter will shorten the life of the portable player by considerably, the voltage instability will seriously affected the normal work of the portable player and bring permanent damage on the player’s performance and reliability, Use the substandard power adapter will also reduced the vocal quality of the players, shutdown the player when you using it, In addition, Use the substandard power... -
Page 6: Settings Menu
All apps—Display a list of all apps installed. Setting —Set the WLAN, BT, Brightness etc. button moves back one step to the previous menu/page. button returns immediately to the main screen. button displays a menu of recently opened applications. ( This interface adds a “CLEAR ALL” button ) NOTE: The appearance of the Home screen may vary. - Page 7 • Wi-Fi – Connect to/disconnect from wireless networks, view connection status • Bluetooth – Connect or disconnect Bluetooth devices • Display – Adjust display settings. • Prompt & Notifications – Adjust different notification settings. • Audio Profiles – Adjust the different audio settings such as ringtones. •...
- Page 8 • Accounts – Add or remove email and Google™ accounts such as Gmail, Google • Google – Location, security, Ads, Nearby, Set up nearby device. • Language and input – add to the dictionary, edit on-screen keyboard settings, vocal search, etc. •...
- Page 9 Use gestures The following gestures can be used with your tablet: Organize the Home screen • To add an app or a widget to the Home screen, touch the Apps tab or the Widgets tab, and then tap and hold an app or widget until it is added to the Home screen. •...
-
Page 10: Back Up Your Data
Apps—Touch , and then touch the Apps tab to see a list of all apps. Widgets—Touch , and then touch the Widgets tab to see a list of all widgets. Notification—Swipe down from the top of the screen to see your notifications. Back up your data Strongly encourages that you periodically back up your personal data and media on your tablet to another computer, a dedicated storage device, or to the cloud using one... -
Page 11: Specification
Specification Flash Memory 32GB Memory Main Chip MTK8765 Quad Core Display 8" 800*1280 IPS Operation system Android™ 11 (Go edition) Built-in WLAN WLAN 802.11 b/g/n RTC(Real-time clock) G-sensor General Power Charger 5V 1.5A Camera 2.0MP+5.0MP FF Bluetooth Support Speaker Dimensions Approx. - Page 12 Puntos de Atención No utilice la Tablet en ambientes excepcionalmente fríos o calientes, polvorientos, húmedos o secos. No permita que la Tablet se caiga mientras la usa. Por favor cargue la batería cuando: El ícono de energía de la batería muestra un ícono vacío; El sistema se apaga automáticamente y la alimentación se apaga pronto cuando vuelve a encender la unidad;...
-
Page 13: Operación Básica
Operación básica Encendido En el estado de apagado, mantenga presionado el botón " " Apagado En el estado de encendido, mantenga presionado el botón " " por segundos, luego en las opciones emergentes del dispositivo seleccione " Apagar”. Reposo En condiciones normales de funcionamiento, presione brevemente el botón de encendido, luego en hibernación, la pantalla se cerrará. - Page 14 segundo disco. Esta unidad es compatible con la extensión de la tarjeta Micro SD de 4 GB a 128 GB. Insertar y retirar la tarjeta Micro SD Insertar: Coloque la tarjeta Micro SD hacia arriba (el lado con palabras) y presione ligeramente la tarjeta en la ranura para tarjeta, es decir, conecte la unidad.
- Page 15 máxima capacidad cada 2 o 3 meses, mientras lo tenga guardado sin uso. El adaptador de corriente es un componente clave del reproductor portátil, el cual desempeña un papel crucial para mantener el desempeño normal del reproductor portátil y proteger su seguridad cuando lo utilice. Las encuestas a largo plazo realizadas a los clientes y el servicio de postventa demuestran, en muchos casos, que el mal funcionamiento del reproductor portátil fue causado por el uso de accesorios inapropiados, en particular el adaptador de corriente.
- Page 16 IMPORTANTE: Si la imagen de la batería no se muestra en pantalla, presione brevemente el botón de encendido para mostrar la imagen y luego mantenga presionado el botón de encendido hasta que se muestre el logotipo. Siga las instrucciones en pantalla para seleccionar un idioma y una red inalámbrica. Todas las aplicaciones—Muestra una lista de todas las aplicaciones instaladas.
-
Page 17: Menú Configuraciones
MENÚ CONFIGURACIONES El menú configuraciones le permite ajustar la configuración del sistema del teléfono celular de la Tablet. Para cambiar configuraciones: 1. Toque el ícono menú “Configuraciones” en el menú de Aplicaciones. abrirá el menú Configuraciones. 2. Toque un título categoría para visualizar más opciones en el lado derecho de la pantalla. - Page 18 • Almacenamiento y USB – Visualice las configuraciones de almacenamiento interno y externo. (Nota: el software del Sistema operativo ocupa parte de la capacidad). • Batería – Visualice el estado de la batería y realice ajustes para el consumo de energía.
- Page 19 pantalla, búsqueda por voz, etc. • Copia de seguridad y restablecer – realizar copias de seguridad y restaurar datos, realizar una restauración de fábrica, etc. • Fecha y hora – Configurar la fecha, la zona horaria, la hora, el formato del reloj, etc. •...
- Page 20 Organizar la pantalla inicio • Para agregar una aplicación o un widget a la pantalla de inicio, toque la pestaña Aplicaciones o la pestaña Widgets, y luego mantenga presionada una aplicación o widget hasta que se agregue a la Pantalla de Inicio. •...
- Page 21 Aplicaciones—Toque y luego toque la pestaña Aplicaciones para ver una lista de todas las aplicaciones. Widgets—Toque y luego toque la pestaña Widgets para ver una lista de todos los widgets. Notificación—Deslizar hacia abajo desde la parte superior de la pantalla para ver las notificaciones.
-
Page 22: Especificaciones
Especificaciones Memoria Flash 32GB Memoria Chip principal MT8765 Quad Core Pantalla 8" 800 x 1280 IPS Sistema operativo Android™ 11 (Go edition) WLAN incorporado WLAN 802.11 b/g/n RTC(Reloj en tiempo rea) G-sensor General Cargador de energía Enchufe 5V 1.5A EE. UU. Cámara 2.0MP+5.0MP FF Bluetooth...
Need help?
Do you have a question about the Elite T8 and is the answer not in the manual?
Questions and answers