Table of Contents
Advertisement
Quick Links
Advertisement
Table of Contents

Summary of Contents for APPASAMY ASSOCIATES KMS 6
- Page 2 INTRODUCTION Appasamy Associates proudly offers the finest and most precise Keratometer. All adjustments on the instrument are manipulated conveniently from the practioner’s position. All functional parts of the Instrument are manufactured and assembled to meet customer’s requirements. High cared design of positioning, rotating, moving and clamping assemblies is confirmed to meet the actual requirements efficiently.
-
Page 3: Table Of Contents
TABLE OF CONTENTS Chapter Page No Introduction & Description of Keratometer Quality, Reliablity and Safety Warning Important Safety & Maintenance Instructions Safety Precautions Caution for use, General Specification Environmental Condition for use Technical Specification Cleaning and disinfection information 10. Unpacking and Installation 11. -
Page 4: Quality, Reliablity And Safety
QUALITY, RELIABILITY AND SAFETY Appasamy Associates is responsible for the safety, reliability and performance of the equipment only if it is used in accordance with the instructions given in the Manual. The Instrument is designed to perform as per the declared Intended for use with safer and reliable. -
Page 5: Warning
If the customer needs any calibration please send the equipment for calibration purpose. TRAINING REQUIREMENT The equipment is expected to operate by ophthalmic Doctors only. If at all it is used by technician they should by trained well in usage of this equipment. Appasamy associates well trained the personal if required. -
Page 6: Important Safety & Maintenance Instructions
IMPORTANT SAFETY & MAINTENANCE INSTRUCTIONS Before using the Equipment, read instructions carefully. Regular maintain and check the instrument and its parts. Handle the Equipment carefully. Use proper methods to clean optics and Equipment. Before switch off, turnoff regulator. Always cover the Equipment when not in use. Don’t touch the exposed lenses, and keep them clean. -
Page 7: Safety Precautions
SAFETY PRECAUTIONS Safety pointers for the manual and the device described therein are depicted according to the following categories. Carefully read these sign codes & follow them when necessary. The following code categories describe the degree of danger or damage likely to be incurred in the event of user error made in ignorance of these codes. - Page 8 CAUTION FOR USE Cautions are intended to alert you to importance of following the correct operating procedures where risk of injury to the patient or system. Do not handle the plug with wet fingers ( To avoid electric shock) The User are here by instructed not to touch the equipment and the patient simultaneously. GENERAL SPECIFICATION Equipment classification Mode of operation...
-
Page 9: Environmental Condition For Use
ENVIRONMENTAL CONDITIONS FOR USE Operating Temperature: 0° C ~ 50° C Humidity : 35% ~ 95% (without dew condensation) Air Pressure : 700hPa ~ 1060hPa STORAGE, USAGE PERIOD AND OTHERS 1. Environmental conditions for installation (without package) Temperature: -5° C ~ 70° C Humidity : 35% ~ 95% (without dew condensation) Air Pressure : 700hPa ~ 1060hPa... -
Page 10: Technical Specification
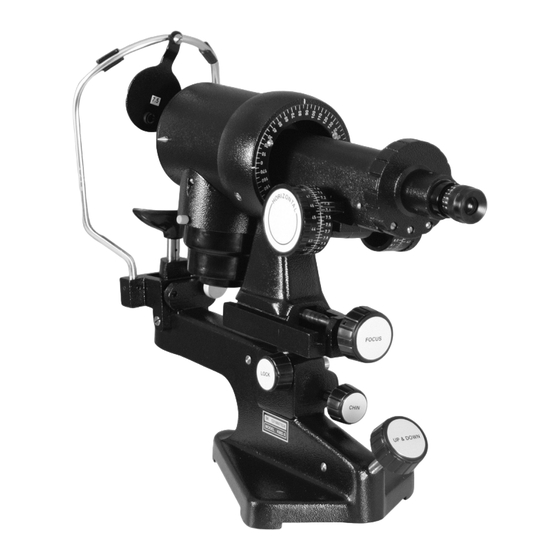
TECHNICAL SPECIFICATION Key Features Coincidence focusing system. Positive measurements to 0.02mm accuracy. One-position instruments. Measure both meridians without change optical system. 15x Wide-angle piece. Two-way adjustment to fit patient. Accurate measurement of corneal curvatures Allows subjective review of corneal surface Measures concave surfaces for contact lens fitting Easy elevation and lowering allows quick patient positioning Engraved focusing scale on eyepiece... -
Page 11: Unpacking And Installation
Lens cleaning Method. Fold a piece of lens tissue four or five times to give a narrow triangular shape with a • finely pointed end. Moisten the pointed end of the lens tissue with a small amount of cleaner, keeping •... - Page 12 After unpacking verifies the list of accessories us indicate below. INSTALLATION The initial installation will be done by Appasamy Associates Trained Engineers only. After installation a performances check will be carried by Appasamy Associates Engineers. Nobody is authorized to install the Medical Equipment except Appasamy Associates Engineers.
-
Page 13: Preliminary Adjustments
PRELIMINARY ADJUSTMENTS... - Page 14 The operator must first adjust the instrument eyepiece for his eye. 1. Position a white background in front of occluder. 2. Turn the eyepiece cap counter clockwise as far as possible. 3. Switch on the instrument lamp and view through the eyepiece; a blurred cross will be seen.
-
Page 15: Instrument Orientation
Seat the patient comfortably before the instrument. The chin should fit snugly into the chin rest. It is necessary that the patient hold his head firmly against the headrest during the examination. The patients should grasp the horizontal arm of the instrument thereby providing a better support while proper fixation is being maintained. - Page 16 After the patient has been properly oriented, turn the instrument to point directly at the eye to be examined. Looking from the side, the practitioner will see a tiny, bright ring in the centre of the cornea (the corneal image of the circular mire). With the correct position established, the patient sees a red fixation light in the tube of the instrument.
- Page 17 very blurred. These will be cleared with the focusing knob. By swiveling the instrument slightly and by making fine adjustments of the elevation knob, the black cross is placed near the centre of the doubled circle, (This doubled circle is called the focusing circle). This accomplished, lock the instrument with “Instrument position locking knob,”...
-
Page 18: Measuring The Horizontal Principal Meridian
Two plus signs will be seen between the left-hand and central focusing circles in the instrument. The axis of the cylinder can be found easily when the axis of these plus signs just touch. Turn the horizontal lines of the drum until the plus signs are barely separated. If the horizontal lines of the plus sign appear to be continuous and unbroken, the instrument is set at the position of the axis of the astigmatism. -
Page 19: Measuring The Vertical Principal Meridian
plus sign will move to the (right or left). Move this plus sign until it is exactly superimposed on the plus sign of the central focusing circle. This completes the setting for the near horizontal meridian. The scale of the left-hand or horizontal measuring drum indicates the actual dioptric power of the cornea in the horizontal or near horizontal meridian. -
Page 20: "With" And "Against" The Rule Astigmatism
meridians nearest is established for the cornea in the meridians nearest to 0-180 degree. On the right, or vertical measuring drum the power it established form the cornea in the meridian nearest to 90 degree. The difference between these two readings is the amount of corneal astigmatism in the eye under examination. - Page 21 TROUBLE SHOOTING This section lists the most common problems that users sometimes encounter. All...
-
Page 22: Warranty And Limitation Of Liability
The returned goods to be shipped via traceable means. The returned goods are obtained by contacting Appasamy Associates, customer service department for detailed policy guidelines including exchange; please contact your local Distributor or Representative. WARRANTY AND LIMITATION OF LIABILITY APPASAMY ASSOCIATES Warrants that this equipment Keratometer is free from... - Page 23 In case of any defect during the warranty period, the concerned person / Hospital / Institution, shall immediately contact Appasamy Associates, Chennai or nearby regional service center given below. Appasamy Associates will rectify the problem and replace any parts if necessary. Please read and follow the safety and maintenance instruction given in this User Manual.
- Page 24 0434 M/s. Emergo Europe,Molenstrat 15, 2513 BH The Hague,The Netherlands. Contact Person: Rene Van de Zande, Designation: President & CEO Phone: (31) (0) 70 345-8570, 70 346-7299 Fax: (31) (0) 70 346-7299 Disposal: Dispose of the instrument according to Email: europe@emergogroup.com Website: www.emergogroup.com...
Need help?
Do you have a question about the KMS 6 and is the answer not in the manual?
Questions and answers