Advertisement
Quick Links
Advertisement

Summary of Contents for TRUGLO TG7650
- Page 1 When Brightness Counts...
- Page 2 Green Laser: TRUGLO, Inc. POWER OUTPUT<1mw 525 International Parkway WAVELENGTH 500-540nm Richardson, Texas 75081 Ph: 972-774-0300 Red Laser: Fx: 972-774-0323 TG7650G / TG7650R TRUGLO, Inc. POWER OUTPUT<1mw 525 International Parkway RICHARDSON, TEXAS 75081 E-mail: contactus@truglo.com MADE IN CHINA WAVELENGTH 630-670nm COMPLIES WITH 21 CFR 1040.10 AND 1040.11...
- Page 3 NEVER look into or stare at the laser beam or its reflection. NEVER point the laser beam at a person or animal. NEVER shine the laser at reflective surfaces. NEVER point the laser beam at any type of moving vehicle, including aircraft. Such actions are unlawful and extremely dangerous.
- Page 4 W ARNING Before you begin, always make sure the weapon is unloaded and safe to handle. W ARNING Always practice safe handling techniques with any weapon. W ARNING Once mounted, the weapon will be pointed in the direction of anything illuminated by the laser. W ARNING Never point the laser at a target you do not intend to shoot.
- Page 5 On / Off Constant on: Move the on /off lever to the down position. Momentary on: Hold the on /off lever in the On / Off up position. Lever Laser Laser / Light Modes Output Aperture Laser only: Move the mode switch to the up position.
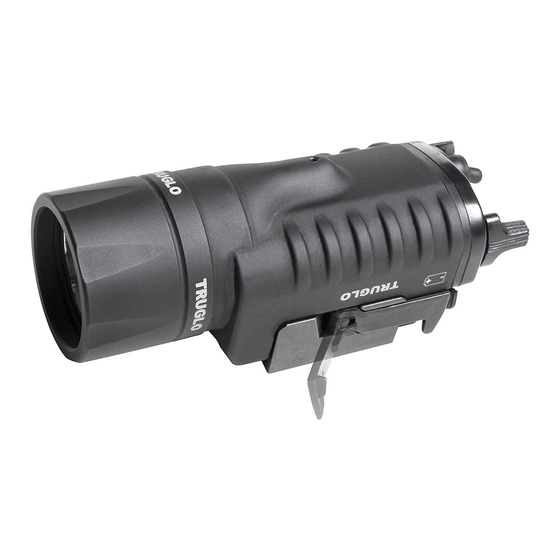
- Page 6 Battery • Your laser sight uses two CR123A lithium 3-volt batteries. To replace batteries: CAUTION: CHECK TO MAKE SURE YOUR WEAPON IS UNLOADED. • Unlock the Quick-Detach Lever. • Rotate the Back Plate Lock and remove the Back Plate. • Replace the batteries (please note the polarity of each battery marked on the outside housing). • Reinstall the Back Plate and lock in place.
- Page 7 Back Plate Recoil Lug Lock (interchangeable) Back Plate Polarity Quick-Detach Batteries (interchangeable) Diagram Lever...
- Page 8 Mounting CAUTION: CHECK TO MAKE SURE YOUR WEAPON IS UNLOADED. • Your laser sight has integrated mounting rails that attach to a standard Weaver-style base or Picatinny rail. • Unlock the Quick-Detach Lever and set the laser sight onto the mounting base of the weapon. • The Recoil Lug should fit into one of the grooves in the top of the mounting base. Be sure the laser sight is fully seated before locking the Quick-Detach Lever. PLEASE NOTE: • It may be necessary to interchange the Recoil Lug. • Two additional Recoil Lugs are included. These can be used to fit a majority of firearm/rail configurations.
- Page 9 • To replace the Recoil Lug, use the included 2mm hex wrench. Left-Handed Back Plate 1. Unlock the Quick-Detach Lever. 2. Rotate the Back Plate Lock and remove the Back Plate. 3. Install the Left-handed Back Plate and lock in place. Remote Pressure Switch 1. Unlock the Quick-Detach Lever. 2. Rotate the Back Plate Lock and remove the Back Plate. 3. Install the Remote Pressure Switch and lock in place.
- Page 10 ZEROING (windage and elevation adjustments) Please note that the laser has been pre-set at the factory to be aligned with the mounting base of the laser sight. Only minor windage and elevation adjustments should be required. If significant adjustments are necessary, please make sure the laser sight is properly mounted or adjust the mounting base. The maximum adjustment is approximately 10 inches in all directions at 30 feet. Insufficient adjustment is not a defect with the laser sight. CAUTION: ALWAYS USE EYE AND EAR PROTECTION. SHOOT ONLY AT AN APPROVED SHOOTING RANGE OR A SUITABLE SAFE AREA.
- Page 11 • After carefully firing at the target, CHECK TO MAKE SURE YOUR WEAPON IS UNLOADED. • Make any necessary adjustments to the W/E adjustment screws using the included 1.25mm allen wrench. • Turning the Windage Adjustment Screw clockwise moves the POI to the left. • Turning the Elevation Adjustment Screw clockwise moves the POI down. Elevation • Do not over-adjust the windage or elevation adjustment Windage Adjustment Adjustment Screw screws. Stop turning if you feel any resistance. Screw...
-
Page 12: Two-Year Limited Warranty
TWO-YEAR LIMITED WARRANTY TRUGLO, Inc. warrants this product to be free from original defects in materials and workmanship for a period of TWO (2) YEARS from the date of original retail purchase, subject to the limitations set forth herein. This warranty applies only to the original retail purchaser and requires the purchaser to supply a copy of the original proof of purchase (original sales receipt) at the time warranty service is requested. No additional warranty “registration” is required. If this product should malfunction or fail, contact us for a Return Merchandise Authorization number. The RMA number should be clearly marked on the outside of the package. - Page 13 THIS LIMITED WARRANTY IS THE EXCLUSIVE WARRANTY FOR THIS PRODUCT. WE DISCLAIM ANY AND ALL OTHER WARRANTIES OF ANY KIND, EXPRESS OR IMPLIED, INCLUDING ANY WARRANTIES OF FITNESS FOR A PARTICULAR PURPOSE OR OF MERCHANTABILITY. WE SHALL NOT BE LIABLE IN TORT, INCLUDING NEGLIGENCE OR STRICT LIABILITY, AND SHALL HAVE NO LIABILITY AT ALL FOR INJURY TO PERSONS OR PROPERTY. OUR LIABILITY FOR FAILURE TO FULFILL ANY OBLIGATION UNDER THIS LIMITED WARRANTY OR ANY OTHER LIABILITY IN CONNECTION WITH THIS PRODUCT SHALL BE LIMITED TO THE AMOUNT OF THE PURCHASE PRICE RECEIVED BY US FOR THE PRODUCT. THE REMEDIES STATED IN THIS LIMITED WARRANTY ARE THE PURCHASER’S EXCLUSIVE REMEDIES AGAINST US REGARDING THIS PRODUCT. UNDER NO CIRCUMSTANCES SHALL WE BE LIABLE FOR ANY INDIRECT, INCIDENTAL, SPECIAL OR CONSEQUENTIAL DAMAGES, INCLUDING LOST PROFITS AND REVENUES, INCONVENIENCE OR INTERRUPTIONS IN OPERATIONS, OR ANY OTHER COMMERCIAL OR ECONOMIC LOSSES OF ANY KIND. THESE LIMITATIONS AND DISCLAIMERS ARE NOT MADE BY US WHERE PROHIBITED BY LAW. SOME STATES PROHIBIT LIMITATIONS OF WARRANTIES AND THE PURCHASER MAY HAVE ADDITIONAL RIGHTS IN THOSE STATES.
- Page 14 Truglo WWW. .CoM...
Need help?
Do you have a question about the TG7650 and is the answer not in the manual?
Questions and answers