
Summary of Contents for EAM marvel
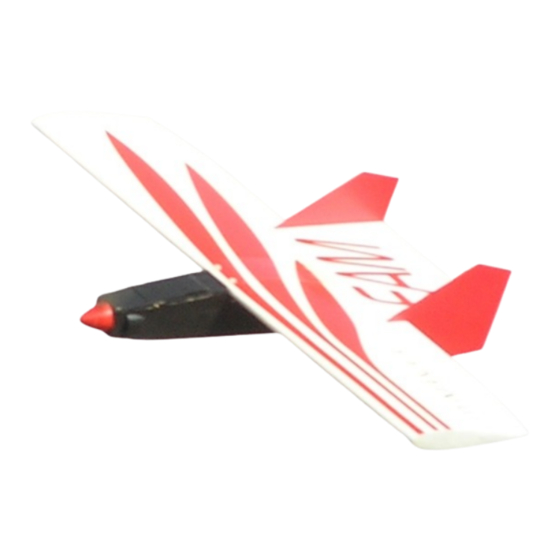
- Page 1 MARVEL A medium/small electric sport aircraft with a wide speed range and smooth flying characteristics. Wing span: 38 in. / 965 mm Wing area: 356.25 sq. in. / 22.98 dm Length: 20.4 in. / 518 mm Weight: 28 – 36 oz / 790 – 1020 g...
- Page 2 EAM Marvel kit instructions. The Marvel kit is a product of Electro Aero Modeling, USA http://www.eam.net/ e-mail: sales@eam.net Power package and radio: Recommended power is an electric motor in the 150 to 250 watt range. We have used Speed 600 brushed motors, Medusa and Lehner brushless motors so far.
- Page 3 Tools: Ruler or other straight edge Clamps Knife (hobby knife, razor knife or similar – even a box knife or razor blade in a pinch...) Screwdrivers - various.. Awl (or bamboo skewer – good as a tool and even reinforcement as necessary) 3/16”...
- Page 4 Wing. Day two would be finishing the wing and attaching the tail to the fuselage. Day three would be finishing details like covering and trimming, motor installation, radio installation and final setup. Marvel kit and build information is available from: http://www.eam.net/ http://eam.net/EAMRC/Marvel/eam_marvel.htm and also on RC Groups http://www.rcgroups.com/...
- Page 5 Fuselage: Inspect the edges of Coroplast pieces for scrap, lumps, etc. Clean up the edges if necessary. Generally, one side of the Coroplast will be smoother than the other. Pick whichever side you prefer for the outside, and lay that side down on the workbench. You will crush the fold lines with a blunt tool, like the end of a dowel –...
- Page 6 Using the above techniques make a sharp crease for the wing bolt tabs. This crease should be across the ends of the relief notches - parallel to and about 1/8” (3mm) below the edge of the wing seat. Use a bit of care here, as folding the Coroplast at a shallow angle across the flutes is a bit tricky, and the cleaner the fold is here, the stronger the wing mounting will be.
- Page 7 Put glue along the bottom front joints and the motor mount joint line. Apply glue to the bottom and sides of the motor mount too. Key the motor mount into one of its associated slots. Fold the sides up, bring the sides and bottom together. Make sure that the motor mount keys into all of its slots. Tape the bottom joints together.
- Page 8 Put glue along the servo tray joint line. Put glue along the sides and back end (bottom) of the servo tray / aft bulkhead. Spread the fuselage sides a bit and put the servo tray in place. Put a strap of tape across the wing saddle toward the front end of the tray to hold it in place.
- Page 9 Find the four nylon wing bolts. Cut 1/2” off of two of them to give them a shaft length of 1”. Take one of the wing mount spreaders, apply a bit of glue to the tee nuts, fit into the holes in the spreader and press them into place.
- Page 10 Remove the piece of tape across the top of the motor mount. Put glue along the top front joints and the top of the motor mount. Put the top on and tape in place. Spread the aft sections out a bit and apply glue along the joints. Bring the aft joints together and tape in place.
- Page 11 Tail: It is easiest to put the elevator control horn in place before doing anything else here, so I suggest that you do it now.. You can do it later if you prefer – your choice. Position the horn at the center of the elevator, with the pushrod holes over the hinge cutout.
- Page 12 Wing: Clean up wing core. Remove any material from spar cutouts and trailing edge cutout. You may choose to gently block sand the core to smooth out any ripples or imperfections, but this is not necessary. DO NOT USE GOOP on the wing! The Goop glues will melt the foam wing core. Use epoxy or PU glue on the wing.
- Page 13 The wings are already routed out for BlueBird BMS-371 servos. In our experience these are excellent micro servos and perfectly adequate to the task for this plane. Carefully enlarge the pockets as necessary if you are using some other servo. It is best for the pockets to be a bit tight so that the servos must be pressed into place.
- Page 14 *** Early production note *** The early production kits have a flat piece of Lexan for the wing center reinforcement. The hole locations are marked with pilot holes. The pieces with the molded dimples will be in later kits. Other than that, the procedure is the same as follows.
- Page 15 Finishing up... If you wish, you can sand the corners of the fuselage to take the edge off. Coroplast sands OK, but will end up with a very fine fuzzy surface. You can reduce this a bit by quickly running a hot covering iron over the corners.
- Page 17 While we will not claim that it is not possible, we have yet to experience flutter with the Marvel. This includes some very high speed dives with the Lehner 2100 Kv motor spinning an APC 6x4 prop.
Need help?
Do you have a question about the marvel and is the answer not in the manual?
Questions and answers