Advertisement
Quick Links
Advertisement

Summary of Contents for SEM iWitness
- Page 1 Security Engineered Machinery Co., Inc USER’S MANUAL SEM iWitness Media Tracking System MAN-029 Rev. 0 Created 04/20/2018 Security Engineered Machinery Co., Inc. NATIONWIDE SERVICE Phone Toll Free: (800) 225-9293 Email: Service@SEMSHRED.com Website: WWW.SEMSHRED.COM...
-
Page 2: Unpacking And Setup
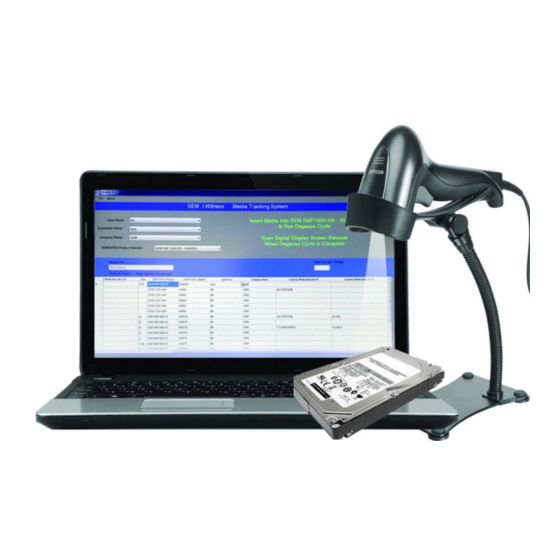
• 1 Handheld 2D USB barcode scanner (includes stand). Unpacking and Setup Upon receipt of your SEM iWitness Media Tracking System, be sure to inspect for any damage. If any damage is present, make a note of it on the Bill of Lading and contact SEM Customer Service. -
Page 3: Overview Of System
Overview of System The SEM iWitness Media Tracking System is intended to be a tool to record barcodes of media that has reached its end of life and is to be destroyed. This creates a record of all destroyed media and is beneficial for tracking and auditing purposes. - Page 4 USER’S MANUAL iWitness Media Tracking System Starting the iWitness software: Start the application by double-clicking the iWitness shortcut icon.
- Page 5 USER’S MANUAL iWitness Media Tracking System The iWitness application will start and the user interface screen will now be present. Before scanning of media can begin, the user will have to enter the information required.
- Page 6 ‘SCANNER NOT READY’ will appear. Please re-check the scanner connection and make sure it is securely plugged into the USB port or try a different USB port. If this message continues to be displayed, please contact the SEM Service Dept.
- Page 7 USER’S MANUAL iWitness Media Tracking System Entering Required Information: Start by entering the User Name. Click on the ‘Down Arrow’ at the end of the data field and select ‘Add/Delete’.
- Page 8 USER’S MANUAL iWitness Media Tracking System The Add/Delete User window will now appear. Enter your User Name and click ‘Add User’.
- Page 9 USER’S MANUAL iWitness Media Tracking System The User Name is now saved in the list of Existing Users. If finished, click ‘Exit’ to return to the main window. If you wish to add more users, repeat the same process. If you wish to delete a user, click on the User Name that you wish to delete and then click ‘Delete User’.
- Page 10 USER’S MANUAL iWitness Media Tracking System The User Name field now contains the name you have entered. If multiple names were entered they will appear in the drop-down list, accessed by clicking on the down arrow at the end of the User Name data field. You may change saved User Names on the fly by...
- Page 11 USER’S MANUAL iWitness Media Tracking System Proceed by entering the Supervisor Name and Company Name. The process is the exact same as entering the User Name field.
- Page 12 USER’S MANUAL iWitness Media Tracking System SEM/SITES Product Selection: Next, enter the SEM/SITES product by clicking on the ‘Down Arrow’ at the end of the Product Selector data field and select ‘Add/Delete’ to bring up the Product Selector menu.
- Page 13 Media Tracking System The SEM/SITES Product Selector will now appear. Scroll down the list and highlight the SEM or SITES product that you will be using. If using a non-SEM/SITES product, select Custom Generic Shredder or Custom Generic Degausser.
- Page 14 Media Tracking System Entering Number of Barcodes to Scan: You will be asked to enter the SEM/SITES product serial number. This is helpful to differentiate products if using more than 1 of the same product model, i.e. two EMP1000- HS degaussers.
- Page 15 USER’S MANUAL iWitness Media Tracking System The product is now added to the Saved Model list. Multiple additional models can be added to the list at any time. Clicking ‘Edit’ will allow the user to edit the number of barcodes to scan and/or the product serial number. Click ‘Delete’ to delete a product from the list.
- Page 16 USER’S MANUAL iWitness Media Tracking System To select an SEM/SITES product that has been added, click on the ‘Down Arrow’ at the end of the Product Selector data field and select the product you wish to use.
- Page 17 USER’S MANUAL iWitness Media Tracking System All required information has now been entered and ‘READY TO SCAN’ now appears, indicating that the system is now ready for use. The barcode fields are now displayed. The Media Barcode S/N is always the first default...
- Page 18 USER’S MANUAL iWitness Media Tracking System Naming of Barcodes: If desired, the additional barcode fields (excluding the first field) may be given a custom user entered name. All 4 additional fields (fields 2 thru 5) can be named at any time, but the system will use only the number of media barcode fields that was previously specified by the user.
-
Page 19: Scanning Barcodes
USER’S MANUAL iWitness Media Tracking System Scanning Barcodes: • When ready, scan the first media barcode. After a successful barcode scan the user will be asked to Accept or Reject the barcode. • If correct, accept the barcode by either clicking on ‘Accept’ or by scanning the barcode shown under ‘Accept’. - Page 20 USER’S MANUAL iWitness Media Tracking System • The decoded barcode information will appear in the appropriate barcode field. • Continue to scan or type the additional barcodes. • When finished click the green button ‘Accept’ to accept the round. • To cancel the round and start again, click the green ‘Cancel’ button.
- Page 21 USER’S MANUAL iWitness Media Tracking System When using an SEM/SITES degausser, the iWitness will now prompt you to enter the Field Strength in terms of Tesla. After degaussing the media, scan the barcode that appears on the touch screen display of the SEM EMP/SITES MMD degausser (see inset). This barcode contains the magnetic field strength generated during the degauss cycle.
- Page 22 USER’S MANUAL iWitness Media Tracking System Scan results showing Pass and Flux Value and Fail and Flux Value. A failed value is not allowed to be Accepted.
- Page 23 USER’S MANUAL iWitness Media Tracking System The round is now complete and the entry has been recorded and appears in the Entry Record List. The list can be scrolled in both directions to view the latest records stored. The latest 100 records are displayed from newest to oldest.
- Page 24 USER’S MANUAL iWitness Media Tracking System Duplicate Barcodes: • If a barcode has already been scanned (anywhere within the entire Master File), a message will appear in the Accept/Reject window. • If a specific piece of media has been scanned and degaussed and then is scanned again to be physically destroyed, a message indicating that the media was already scanned and degaussed will appear in BLUE.
- Page 25 USER’S MANUAL iWitness Media Tracking System If a piece of media has already been scanned for physical destruction or scanned for both degaussing and physical destruction, a message indicating that the media was already scanned and degaussed will appear in RED. This is to warn the user that the barcode is a duplicate or that the media barcode has already been recorded and that the media has not been destroyed, as it should have been.
- Page 26 USER’S MANUAL iWitness Media Tracking System Additionally, duplicate barcodes for one piece of media are not allowed to be entered in the same round of scanning. The message above will appear if this occurs.
-
Page 27: Exporting Data
USER’S MANUAL iWitness Media Tracking System Exporting Data: Recorded data can be exported at any time by clicking on ‘File’ and then ‘Export’. The Export Data window will appear, and the user can select the exact date ranges of the data to be exported. - Page 28 • This export data location can be accessed simply by clicking on the “iWitness Exported Files” shortcut link found on the Windows Desktop. • Data files can also be saved to a custom destination, USB Flash Drive or Optical Disc.
- Page 29 USER’S MANUAL iWitness Media Tracking System The exported file default directory location is shown above. It is easily accessed using the “iWitness Exported Files” shortcut found on the Windows Desktop.
- Page 30 Security Engineered Machinery For sales, service, parts and customer support, contact us: E-Mail: Service@SEMSHRED.com Website: www.SEMSred.com Phone: 1 (508) 366-1488 Toll Free US: 1 (800) 225-9293 Address: 5 Walkup Drive, PO Box 1045, Westborough, Massachusetts 01581...
Need help?
Do you have a question about the iWitness and is the answer not in the manual?
Questions and answers