
Related Manuals for KaZAM WeeRide Co-Pilot


Summary of Contents for KaZAM WeeRide Co-Pilot
- Page 1 Trailer Bike CO-PILOT ASSEMBLY THIS INSTRUCTION BOOKLET CONTAINS IMPORTANT SAFETY, ASSEMBLY, USE, AND MAINTENANCE INFORMATION. PLEASE READ AND KEEP FOR FUTURE REFERENCE.
- Page 2 FOR SERVICE ASSISTANCE CALL TOLL FREE 1.800.451.5368 Monday - Friday 8:00 a.m. to 4:00 p.m. Eastern Standard Time Congratulations on the purchase of your new Co-Pilot! With proper assembly and maintenance it will offer your family years of enjoyable riding! IMPORTANT: Carefully read and follow this manual (and any other materials included with this model) before riding.
-
Page 3: Responsibility Of The Owner
RESPONSIBILITY OF THE OWNER! IMPORTANT: Reading and following the information and instructions in this manual are essential to the ability to ride safely. 1. It is the responsibility of the owner or in the case of a younger rider the parents of the rider to be certain all assembly instructions have been followed, even if the bike has been assembled by the seller or a professional assembly company. -
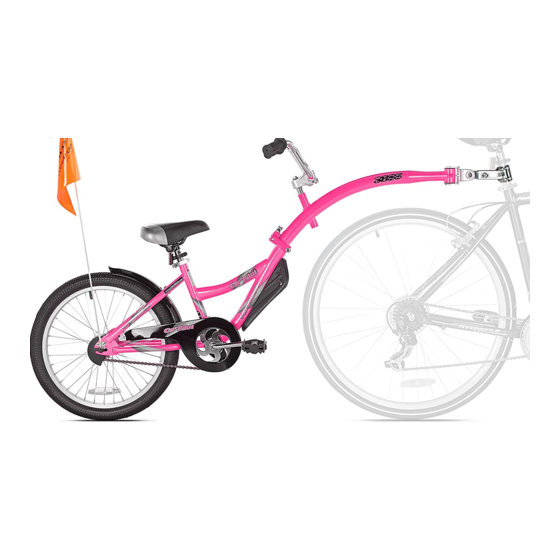
Page 4: Parts Identification
PARTS IDENTIFICATION Grips Handlebar Flag Trailer Mount Stem Seat Seat Post Reflector Seat Post Folding Mechanism Clamp Spokes Tire Pedal Crank Arm Wheel Chainguard IMPORTANT: Use this Diagram when reading this manual Reflector Chainwheel to help you understand directions and instructions. -
Page 5: Rules Of The Road
RULES OF THE ROAD In the interest of safe cycling, make sure you read and understand the bike owner r ’s manual and the Co-Pilot assembly manual. DANGER, WARNING , CAUTION, IMPORTANT, and NOTE or NOTICE. These are important signal words telling you to pay special attention to that text as rider safety is involved. DANGER and WARNING: Pay special attention to these since failure to do so could result in serious injury or death to the rider(s) or others. - Page 6 RULES OF THE ROAD continued 4. CAUTION: WET WEATHER WARNING: Check your brakes frequently. The ability to stop is critical. Roads are slippery in wet weather so avoid sharp turns and allow more distance for stopping. Brakes may become less efficient when wet. Leaves, loose gravel and other debris on the road can also affect stopping distance.
- Page 7 RULES OF THE ROAD continued 16. Cover the stem, handlebar, and top tube of the bike and Co-Pilot with safety pads for additional protection when riding on rough surfaces. 17. Never hitch rides. Never hold onto moving vehicles while riding. Never stunt ride or jump on your bike, especially when the Co-Pilot is attached.
-
Page 8: Before Riding
BEFORE RIDING: Your new Co-Pilot was assembled and tuned in the factory and then partially disassembled for shipping. The following instructions will enable you to prepare your Co-Pilot for years of enjoyable cycling. For more details on inspection, lubrication, maintenance and adjustment of any area please refer to the relevant sections in this manual. - Page 9 BEFORE RIDING: CAUTION: Added weight from the Co-Pilot unit, plus its passenger if applicable, will affect the riding and braking functions of the lead bicycle. Before riding make sure your bicycle is in good working condition. Be aware that braking, stopping, and turning may take longer or feel different due to extra load.
-
Page 10: Step 1: Hinge Assembly
ASSEMBLY INSTRUCTIONS 1. HINGE CLOSED AND IN LOCK POSITION STEP 1: HINGE ASSEMBLY 1. Grasp the lower frame (A) and rotate trailer arm (B) upwards until the two flat plates meet and the alignment pin clicks securely into place. 2. Rotate the quick release lever over and down into the slot. Adjust the quick release tension by rotating clockwise to tighten and counter clockwise to loosen. -
Page 11: Step 2: Handlebar Assembly
ASSEMBLY INSTRUCTIONS continued STEP 2: HANDLEBAR ASSEMBLY NOTE: The stem has been pre-assembled to the handlebar at the factory. Prior to assembly, check to be certain the handlebar is securely fastened to the stem. 1. Insert the handlebar stem (C) into the frame tube with the clamp portion, which holds the handlebar in place, toward the front. -
Page 12: Seat Post Assembly
ASSEMBLY INSTRUCTIONS continued STEP 3: INSTALL SEAT AND SEAT POST FOR YOUR CONVENIENCE THE SEAT ON SOME UNITS MAY HAVE BEEN ASSEMBLED TO THE SEAT POST AT THE FACTORY. SEAT ASSEMBLY: 1. Loosen seat clamp nut (G). 2. Insert the top portion of seat post (H) into the seat clamp (I). -
Page 13: Step 4: Install Pedals
ASSEMBLY INSTRUCTIONS continued STEP 4: INSTALL PEDALS WARNING: For safe operation, the pedal spindle must be securely tightened against the crank arm. Always replace damaged pedals, and always wear shoes or sneakers when riding a bicycle. NOTICE: Start each pedal spindle by hand to avoid stripping the threads. 1. -
Page 14: Clamp Attachment
ASSEMBLY INSTRUCTIONS continued STEP 5: ATTACH THE TRAILER MOUNT TO THE ADULT (LEAD) BICYCLE CLAMP ATTACHMENT: 1. Loosen all 4 clamp bolts (K) and remove the front plate (L) from the trailer clamp. 2. Place the copilot mount behind the adult bike with the trailer clamp against the adult bike seat post (M). The seat post should rest in the valley of the trailer mount. - Page 15 ASSEMBLY INSTRUCTIONS continued STEP 6: ATTACHING THE TRAILER TO THE BICYCLE 1. Insert the Co-Pilot arm (N) into the mount (O) on the adult bicycle and align the holes on each part. 2. Remove the nut from quick release pin and insert the pin into the mount and push it all the way through the hole. 3.
- Page 16 ASSEMBLY INSTRUCTIONS continued STEP 7: INSTALL SAFETY FLAG ALWAYS USE THE SAFETY FLAG WHEN RIDING YOUR TRAILER BIKE. 1. Locate the safety flag, poles, and plastic joiner. Join the two poles by inserting one pole into each end of the joiner. 2.
- Page 17 OPERATING THE CO-PILOT TRAILER BIKE Before riding, check the tire pressure and recheck all fasteners. WARNING: Always use the safety flag when riding with this product. The adult should straddle the bike to hold it steady and upright while the child climbs onto the Co-Pilot. WARNING! THE ADULT BIKE KICKSTAND IS NOT DESIGNED TO SUPPORT THE ADDITIONAL WEIGHT OF A CHILD SEATED ON THE TRAILER BIKE.
- Page 18 REFLECTORS Your Co-Pilot is supplied with a red rear reflector and a white wheel reflector as well as four orange pedal reflectors. These are an important safety and legal requirement, and should remain securely fitted and in good condition at all times. Periodically, inspect all reflectors, brackets and mounting hardware for signs of wear or damage.
-
Page 19: Maintenance
MAINTENANCE 1. Inflate tires with a hand or foot pump to correct PSI reading shown on the tire sidewall. Do not use a high volume/high pressure commercial inflation system to inflate tire as damage could result. 2. Lube the chain monthly, or as needed, with bicycle chain oil. 3. -
Page 20: Limited Warranty
LIMITED WARRANTY This limited warranty extends only to the original retail purchaser, who must produce proof of purchase in order to validate any claim and is not transferable to anyone else. What does this Limited Warranty cover? This limited warranty covers all parts of the Co-Pilot to be free of defects in workmanship and materials.
Need help?
Do you have a question about the WeeRide Co-Pilot and is the answer not in the manual?
Questions and answers
What is the recommended tire pressure for the Kazam weeride?? My child weighs 45 lbs.