
Related Manuals for Samsung SSA-P400

Summary of Contents for Samsung SSA-P400
- Page 1 SSA-P400 SSA-P400T SSA-P401 SSA-P401T Quick Guide Contents Product Introduction Installation and External Connection Initialization...
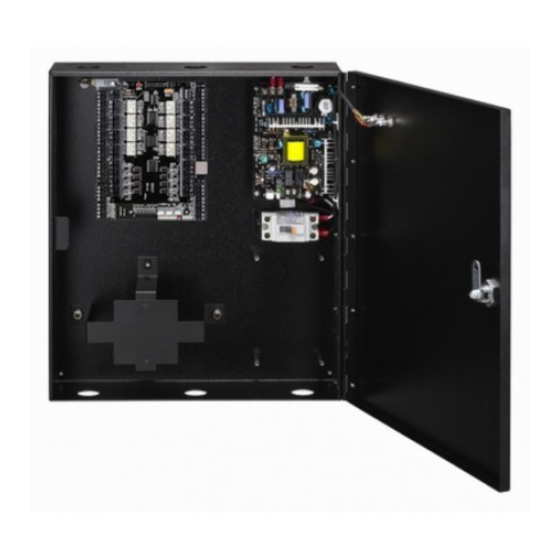
- Page 2 Product Introduction WHAT’S INCLUDED Check if the following items are included in the product package. Main Unit Quick Guide Diode (x12) CD Manual (UF4004, 1N4001~4007) Main Board _Product Introduction...
- Page 3 QUICK GUIDE The address number specifi ed by the address setup switch should Board ID Setup Switch match that of the host computer as it is used for communications with the host computer. Communication ports to connect to the I/O board, which include Input I/O Board Connection Port #8 through Input #15 and Output #8 through Output #15.
- Page 4 Indicates the status of the incoming signal to the input port. A fl ashing indicator denotes the occurrence of any signal to the input port (NC- Input LED Indicator type input device). In the NO-type connection, the LED indicator turns on if no sensor signal occurs while it turns off if any signal occurs.
- Page 5 QUICK GUIDE Fixing Hole Used to fi x the main board to the I/O board using screws. Power LED Indicator The red indicator turns on in the normal power supply condition. Main Board Connection Port Connector used to connect to the main board. Output (Relay #5) Port Output port #5.
- Page 6 Installation and External Connection POWER, READER, AND I/O CONNECTION Power Connection DC +12V - Connect the plus (+) line of DC 12V to the corresponding port (+12V). - Connect the GND (-) line of DC 12V to the GND (-) port. _Installation and External Connection...
- Page 7 None Internal Exit Button Four Door Control Reader #3 None Internal Exit Button Reader #4 None Internal Exit Button • Refer to the list of compatible readers. - SSA-P400(T) : 26Bit Wiegand Reader - SSA-P401(T) : 34Bit Wiegand Reader English_...
- Page 8 POWER, READER, AND I/O CONNECTION Input Connection Input #7 Input #6 Input #5 Input #4 Door Open Sensor Exit Button Input #3 Input #2 Door Open Sensor Exit Button Input #1 - Exit Button Connection (Input #1, Input #3) Connect one line of the Exit button to an input port (Door 1: Input #1, Door 2: Input #3) of the Exit button.
- Page 9 QUICK GUIDE Output Connection DC +12V Door Lock POWER FAIL SAFE Alarm Device POWER FAIL SECURE - If the door lock is in POWER FAIL SAFE mode: (Door 1: Relay #1, Door 2: Relay #3) Connect the COM line of the Door Lock relay to DC +12V. Connect the plus (+) line of the Door Lock to the Normal Close (NC) line of the Door Lock relay.
- Page 10 COMMUNICATION LINE CONNECTION RS-232 Communication Port Connection A 9-pin connector for serial communication is required to make connection to the PC. Connect the 9 pin connector for RS-232 communications as follows: HOST PC RS-232 9-Pin Female Connector Connect RS-232 TX to pin #2 of the 9-pin connector. Connect RS-232 RX to pin #3 of the 9-pin connector.
- Page 11 QUICK GUIDE RS-422 Communication Port Connection (Standalone) The RS-422/RS-232 converter is required to establish RS-422 communications. Connect the 9-pin connector of the RS-422/RS-232 converter as follows: RS-422/232 Converter RS-232C Power HOST T+ T- R+ R- MAX. 1200m Connect RS-422 TX(-) to the RX(-) port of the converter. Connect RS-422 TX(+) to the RX(+) port of the converter.
- Page 12 COMMUNICATION LINE CONNECTION RS-422 Communication Port Connection (Multiple Units) The RS-422/RS-232 converter is required to establish RS-422 communications. RS-422/232 Converter RS-232C Power HOST T+ T- R+ R- MAX. 1200m - Follow the guidelines below to make connection between devices. Connect TX(-) of one device to TX(-) of other one. Connect TX(+) of one device to TX(+) of other one.
- Page 13 QUICK GUIDE TCP/IP Communication Port Connection 1) TCP/IP Communication Confi guration TCP / IP TCP / IP 2) TCP/IP Connection Connect the LAN cable to the TCP/IP RJ-45 jack as shown. (applicable only to SSA-P400T / SSA-P401T) Connect the RJ45 jack of the unit to the RJ45 plug, the LAN cable of the network system.
- Page 14 Initialization SYSTEM INITIALIZATION Initializing the system using the Initialize switch Apply the power and initialize the system by using the initialization switch. Initialize Switch Locate the Initialize switch ( ) on the upper right corner and press both switches simultaneously. •...
- Page 15 QUICK GUIDE BOARD ID SETTING Each device in the multi-serial communication connection is assigned a unique number to identify each other. The initial value of the switch is “0”, and all of the 8 switches are defaulted to OFF. Each switch has a unique value, and the board ID is the sum of the values of the switches.
- Page 16 AB82-02548A...
- Page 17 SSA-P400 SSA-P400T SSA-P401 SSA-P401T Guide de prise en main rapide Table des matières Lancement du produit Installation et connexion externe Initialisation...
- Page 18 Lancement du produit CONTENU Vérifi ez si les éléments suivants sont inclus dans l’emballage. Unité principale Guide de prise en main rapide Diode (x12) Manuel sur CD (UF4004, 1N4001~4007) Carte mère _Lancement du produit...
- Page 19 GUIDE DE PRISE EN MAIN RAPIDE Le numéro d’adresse spécifi é par l’interrupteur de confi guration de Interrupteur de confi guration l’adresse doit correspondre avec celui de l’ordinateur hôte car il est d’ID de carte utilisé pour les communications avec l’ordinateur hôte. Les ports de communication permettent de connecter la carte d’E/S, ce Port de connexion de carte E/S qui inclut l’Entrée n°8 via l’Entrée n°15 et la Sortie n°8 via la Sortie n°15.
- Page 20 Indique l’état du signal entrant via le port d’entrée. Un voyant clignotant indique la survenue d’un signal sur le port d’entrée (périphérique Voyant DEL d’entrée d’entrée de type NC). Dans la connexion de type NO, le voyant DEL s’allume en l’absence d’émission de tout signal de capteur et s’éteint à la survenue du moindre signal.
- Page 21 GUIDE DE PRISE EN MAIN RAPIDE Trou de fi xation Sert à fi xer la carte mère sur la carte E/S à l’aide de vis. Voyant DEL d’alimentation Le voyant rouge s’allume dans les conditions d’alimentation normale. Port de connexion de la carte Connecteur utilisé...
- Page 22 Installation et connexion externe ALIMENTATION, LECTEUR ET CONNEXION E/S Branchement de l’alimentation CC +12 V - Connectez la ligne plus (+) du courant CC 12 V au port correspondant (+12 V). - Connectez la ligne GND (-) du courant CC 12 V au port GND (-). _Installation et connexion externe...
- Page 23 Commande à quatre portes Lecteur n°3 Aucun Bouton de sortie interne Lecteur n°4 Aucun Bouton de sortie interne • Reportez-vous à la liste de lecteurs compatibles. - SSA-P400(T) : Lecteur Wiegand 26 bits - SSA-P401(T) : Lecteur Wiegand 34 bits Français_...
- Page 24 ALIMENTATION, LECTEUR ET CONNEXION E/S Connexion d’entrée Entrée n°7 Entrée n°6 Entrée n°5 Entrée n°4 Capteur de porte ouvert Bouton Entrée n°3 de sortie Entrée n°2 Capteur de porte ouvert Bouton de sortie Entrée n°1 - Connexion du bouton de sortie (Entrée n°1, Entrée n°3) Connectez une ligne du bouton de sortie au port d’entrée (Porte 1: Entrée n°1, Porte 2 : Entrée n°3) du bouton de sortie.
- Page 25 GUIDE DE PRISE EN MAIN RAPIDE Connexion de sortie DC +12V Verrouillage de la porte ALIMENTATION À SÉCURITÉ INTÉGRÉE FAIL-SAFE Dispositif d’alarme ALIMENTATION À SÉCURITÉ INTÉGRÉE FAIL SECURE - Si le dispositif de verrouillage de porte est en mode ALIMENTATION À SÉCURITÉ...
- Page 26 CONNEXION DES LIGNES DE COMMUNICATION Connexion du port de communication RS-232 Un connecteur à 9 broches pour la communication en série est requis aux fi ns de connexion à l’ordinateur. Branchez le connecteur à 9 broches pour les communications RS-232 de la manière suivante : ORDINATEUR HÔTE RS-232 Connecteur femelle à...
- Page 27 GUIDE DE PRISE EN MAIN RAPIDE Connexion du port de communication RS-422 (mode autonome) Il est nécessaire de disposer d’un convertisseur RS-422/RS-232 pour établir les communications RS-422. Branchez le connecteur à 9 broches du convertisseur RS-422/RS-232 de la manière suivante : Convertisseur RS-422/232 RS-232C...
- Page 28 CONNEXION DES LIGNES DE COMMUNICATION Connexion du port de communication RS-422 (unités multiples) Il est nécessaire de disposer d’un convertisseur RS-422/RS-232 pour établir les communications RS-422. Convertisseur RS-422/232 RS-232C Alimentation HÔTE T+ T- R+ R- MAX. 1 200 m - Suivez les directives ci-dessous pour effectuer la connexion entre les périphériques. Connectez TX (-) de l’un des périphériques à...
- Page 29 GUIDE DE PRISE EN MAIN RAPIDE Connexion du port de communication TCP/IP 1) Confi guration de la communication TCP/IP CONCENTRATEUR TCP / IP TCP / IP ORDINATEUR 2) Connexion TCP/IP Connectez le câble LAN à la prise RJ-45 TCP/IP tel qu’illustré. (applicable uniquement aux modèles SSA-P400T / SSA-P401T) Connectez la prise RJ45 de l’unité...
- Page 30 Initialisation INITIALISATION DU SYSTÈME Initialisation du système à l’aide de l’interrupteur d’initialisation Branchez l’alimentation et initialisez le système à l’aide de l’interrupteur d’initialisation. Interrupteur Localisez l’interrupteur d’initialisation ( ) au d’initialisation niveau du coin supérieur droit et appuyez sur les deux interrupteurs simultanément.
- Page 31 GUIDE DE PRISE EN MAIN RAPIDE RÉGLAGE DE L’ID DE CARTE Chaque périphérique participant à une connexion de communication multi-série est affecté d’un numéro d’identifi cation unique. La valeur initiale de l’interrupteur est « 0 », et l’ensemble des 8 interrupteurs sont réglés, par défaut, sur OFF.
- Page 32 AB82-02548A...
- Page 33 SSA-P400 SSA-P400T SSA-P401 SSA-P401T Kurzanleitung Inhalt Produkteinführung Montage und externe Verkabelung Initialisierung...
- Page 34 Produkteinführung LIEFERUMFANG Überprüfen Sie, ob die folgenden Teile in der Produktverpackung enthalten sind. Haupteinheit Kurzanleitung Diode (12 Stk.) Handbuch auf CD (UF4004, 1N4001~4007) Hauptplatine (Mainboard) _Produkteinführung...
- Page 35 KURZANLEITUNG Die Adresse, die mittels des Adressen-Setup-Schalters festgelegt Board-ID Setup-Schalter wurde, sollte mit der des Host-Computers übereinstimmen, da sie für die Kommunikation mit dem Host-Computer verwendet wird. Die Kommunikationsports zum Anschließen des E/A-Boards, diese Anschluss E/A-Board umfassen die Eingänge Nr. 8 bis Nr. 15 und die Ausgänge Nr. 8 bis Nr. 15. Wenn Sie die Schalter gleichzeitig ungefähr 2 Sekunden lang drücken, ertönt ein Signal, das die erfolgreiche Initialisierung anzeigt.
- Page 36 Anschluss Lesegerät Nr. 3 Der Anschluss für das dritte Lesegerät. Anschluss Lesegerät Nr. 4 Der Anschluss für das vierte Lesegerät. Zeigt dem Eingangsanschluss den Status des Eingangssignals an. Eine blinkende Anzeige zeigt dem Eingangsanschluss an, dass gerade ein LED-Anzeige für Eingang Signal auftritt (Eingangsgerät NC-Typ).
- Page 37 KURZANLEITUNG Befestigungsbohrung Wird verwendet, um mit Schrauben das Mainboard am E/A-Board zu befestigen. LED-Betriebsanzeige Bei normaler Stromversorgung leuchtet die rote Anzeige auf. Anschluss Hautplatine Anschluss zur Verbindungsherstellung mit dem Mainboard. (Mainboard) Ausgangsanschluss (Relais Nr. 5) Ausgangsanschluss Nr. 5. Ausgangsanschluss (Relais Nr. 6) Ausgangsanschluss Nr.
- Page 38 Montage und externe Verkabelung ANSCHLUSS VON NETZTEIL, LESEGERÄT UND EINGANG/AUSGANG Netzanschluss +12V DC GND (ERDUNG) - Schließen Sie die Plus (+)-Leitung von DC 12V an den entsprechenden Anschluss (+ 12 V) an. - Schließen Sie die GND (-)-Leitung von DC 12V an den GND-Anschluss (-) an. _Montage und externe Verkabelung...
- Page 39 Türen Lesegerät Nr. 3 Keines Integrierte Taste “Exit” Lesegerät Nr. 4 Keines Integrierte Taste “Exit” • Siehe dazu die Liste mit den kompatiblen Lesegeräten. - SSA-P400(T) : Wiegand Lesegerät 26 Bit - SSA-P401(T) : Wiegand Lesegerät 34 Bit Deutsch_...
- Page 40 ANSCHLUSS VON NETZTEIL, LESEGERÄT UND EINGANG/AUSGANG Anschluss der Eingänge GND (ERDUNG) Eingang Nr. 7 GND (ERDUNG) Eingang Nr. 6 GND (ERDUNG) Eingang Nr. 5 GND (ERDUNG) Eingang Nr. 4 Türöffnungssensor GND (ERDUNG) Taste „Exit“ Eingang Nr. 3 GND (ERDUNG) Eingang Nr. 2 Türöffnungssensor GND (ERDUNG) Taste „Exit“...
- Page 41 KURZANLEITUNG Anschluss des Ausgangs DC +12V Türschließvorrichtung STROMAUSFALLSICHERUNG GND (ERDUNG) Alarmgerät ARBEITSSTROMFUNKTION - Wenn sich der Türschließer im Modus STROMAUSFALLSICHERUNG befi ndet: (Tür 1: Relais Nr. 1, Tür 2: Relais Nr. 3) Verbinden Sie die COM-Leitung des Türschließer-Relais zu DC + 12 V. Verbinden Sie die Plus (+)-Leitung des Türschließers zur NC-Leitung (Normal geschlossen) des Türschließer-Relais.
- Page 42 ANSCHLUSS DER KOMMUNIKATIONSVERBINDUNG Anschluss RS-232-Schnittstelle Zur Verbindungsherstellung mit dem PC ist ein 9-poliger Steckverbinder für die serielle Schnittstelle erforderlich. Schließen sie den 9-poligen Stecker für die RS-232-Kommunikation wie folgt an: HOST-PC RS-232 9-poliger Steckverbinder (Buchse) Schließen Sie die RS-232 TX-Leitung an den 2. Stecker des 9-poligen Steckverbinders an. Schließen Sie die RS-232 RX-Leitung an den 3.
- Page 43 KURZANLEITUNG Anschluss RS-422-Schnittstelle (Standalone) Zur Herstellung einer RS-422-Kommunikation ist ein RS-422/RS-232-Converter erforderlich. Schließen Sie den 9-poligen Steckverbinder des RS-422/RS-232-Converters wie folgt an: RS-422/232-Converter RS-232C Stromzufuhr HOST T+ T- R+ R- MAX. 1200 m Verbinden Sie RS-422 TX (-) zum RX (-)-Anschluss des Converters. Verbinden Sie RS-422 TX (+) zum RX (+)-Anschluss des Converters.
- Page 44 ANSCHLUSS DER KOMMUNIKATIONSVERBINDUNG Anschluss RS-422-Schnittstelle (mehrere Einheiten) Zur Herstellung einer RS-422-Kommunikation ist ein RS-422/RS-232-Converter erforderlich. RS-422/232-Converter RS-232C Power HOST T+ T- R+ R- MAX. 1200 m - Befolgen Sie die nachstehenden Anweisungen, um eine Verbindung zwischen den Geräten herzustellen. Verbinden Sie TX(-) des einen Geräts zu TX(-) des anderen. Verbinden Sie TX(+) des einen Geräts zu TX(+) des anderen.
- Page 45 KURZANLEITUNG Anschluss TCP/IP-Kommunikationsport 1) Konfi guration der TCP/IP-Kommunikation TCP / IP TCP / IP 2) TCP/IP-Verbindung Schließen Sie das LAN-Kabel wie dargestellt an die TCP/IP RJ-45-Buchse an. (gilt nur für die Modelle SSA-P400T / SSA-P401T) Führen Sie die RJ45-Buchse der Einheit zum RJ45-Stecker, dem LAN-Kabel des Netzwerksystems.
- Page 46 Initialisierung SYSTEMINITIALISIERUNG Initialisierung des Systems mithilfe des Initialisierungsschalters Schalten Sie das Produkt ein und initialisieren Sie das System mithilfe des Initialisierungsschalters. Initialisierungsschalter Suchen Sie den Initialisierungsschalter ( ) in der oberen rechten Ecke und drücken Sie beide Schalter gleichzeitig. • Wenn Sie die Schalter gleichzeitig ungefähr 2 Sekunden lang drücken, ertönt ein Signal, das die erfolgreiche Initialisierung anzeigt.
- Page 47 KURZANLEITUNG EINSTELLUNGEN DER BOARD-ID Jedem Gerät in der multiseriellen Kommunikationsverbindung wird eine eigene Nummer zugewiesen, damit jedes Gerät identifi ziert werden kann. Der ursprüngliche Wert des Schalters lautet “0”, und alle 8 Schalter sind standardmäßig auf AUS gesetzt. Jeder Schalter hat einen eigenen Wert, wobei sich die Board-ID aus der Summer aller Schalterwerte ergibt.
- Page 48 AB82-02548A...
- Page 49 SSA-P400 SSA-P400T SSA-P401 SSA-P401T Manual de consulta rápida Índice Información del producto Instalación y conexión externa Inicialización...
- Page 50 Información del producto COMPONENTES Compruebe que se incluyen los siguientes elementos en el paquete del producto. Unidad principal Manual de consulta rápida Diodo (x12) CD de manual (UF4004, 1N4001~4007) Placa principal _Información del producto...
- Page 51 MANUAL DE CONSULTA RÁPIDA El número de dirección especifi cado con el interruptor de confi guración Interruptor de confi g. de ID de de la dirección debe coincidir con el del ordenador host ya que se placa utiliza para comunicaciones con el ordenador host. Puerto de conexión de placa de Puertos de comunicación para conectar a la placa de E/S, que incluye de la Entrada 8 a la Entrada 15 y de la Salida 8 a la Salida 15.
- Page 52 Puerto de Lector 4 El cuarto puerto de conexión del lector. Indica el estado de la señal entrante al puerto de entrada. Un indicador intermitente denota la ocurrencia de una señal en el puerto de entrada Indicador LED de entrada (dispositivo de entrada de tipo NC).
- Page 53 MANUAL DE CONSULTA RÁPIDA Se utiliza para fi jar la placa principal en la placa de E/S utilizando Orifi cio de fi jación tornillos. El indicador rojo se enciende en una condición de suministro de Indicador LED de alimentación energía normal. Puerto de conexión de la Conector utilizado parra conectar a la placa principal.
- Page 54 Instalación y conexión externa CONEXIÓN DE ALIMENTACIÓN, LECTOR Y E/S Conexión a toma de corriente DC +12V - Conecte la línea más (+) de 12V de CC al puerto correspondiente (+12V). - Conecte la línea GND (-) de DC 12V al puerto GND (-). _Instalación y conexión externa...
- Page 55 Botón de salida Lector 3 Ninguno interno Botón de salida Lector 4 Ninguno interno • Consulte la lista de lectores compatibles. - SSA-P400(T) : Lector Wiegand de 26 bits - SSA-P401(T) : Lector Wiegand de 34 bits Español_...
- Page 56 CONEXIÓN DE ALIMENTACIÓN, LECTOR Y E/S Conexión de entrada Entrada 7 Entrada 6 Entrada 5 Entrada 4 Sensor de puerta abierta Botón de Entrada 3 salida Entrada 2 Sensor de puerta abierta Botón de Entrada 1 salida - Conexión del botón de salida (Entrada 1, Entrada 3) Conecte una línea del botón de salida al puerto de entrada (Puerta 1: Entrada 1, Puerta 2: Entrada 3) del botón de salida.
- Page 57 MANUAL DE CONSULTA RÁPIDA Conexión de salida DC +12V Bloqueo de puerta POWER FAIL SAFE Dispositivo de alarma POWER FAIL SECURE - Si el bloqueo de puerta es el modo POWER FAIL SAFE: (Puerta 1: Relé 1, Puerta 2: Relé 3) Conecte la línea COM del relé...
- Page 58 CONEXIÓN DE LA LÍNEA DE COMUNICACIONES Conexión del puerto de comunicaciones RS-232 Se necesita un conector de 9 pines para las comunicaciones serie para realizar la conexión al PC. Conecte el conector de 9 pines para las comunicaciones RS-232 de la siguiente forma: PC HOST RS-232...
- Page 59 MANUAL DE CONSULTA RÁPIDA Conexión del puerto de comunicaciones RS-422 (autónomo) Se necesita el conversor RS-422/RS-232 para establecer comunicaciones RS-422. Conecte el conector de 9 pines del conversor RS-422/RS-232 de la siguiente forma: Conversor RS-422/232 RS-232C Alimen- tación HOST T+ T- R+ R- MÁX.
- Page 60 CONEXIÓN DE LA LÍNEA DE COMUNICACIONES Conexión del puerto de comunicaciones RS-422 (varias unidades) Se necesita el conversor RS-422/RS-232 para establecer comunicaciones RS-422. Conversor RS-422/232 RS-232C Alimentación HOST T+ T- R+ R- MÁX. 1.200 m - Siga las directrices que se incluyen a continuación para realizar la conexión entre dispositivos.
- Page 61 MANUAL DE CONSULTA RÁPIDA Conexión del puerto de comunicaciones TCP/IP 1) Confi guración de comunicaciones TCP/IP TCP / IP TCP / IP 2) Conexión TCP/IP Conecte el cable LAN al terminal TCP/IP RJ-45 como se muestra. (sólo aplicable a SSA-P400T / SSA-P401T) Conecte el terminal RJ45 de la unidad al enchufe RJ45, el cable LAN del sistema de red.
- Page 62 Inicialización INICIALIZACIÓN DEL SISTEMA Inicialización del sistema utilizando el interruptor de inicialización Encienda e inicialice el sistema utilizando el interruptor de inicialización. Interruptor de Localice el interruptor de inicialización ( ) en inicialización la esquina superior derecha y pulse ambos interruptores de forma simultánea.
- Page 63 MANUAL DE CONSULTA RÁPIDA AJUSTE DEL ID DE LA PLACA A cada dispositivo de la conexión de comunicaciones multiserie se le asigna un número único para identifi carse entre sí. El valor inicial del interruptor es “0” y los 8 interruptores por defecto se defi...
- Page 64 AB82-02548A...
- Page 65 SSA-P400 SSA-P400T SSA-P401 SSA-P401T Guida rapida Indice Presentazione del prodotto Installazione e collegamento esterno Inizializzazione...
- Page 66 Presentazione del prodotto CONTENUTO DELLA CONFEZIONE Controllare che i seguenti componenti siano compresi nella confezione. Unità principale Guida rapida Diodi (x12) Manuale su CD (UF4004, 1N4001~4007) Scheda madre _Presentazione del prodotto...
- Page 67 GUIDA RAPIDA Il numero dell’indirizzo specifi cato dall’interruttore di impostazione Interruttore impostazione ID dell’indirizzo deve corrispondere a quello del computer host poiché scheda viene utilizzato per le comunicazioni con il computer host. Porte di comunicazione per il collegamento alla scheda I/O, che I/O Board Connection Port comprendono gli ingressi da N.
- Page 68 Indica lo stato del segnale in ingresso nella porta di ingresso. Il lampeggio dell’indicatore segnala la presenza di un segnale alla porta Spia a LED di ingresso di ingresso (dispositivo di ingresso di tipo NC). Nel collegamento di tipo NO, la spia a LED si accende se non vi è nessun segnale del sensore, e si spegne se vi è...
- Page 69 GUIDA RAPIDA Foro di fi ssaggio Utilizzato per fi ssare la scheda madre alla scheda I/O mediante viti. Spia a LED di alimentazione La spia rossa è accesa in condizioni di alimentazione normale. Porta di collegamento scheda Connettore utilizzato per il collegamento alla scheda madre. madre Porta di uscita (relè...
- Page 70 Installazione e collegamento esterno ALIMENTAZIONE, COLLEGAMENTO DEL LETTORE E COLLEGAMENTO I/O Alimentazione CC 12V - Collegare il cavo positivo (+) dell’alimentazione CC da 12V alla porta corrispondente (+12V). - Collegare il cavo GND negativo (-) dell’alimentazione CC da 12V alla porta GND (-).
- Page 71 Controllo quattro interno porte Tasto di uscita Lettore N. 3 Nessuno interno Tasto di uscita Lettore N. 4 Nessuno interno • Vedere l’elenco di lettori compatibili. - SSA-P400(T) : Lettore Wiegand 26 bit - SSA-P401(T) : Lettore Wiegand 34 bit Italiano_...
- Page 72 ALIMENTAZIONE, COLLEGAMENTO DEL LETTORE E COLLEGAMENTO I/O Collegamento di ingresso Ingresso N. 7 Ingresso N. 6 Ingresso N. 5 Ingresso N. 4 Sensore porta aperta Tasto di uscita Ingresso N. 3 Ingresso N. 2 Sensore porta aperta Tasto di uscita Ingresso N.
- Page 73 GUIDA RAPIDA Collegamento di uscita DC +12V Blocco porta POWER FAIL SAFE Dispositivo di allarme POWER FAIL SECURE - Se il blocco porta è in modo POWER FAIL SAFE: (porta 1: relè N. 1, porta 2: relè N. 3) Collegare la linea COM del relè blocco porta all’alimentazione CC 12V. Collegare il cavo positivo (+) del blocco porta alla linea normalmente chiusa (NC) del relè...
- Page 74 COLLEGAMENTO DELLA LINEA DI COMUNICAZIONE Collegamento della porta di comunicazione RS-232 Per collegarsi al PC è necessario un connettore a 9 pin per la comunicazione seriale. Collegare il connettore a 9 pin per le comunicazioni RS-232 come indicato di seguito: PC HOST RS-232 Connettore femmina a 9 pin...
- Page 75 GUIDA RAPIDA Collegamento della porta di comunicazione RS-422 (unità indipendente) È necessario un convertitore RS-422/RS-232 per le comunicazioni RS-422. Collegare il connettore a 9 pin del convertitore RS-422/RS-232 come indicato di seguito: Convertitore RS-422/232 RS-232C Alimentazione HOST T+ T- R+ R- Max.
- Page 76 COLLEGAMENTO DELLA LINEA DI COMUNICAZIONE Collegamento della porta di comunicazione RS-422 (più unità) È necessario un convertitore RS-422/RS-232 per le comunicazioni RS-422. Convertitore RS-422/232 RS-232C Alimentazione HOST T+ T- R+ R- Max. 1200 m - Seguire i passi riportati di seguito per eseguire il collegamento tra i dispositivi. Collegare TX(-) di un dispositivo a TX(-) di un altro.
- Page 77 GUIDA RAPIDA Collegamento della porta di comunicazione TCP/IP 1) Confi gurazione della comunicazione TCP/IP TCP / IP TCP / IP 2) Collegamento TCP/IP Collegare il cavo LAN al jack RJ-45 TCP/IP come indicato. (valido solo per SSA-P400T / SSA-P401T) Collegare il jack RJ45 dell’unità al connettore RJ45, il cavo LAN del sistema di rete. Impostare un indirizzo di comunicazione univoco (COMM ADDR) per ogni unità.
- Page 78 Inizializzazione INIZIALIZZAZIONE DEL SISTEMA Inizializzazione del sistema attraverso il relativo tasto Collegare l’alimentazione e inizializzare il sistema utilizzando il relativo tasto. Tasto di Individuare il tasto di inizializzazione ( inizializzazione nell’angolo in alto a destra e premere entrambi i tasti contemporaneamente.
- Page 79 GUIDA RAPIDA IMPOSTAZIONE DELL’ID SCHEDA Nel collegamento per la comunicazione multiseriale a ogni dispositivo è assegnato un numero di identifi cazione univoco. Il valore iniziale dell’interruttore è “0” e tutti gli 8 interruttori sono impostati su OFF. Ogni interruttore ha un valore univoco e l’ID della scheda è uguale alla somma dei valori dei singoli interruttori.
- Page 80 AB82-02548A...
Need help?
Do you have a question about the SSA-P400 and is the answer not in the manual?
Questions and answers