Table of Contents
Advertisement
Quick Links
Advertisement
Table of Contents

Summary of Contents for SECURENET UMU
- Page 1 OUTDOOR CAMERA Quick Start Guide POWERED BY...
-
Page 3: Getting To Know The Camera
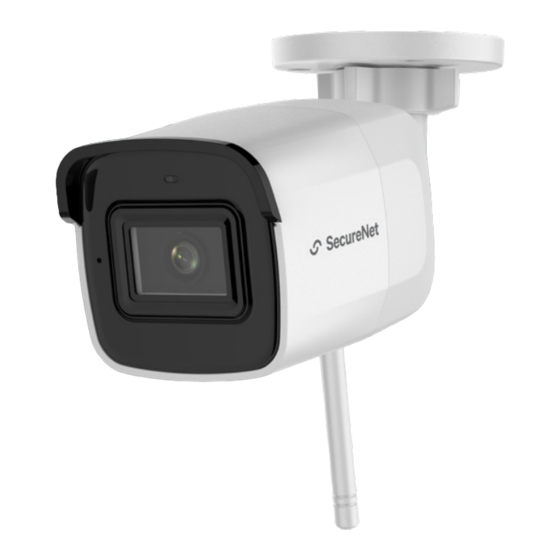
Getting to know the camera 12V POWER SOCKET STATUS INDICATOR LENS ETHERNET SOCKET MICROPHONE ADJUSTING NUT STATUS INDICATOR + Flashing blue: the camera is on and ready for Wi-Fi connection + Steady blue: the camera is running properly + Steady red: the camera is starting + Flashing red: there is a network connection issue MicroSD CARD &... - Page 4 What’s in the box? OUTDOOR CAMERA POWER ADAPTER SCREWS & ETHERNET KIT ANCHORS DRILL TEMPLATE ANTENNA T10 HEX KEY...
-
Page 5: Installation Options
Installation options Wi-Fi WITH POWER ADAPTER (Recommended) Run the power adapter to a nearby internal power outlet. The camera will communicate over the local Wi-Fi network. You may need the following equipment to extend the range of your power adapter cable (not included): + AC power extension cord OR + 12V DC 5.5mm x 2.1mm power extension cable OR + 18/2 stranded Siamese cable, pigtail connectors... -
Page 6: Installing The Antenna
Installing the antenna If connecting via Wi-Fi, attach the antenna to the back of the camera, screwing it tightly into position. Installing a MicroSD card (optional) Using the T10 hex key, unscrew the cover on the bottom of the camera. Insert the MicroSD card and replace the cover. - Page 7 Drilling and running the power cable Stick the adhesive drill template to the exterior surface of the wall to mark the desired mounting position. Depending on the mounting surface, you may require screw anchors. If using anchors, drill holes at each of the three outer markers with a 5mm drill bit, then insert the anchors.
- Page 8 Installing the Ethernet kit (PoE only) The Ethernet kit is not required if powering with the 12V power adapter. The Ethernet accessory kit includes a lock nut, a waterproof end-cap, a rubber gasket and an O-gasket. Insert the Ethernet cable through the plastic lock nut and waterproof end-cap.
-
Page 9: Connecting To The Camera
Mounting and adjusting the camera Push the camera socket cables into the wall through the center template hole. Place the camera into the final mounting position and fasten it securely to the wall with the 3 included mounting screws. Loosen the large adjusting nut at the base of the camera. -
Page 10: Resetting The Camera
Resetting the camera If you change your Wi-Fi network or for some other reason you cannot connect to the camera, you will need to reset it. Remove the cover on the bottom of the camera with the T10 hex key, then press and hold the Reset button for 10 seconds.
Need help?
Do you have a question about the UMU and is the answer not in the manual?
Questions and answers