
Subscribe to Our Youtube Channel
Related Manuals for Link4 iPonic 624 Alert

Summary of Contents for Link4 iPonic 624 Alert
- Page 1 624 Alert 990-0701-02 Dual-Room Cloud based monitoring and Alarm System Controller User Manual 840-0101-00 Revision 1 Copyright © 2019 Link4 Corporation...
-
Page 2: Table Of Contents
Table of Contents Introduction ..............3 Customer Service ............4 Contact Us… …............... 4 Terms and Conditions ..........5 Installation ..............6 Inspect Your Package ............6 Contents .................. 6 Mount Your iPonic™ Alert 624......... Connect To The Internet ..........8 Remote Access.............. -
Page 3: Introduction
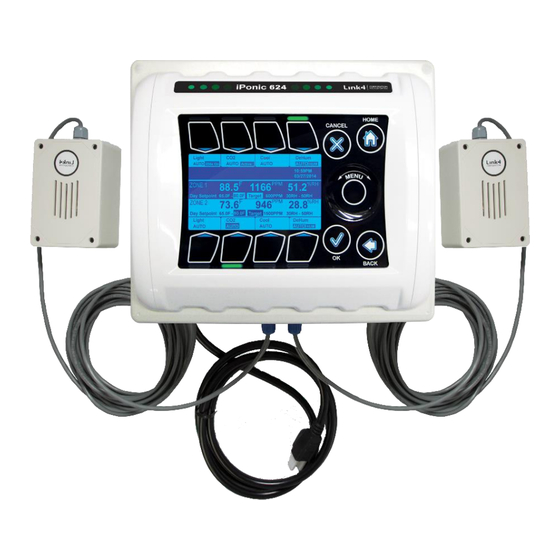
The iPonic Alert comes with a Digital Integrated Sensor Module (DISM) that provides temperature, CO2, light and humidity. Use your smart phone to monitor your grow and receive alerts. With the iPonic 624 Alert you get the peace of mind while you’re away. •... -
Page 4: Customer Service
Web: www.link4controls.com Address: Link4 Corporation 175 E Freedom Ave Fullerton, CA 92801 There is extensive online support for all Link4 products for registered users at www.link4controls.com. Registration is provided at no charge. P/N: 840-0101-00 Revision 1 Page 4 of 15... -
Page 5: Terms And Conditions
Terms and Conditions Warranty – Link4 warrants that the goods sold under this contract will be free from defects in material and workmanship for a period of twelve (12) months after the date of purchase. This warranty will be limited to the repair and replacement of parts, and the necessary labor and services required. -
Page 6: Installation
624 Qty: 1 Sensor modules with 16 ft. cable Qty: 2 Preinstalled Internet Communication Module Qty: 1 Grow Room 2 Grow Room 1 *D.I.S.M 50ft. Extension cable available from Link4 P/N 995-0020-00 P/N: 840-0101-00 Revision 1 Page 6 of 15... -
Page 7: Mount Your Iponic™ Alert 624
You may lengthen and extend the sensor cable as needed but be sure to use Link4 extension cables, junction boxes and wire. Cutting and splicing could result in unstable sensor readings and sensor failure. -
Page 8: Connect To The Internet
- Close and lock the controller door - Power up the controller Once you’re connected to the Internet, the controller will automatically link up to the Link4 Cloud Server (iponic.link4cloud.com) and the Server Setup Screen connection status will display “Check Account”. -
Page 9: Remote Access
Go to the Browser on your computer or mobile phone and visit the Link4 Cloud iponic.link4cloud.com). If you haven’t done so already, please create an account. Remote Access To set up your controller for remote access through your computer or smartphone, please follow the three (3) easy steps below: Step 1 –... -
Page 10: Control Panel
Control Panel The iPonic™ 624 Alert has a Navigation Menu with four (4) Soft Buttons (HOME, CANCEL, OK, and BACK). The functions are as follows: MENU • Use the Navigation Menu to highlight a selection. Press OK to confirm the selection. The center of the •... -
Page 11: Sensor Setup
Sensor Module Settings can be Enabled or Disabled Outdoor Temperature Sensor can be Enabled or Disabled. You would need a Link4 Analog Probe wired to one of the controllers Analog inputs to get the Out- Temperature reading. P/N: 840-0101-00 Revision 1... - Page 12 The Sensor Setup screen in the Advanced menu allows you to Map your sensors, Calibrate, Calibrate to Average and Auto Calibrate your CO2 Map Sensors allows you to manually assign sensors to inputs on your controller. OK or Menu Wheel allows you to scroll thru the various sensors.
-
Page 13: Alarms Setup
Alarms Setup Alarms Setup is the 3 option of the Systems Setup Menu that allows you to setup Alarm Thresholds for your Sensors which can trigger an Alarm Output as well as send notifications if controller is setup on the iPonic Cloud. The Alarm Settings features 6 alerts that can be designated to warn you of high and low... -
Page 14: Time/Date Setup
Time/Date Setup The Time/Date Setup is the 4 option of the System Setup Menu. This option allows you to change the time and date. From the Set Time & Date option, you can Set Time, Set Date, and set it up with the Internet Time Server. -
Page 15: Communications Setup
Communication Setup Communication Setup is the option in the System Setup Menu that allows you to configure your controller to connect to the Internet for remote access using the iPonic Cloud. From the Communication Setup Menu, configure the controller to be accessible from your PC with the IP Address on your router.
Need help?
Do you have a question about the iPonic 624 Alert and is the answer not in the manual?
Questions and answers