Advertisement
Quick Links
Advertisement

Summary of Contents for Ocean Way Audio HR4
- Page 1 Manual of Operations Ocean Way Audio HR4 (2-Way) and HR4S (3-Way) Sound System...
- Page 2 Contents 1) HR4 Description 2) Safety Instructions and Warnings! (please read carefully) 3) Inputs and Controls 4) Input selectors & Legends 5) HR4S & S12A / Physical Setup 6) Signal Flow 2-Way & 3-Way 7) S12A Description 8) Specifications 9) Warranty...
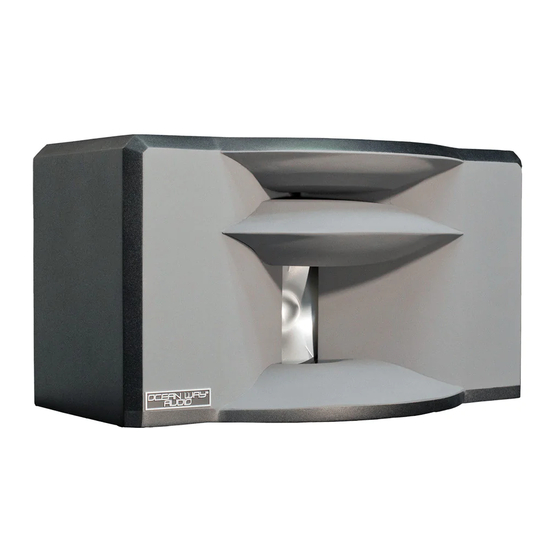
- Page 3 At the heart of the acoustic design is HR4’s dual/hybrid waveguide system. Its unique design was engineered utilizing modeling and then CNC machined from composite materials. This accurate process allows for the creation of geometrically- complex surfaces that are accurately-matched for delivering detailed imaging.
-
Page 4: Safety Instructions And Warnings
2) Safety Instructions and Warnings Read the information for use Please keep this user manual in a safe place during the lifetime of the product. Heed all warnings. Follow all instructions. Do not use this product near water (for example, in damp rooms or near a swimming pool). ... - Page 5 Servicing Do not attempt to service this product yourself. As opening or removing covers may expose you to dangerous voltage or other hazards, the amplifier may only be opened by qualified personnel. Please refer to your dealer/distributor. Servicing and Replacement Parts All service and repair work must be carried out by an authorized dealer/distributor.
- Page 6 Power -Cord Protection Power supply cords should be routed so that they are not likely to be walked on or pinched by items placed upon them or against them, paying particular attention to cords and plugs, and the point where they exit from the Amplifier Unit.
- Page 7 Connecting When you connect this speaker to other equipment, turn off the power and unplug all of the equipment from the supply source. Failure to do so may cause an electric shock and serious personal injury. Read the user's manual of the other equipment carefully and follow the instructions when making the connections.
- Page 8 DO NOT REMOVE MAINS CONNECTOR GROUND, IT IS ILLEGAL AND DANGEROUS. AC power 115/230v switch Make sure to correctly configure with the correct voltage for your country.
- Page 9 3) Inputs and Controls HR4 Master Volume The Master Volume allows trimming the speaker input gain when desired.
- Page 10 4) Input Selection and Legends LED 1 –when illuminated indicates preset selected requires an analog signal LED2 – when illuminated indicates preset selected requires an AES-EBU digital signal LEDS 3 & 4 - will be illuminated or dark in combinations specified in the legend above To indicate which of the 4 presets is currently active.
- Page 11 Selecting Presets Using a small diameter blunt tool (i.e. plain end of a cotton swab), depress the LED Selector pushbutton for a short (1/2 second or less) duration. Each press will toggle the LEDS into different flashing sequences that will match the legend above. When the desired sequence is flashing, depress the switch for a full second.
- Page 12 5) HR4S & S12A / Physical Setup HR4 & S12A Sub-Bass Combine forming HR4S (Stand not included or required)
- Page 13 Some consoles will not afford a safe support the HR4, and we generally recommend using the Sound Anchor ADJ2 for this. The HR4 is easily positioned on the ADJ2 platform and can be rotated safely as its center of gravity falls well within the platform’s generous footprint.
- Page 14 Aiming more outward, the Stereo-Zone™ widens but the result is more sound impacting the sides of the studio environment, changing the overall sound of the space. It is up to the HR4 owner or studio designer to choose what works best.
- Page 15 The HF horizontal pattern of the HR4 (S) is largely controlled by the HF horn walls. There is a very easy on- site test for aiming: If you can see the little “dot” or circle at the entrance to both HF horns, you will be in the stereo-zone.
- Page 16 HR4 & HR4S are perfect for any teaching environment. Its 100 degree dispersion pattern allows everyone to hear the full stereo mix in great detail. Below, an almost zero-aiming-angle achieves a wide Stereo-Zone for a classroom.
- Page 17 6) Signal Flow 2-Way & 3-Way The HR4 is configured as a 2-way system with no programmed roll-off in the low end response. There is a factory preset installed that will allow the speaker’s low frequency response to be extended by adding a sub- bass cabinet.
- Page 18 7) Inputs and Controls S12A The Power Switch (toggle) has three positions. 1.) In the left most position the unit is powered OFF. 2.) In the center position the unit is in Auto mode. It can be powered on uniting the 12V trigger inputs or by feeding audio into the input XLR.
- Page 19 Inputs and Controls S12A GAIN is the volume control. A suggested starting position is 12 o’clock when matched with HR5 speakers. Adjust up or down to suit positioning in your room. (Closer to a wall or a corner on the floor will increase the low frequency response.
-
Page 20: Specifications
8) Specifications Tech Specs Powered YES. Accepts analog/digital inputs 24 bit / 192 kHz Driver Configuration 2-way, compression-driven horns/waveguides 3-Way version available HF Driver Size / Amp 1" / 125watts LF Driver Size / Amp 8" / 125watts AES3 Digital Inputs Horizontal / Vertical directivity control 100 / 40 degrees Frequency Range... -
Page 21: Warranty
9) Warranty Ocean Way Audio speakers are under limited warranty as described in the following conditions. Warranty period starts as of date of purchase from the authorized dealer. OWA reserves the right to request original purchase receipt as proof of the date of purchase. -
Page 22: Maintenance
10)Maintenance Exterior surfaces of this product may be cleaned using a non-abrasive lint-free cloth lightly damped with water. Disconnect the mains power cable when cleaning to avoid risk of electric shock. Do not use alcohol or ammonia based cleaners. Driver active surfaces will not require cleaning as they are deep-set inside horn expansions... - Page 23 Ocean Way Audio History...
- Page 24 About Ocean Way It all started with speakers. Ocean Way Recording began in 1968, as a showcase for Allen’s custom monitors. Allen needed impressive sounding material for his speakers so he began to record music that sounded dramatic! The studio business boomed and he met the demand with many rooms in several locations.
- Page 25 Through-out the history of Ocean Way Studios, we built the monitor systems for all the control rooms and private studios for selected elite cliental. These many accomplishments, paved the way for Ocean Way Audio delivers “the” sound of Ocean Way Studios in a free standing design. HR Series...
Need help?
Do you have a question about the HR4 and is the answer not in the manual?
Questions and answers