Table of Contents
Advertisement
Available languages
Available languages
Quick Links
Advertisement
Table of Contents

Related Manuals for Ayce 5272.2

Summary of Contents for Ayce 5272.2
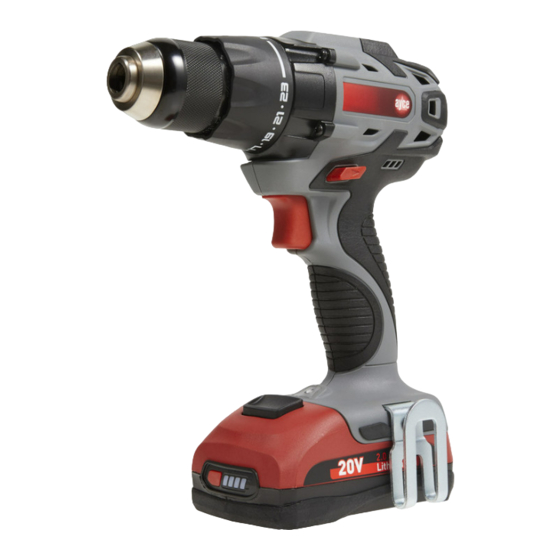
- Page 1 AKKU-BOHRSCHRAUBER MIT BÜRSTENLOSEM MOTOR PERCEUSE SANS FIL AVEC MOTEUR SANS BALAIS TRAPANO SENZA FILI CON MOTORE BRUSHLESS BRUSHLESS MOTOR CORDLESS DRILL GEBRAUCHSANWEISUNG I MANUEL D'UTILISATION I MANUALE DI ISTRUZIONI I OPERATOR'S MANUAL...
-
Page 2: Technische Daten
PH2-Bit am Gehäuse 1 Stk Gürtelclip 1 Stk WICHTIGE INFORMATION ayce Power Tool behält sich das Recht vor, zu jeder Zeit und ohne Vorankündigung die Ausführung und technischen Spezifikationen dieses Produktes zu ändern und zu verbessern. WARNUNG LISTE DER HAUPTTEILE... -
Page 3: Bestimmungsgemässer Gebrauch
DE D BESTIMMUNGSGEMÄSSER GEBRAUCH 18. Selbst wenn das Werkzeug vorschriftsmässig benutzt wird, kann ein gewisses Restrisiko nicht ausgeschlossen werden. Die folgenden Gefahren können in Dieses Gerät wurde zum Bohren und Schrauben in Holz und Bleche Verbindung mit der Konstruktion und dem Design des Werkzeugs auftreten: entwickelt. - Page 4 DE D einem Schuppen oder einer Metallkonstruktion im Sommer. anderen Ladegerät als dem mitgelieferten aufzuladen. 7. Lassen Sie den Akku nach dem Aufladen abkühlen. Legen Sie ihn nicht in eine 6. Stellen Sie keine Gegenstände auf das Ladegerät, da dies zuÜberhitzen führen heisse Umgebung, z.
-
Page 5: Allgemeine Sicherheitshinweise Zur Verwendung Des Geräts
DE D ALLGEMEINE SICHERHEITSHINWEISE ZUR VERWENDUNG 20. Ziehen Sie den Stecker des Ladegerätes aus der Steckdose, bevor Sie das Gerät reinigen. Dadurch wird das Risiko eines Stromschlags vermindert. Das DES GERÄTS Entfernen des Akkus reduziert nicht das Risiko. Lesen Sie alle Sicherheitshinweise und Anweisungen. Die 21. - Page 6 10 11 DE D 4. Verwendung und Pflege des Elektrowerkzeugs elektrischen Schlags. e) Verwenden Sie bei Einsatz eines Elektrowerkzeugs im Freien nur für den a) Überlasten Sie das Elektrowerkzeug nicht. Verwenden Sie das für Ihre Aussenbereich geeignete Verlängerungskabel. Die Verwendung eines Arbeit vorgesehene Elektrowerkzeug.
-
Page 7: Beschreibung Der Symbole
12 13 DE D BESCHREIBUNG DER SYMBOLE c) Verwenden Sie nur die für das jeweilige Elektrowerkzeug vorgesehenen Akkus. Der Gebrauch von anderen Akkus kann zu Verletzungen und 1. Sicherheitssymbole Brandgefahr führen. Die in diesem Handbuch verwendeten Symbole dienen dazu, Sie auf eventuelle d) Wenn der Akku nicht verwendet wird, muss er von anderen metallischen Risiken aufmerksam zu machen. -
Page 8: Betrieb
14 15 DE D BETRIEB 1. Vor der Benutzung Recyceln Sie unerwünschte Materialien anstatt diese zu • Entfernen Sie das Verpackungsmaterial und lose Teile vom Gerät. entsorgen. Alle Geräte und Verpackungen sollten sortiert und einem Recyclingzentrum vor Ort zugeführt werden, damit sie •... - Page 9 16 17 DE D • Legen Sie den Akku in das Ladegerät und vergewissern Sie sich, dass der Akku • Setzen Sie den Akku in das Gerät ein, indem Sie die Erhebungen am Akku an den richtig eingesetzt ist. Nuten im Werkzeug ausrichten und dann den Akku vollständig in das Werkzeug schieben, bis der Akku in seiner Position einrastet.
- Page 10 18 19 DE D b. Einstellen des Links-/Rechtslaufs (Abb.4) e. Zwei-Stufen-Schalter (Abb.7) • Für Vorwärtslauf (im Uhrzeigersinn) • Passen Sie die Geschwindigkeit an, Abb.4 Abb.7 drücken Sie den Schalter für Rechts-/ indem Sie den Zwei-Stufen-Schalter Linkslauf in die linke Position. auf die gewünschte Geschwindigkeit einstellen.
- Page 11 20 21 DE D i. Gürtelclip (Abb. 10) dem Kopf der Schraube herausrutscht. Der Kopf der Schraube könnte dadurch beschädigt werden, was dazu führt, dass sie schwieriger hinein- oder auch • Das Werkzeug ist mit einem Abb.10 herausgedreht werden kann. Gürtelclip ausgestattet, der beiderseits des Werkzeugs b.
-
Page 12: Wartung
22 23 DE D WARTUNG • Stellen Sie das Werkzeug auf den Bohrmodus ein. • Markieren Sie die Lochmitte mit einem spitzen Körner. VORSICHT! • Verwenden Sie ein für das bearbeitete Material geeignetes Schmiermittel. Ziehen Sie immer den Netzstecker des Gerätes, bevor Sie Einstellungen vornehmen •... - Page 13 Wahl getroffen. Unsere Qualitätsverpflichtung schliesst auch unseren Vorname Nachname Kundendienst ein. Jumbo bietet einen ausgezeichneten Reparaturdienst für alle ayce Produkte an. Strasse/Hausnummer Telefon Sollte Ihr Gerät entgegen aller Erwartungen bei der privaten Nutzung innerhalb von FÜNF JAHREN ab Kaufdatum einen...
- Page 14 26 27 DE D EU-Konformitätserklärung 1. Gerätetyp/Produkt: Produkt: Akku-Bohrschrauber Typen : 5272.2 Chargen- oder Seriennummer: 1809-2809 Name und Anschrift des Herstellers oder seines Bevollmächtigten: Jumbo-Markt AG CH-8305 Dietlikon Switzerland +41 (44) 805 61 11 Die alleinige Verantwortung für die Ausstellung dieser Konformitätserklärung trägt der Hersteller.
-
Page 15: Technische Zeichnung
28 29 DE D TECHNISCHE ZEICHNUNG ERSATZTEILLISTE Nr Teile- name Nr Teile- name 1 Schraube (links) 12 Mutter 2 Bohrfutter 13 Elektro-Grundplatte 3 Klemmen für Wellen-Typ B 14 Vor-/Rück-Taste 4 Kupplungskappe 15 Rechte Gehäusegruppe 5 Blechschraube 16 Druckfeder 6 Dekorative Abdeckung 17 Stahlkugel 7 Getriebegehäusegruppe 18 LED-Abdeckung... - Page 16 30 31 DE D NOTIZEN NOTIZEN 180605_ayce_5272.2_IM 180605_ayce_5272.2_IM...
-
Page 17: Liste Des Principaux Elements
Embout PH2 clipsé au corps de l’appareil 1Pce Clip de ceinture 1Pce INFORMATIONS IMPORTANTES ayce Power Tool se réserve le droit de modifier et d’améliorer à tout moment et sans préavis le design et les spécifications techniques de ce produit. LISTE DES PRINCIPAUX... -
Page 18: Domaine D'utilisation
34 35 FR F DOMAINE D’UTILISATION 18. Il est impossible d’éliminer tous les facteurs de risques résiduels, même si les instructions d’utilisation de l’outil sont respectées. Les dangers suivants Cet outil est conçu pour percer le bois et les plaques de métal, et pour visser. peuvent exister du fait de la construction et de la conception de l’outil : •... - Page 19 36 37 FR F 7. Laissez la batterie refroidir avant de la recharger. Ne la placez pas dans 6. Ne mettez aucun objet sur le chargeur, car cela peut provoquer une un environnement très chaud, par exemple dans un abri métallique ou une surchauffe.
-
Page 20: Avertissements De Sécurité Généraux Pour L'outil
38 39 FR F AVERTISSEMENTS DE SÉCURITÉ GÉNÉRAUX POUR L’OUTIL une alimentation protégée par un dispositif à courant différentiel résiduel (RCD). L’usage d’un RCD réduit le risque de choc électrique. Lire tous les avertissements de sécurité et toutes les instructions. Ne pas suivre les avertissements et instructions peut donner lieu à... - Page 21 40 41 FR F INFORMATION SUR LE BRUIT ET LES VIBRATIONS batterie de l’outil avant tout réglage, changement d’accessoires ou avant de ranger l’outil. De telles mesures de sécurités préventives réduisent le risque Valeurs de mesure déterminées conformément à EN 60745-1. de démarrage accidentel de l’outil.
-
Page 22: Description Des Symboles
42 43 FR F DESCRIPTION DES SYMBOLES 1. SYMBOLES DE SÉCURITÉ Recycler les matériaux indésirables au lieu de les jeter à la poubelle. Chaque outil et emballage doit être trié et déposé au L’utilisation des symboles dans ce manuel a pour but d’attirer l’attention sur les centre de recyclage de la région afin d’être traité... - Page 23 44 45 FR F UTILISATION • Rechargez la batterie lithium-ion exclusivement avec le chargeur approprié. • Branchez le chargeur dans une prise secteur. 1. Avant utilisation • Fixez la batterie au chargeur en alignant les arêtes sur la batterie avec les fentes •...
- Page 24 46 47 FR F • Pour installer la batterie, alignez les arêtes sur la batterie avec les fentes dans b. Régler le sens de rotation (Fig 4) l’outil, glissez entièrement la batterie sur l’outil jusqu’à ce que la batterie se •...
- Page 25 48 49 FR F i. Clip de ceinture (Fig. 10) e. Sélecteur de vitesse à double plage (Fig 7) • Réglez la vitesse en plaçant le Fig.10 Fig.7 sélecteur de vitesse à double plage • L’outil est équipé d’un clip de ceinture sur la vitesse souhaitée.
-
Page 26: Entretien
50 51 FR F ENTRETIEN b. Percer • Pour percer un trou de grand diamètre, il est parfois préférable de commencer par ATTENTION ! percer un trou avec un foret d’un diamètre moindre, puis de continuer avec un foret Débranchez toujours l’outil avant d’effectuer un réglage ou une opération d’entretien. du diamètre requis. -
Page 27: Certificat De Garantie
N° de modèle Code barre (EAN) engagement de qualité inclut également notre service de réparation. Jumbo offre un excellent service de réparation, pour tous les produits ayce. Si, contre toute attente, vous rencontrez un problème dû à un Garantie (cochez la case) défaut de fabrication ou de matériau dans le cadre d’un usage... - Page 28 Perceuse sans fil Modèle: 5272.2 Tension nominale: 20 V CC Marque: ayce L’objet de la déclaration décrit ci-dessus est conforme à la législation Perceuse sans fil 5272.2 Chargeur S040KV1800185 2006/42/CE « Machines » 2014/35/EU « Basse tension» 2014/30/CE « Compatibilité électromagnétique »...
-
Page 29: Vue Éclatée
56 57 FR F VUE ÉCLATÉE LISTE DES PIÈCES N° Nom de la pièce Anz N° Nom de la pièce 1 Vis (filetage vers la gauche) 12 Écrou 2 Mandrin 13 Bloc électrique 3 Circlips pour arbre de type B 14 Bouton avant/arrière 4 Capot de l'embrayage 15 Partie droite du boîtier... - Page 30 58 59 FR F REMARQUE REMARQUE 180605_ayce_5272.2_IM 180605_ayce_5272.2_IM...
-
Page 31: Elenco Dei Componenti Principali
Punta PH2 su corpo 1 pzi Clip per cintura 1 pzi INFORMAZIONI IMPORTANTI ayce Power si riserva il diritto di modificare e migliorare il prodotto e le sue specifiche tecniche in qualsiasi momento e senza preavviso. ELENCO DEI COMPONENTI PRINCIPALI... -
Page 32: Uso Previsto
62 63 IT I USO PREVISTO dell’uso e della natura dell’apparecchio: • Danni ai polmoni, se non si indossa una maschera antipolvere; Questo apparecchio è progettato per trapanare legno e lamine di metallo e per avvitare. • Danni all’udito, se non si indossano protezioni per le orecchie. ULTERIORI PRECAUZIONI DI SICUREZZA RELATIVE ALLA ISTRUZIONI DI SICUREZZA SPECIALI BATTERIA... - Page 33 64 65 IT I 9. Non mettere il gruppo batteria vicino al fuoco o a fonti di calore. 9. Non utilizzare una prolunga, se non è assolutamente necessario. L’uso di una prolunga inadatta può causare incendio, scossa elettrica o folgorazione. 10.
-
Page 34: Norme Di Sicurezza Generali
66 67 IT I NORME DI SICUREZZA GENERALI umido, collegarsi ad un impianto di alimentazione elettrica protetto da un interruttore differenziale (RCD). L’utilizzo di un interruttore RCD limita i Leggere con attenzione tutte le avvertenze e tutte le istruzioni.La rischi di scosse elettriche. mancata osservanza delle istruzioni riportate di seguito potrebbe provocare incidenti quali incendi, scosse elettriche e/o gravi lesioni 3. - Page 35 68 69 IT I c) Scollegare l’apparecchio o rimuovere la batteria prima di procedere ad e) Se utilizzate in modo non corretto, dalle batterie può fuoriuscire liquido; eventuali regolazioni, alla sostituzione degli accessori o prima di riporlo. In evitare il contatto. In caso di contatto accidentale con il liquido della batteria, questo modo è...
-
Page 36: Descrizione Dei Simboli
70 71 IT I DESCRIZIONE DEI SIMBOLI Riciclare i materiali di scarto piuttosto che smaltirli. Tutte le 1. Simboli di sicurezza apparecchiature e gli imballaggi devono essere differenziati L’uso di simboli nel presente manuale ha lo scopo di informare circa i possibili rischi. e portati presso un centro locale di riciclaggio in modo tale da È... -
Page 37: Funzionamento
72 73 IT I FUNZIONAMENTO • Collegare il caricabatteria alla presa elettrica. • Collegare il gruppo batteria al caricabatteria allineando le nervature in rilievo 1. Prima dell’uso presenti su di esso con le scanalature del caricabatteria.Inserire la batteria nel • Rimuovere il materiale di imballaggio e gli altri oggetti estranei dall’apparecchio. caricabatteria, accertandosi di introdurla fino in fondo. - Page 38 74 75 IT I • Per installare il gruppo batteria, allineare le nervature in rilievo presenti su di b. Rotazione avanti/indietro (Fig. 4) esso con le scanalature all’interno dell’attrezzo, fare scorrere il pacco batteria • Per la rotazione in avanti (in senso Fig.4 completamente sull’attrezzo fino a far scattare in posizione la batteria (condizione orario) spostare l’interruttore...
- Page 39 76 77 IT I e Selettore di marcia dualrange(Fig. 7) i. Clip per cintura (Fig. 10) • Regolare la velocità spostando il • L’attrezzo è dotato di una clip per Fig.7 Fig.10 selettore di marcia sulla velocità cintura che può essere posizionata su desiderata.
-
Page 40: Manutenzione
78 79 IT I b. Trapanatura di fori MANUTENZIONE • Per praticare un foro più grande, può essere utile cominciare con una punta più ATTENZIONE! piccola e poi aumentare fino alla dimensione desiderata. In questo modo, si evita di sovraccaricare il trapano. Scollegare sempre l’apparecchio prima di qualsiasi operazione di manutenzione. -
Page 41: Certificato Di Garanzia
Congratulazioni per avere acquistato questo prodotto di alta qualità. Il nostro impegno Nome Cognome per la qualità include anche l'assistenza. Jumbo dispone di un eccellente servizio di riparazione, per tutti e prodotti ayce. Via/Num. Telefono Qualora si riscontrino difetti relativi ai materiali o alla fabbri- cazione entro CINQUE ANNI dalla data di acquisto del prodotto, l'utente potrà... - Page 42 Trapano senza fili Modello: 5272.2 Tensione nominale: 20 V DC Marchio: ayce L’oggetto della dichiarazione di cui sopra è conforme alla pertinente normativa di armonizzazione dell’Unione: Trapano senza fili 5272.2 Caricabatteria S040KV1800185 Macchine (2006/42/CE) “LVD” (2014/35/EU) Compatibilità elettromagnetica (2014/30/CE ) ROHS (2011/65/CE)”...
- Page 43 84 85 IT I SCHEMI TECNICI ELENCO DEI PEZZI DI RICAMBIO Num. Nome pezzo QTÀ Num. Nome pezzo QTÀ Vite (SIN) Dado Mandrino Montaggio elettrico Anelli elastici per steli di tipo B Pulsante A/I Campana frizione Scatola esterna parte destra Vite a tappo Scatola esterna parte destra Coperchio decorato...
- Page 44 86 87 IT I NOTA NOTA 180605_ayce_5272.2_IM 180605_ayce_5272.2_IM...
-
Page 45: Technical Specifications
PH2 bit on body 1 pc Belt clip 1 pc IMPORTANT INFORMATION At any time and without prior notice ayce Power tool reserves the right to change and improve the design and the technical specifications of this product. WARNING LIST OF MAIN PART... -
Page 46: Intended Use
90 91 INTENDED USE EXTRA SAFETY REGULATIONS CONCERNING BATTERY The machine is intended for drilling in wood and metal sheets, screwing. 1. To ensure the longest battery life and best battery performance, always charge the battery when the temperature is between 18-24°C. Do not charge SPECIAL SAFETY INSTRUCTIONS the battery pack when the temperature is below 0°C, or above 40°C. - Page 47 92 93 11. Do not disassemble the charger. Take it to an authorized service centre when 12. The best storage place is one that is cool and dry away from direct sunlight service or repair is required. Incorrect re-assembly may result in the risk of and excess heat or cold.
- Page 48 94 95 GENERAL SAFETY WARNINGS FOR THE TOOL operating power tools may result in serious personal injury. b) Use personal protective equipment. Always wear eye protection. Protective Read all safety warnings and instructions. Failure to follow all the equipment such as dust mask, non-skid safety shoes, hard hat, or hearing warnings and instructions may result in electric shock, fire and/or protection used for appropriate conditions will reduce personal injuries.
-
Page 49: Noise/Vibration Information
96 97 instructions, taking into account the working conditions and the work to be DESCRIPTION OF THE SYMBOLS performed. Use of the power tool for operations different from intended 1. Safety symbols could result in a hazardous situation. The use of symbols in this manual is intended to draw your attention to possible risks. 5. -
Page 50: Operation
98 99 OPERATION Recycle unwanted materials instead of disposing of them. All 1. Before use appliances and packaging should be sorted and tendered at a • Remove any packing material and loose parts from unit. regional recycling centre into to be processed in an ecological •... - Page 51 100 101 • The red and green light on the charger will glow for one second as a self-check,the • This battery pack is equipped with a power bar which is used to give an indication of green light on charger will then flash to show that the battery pack is charging. the battery pack’s remaining charge.
- Page 52 102 103 f. bit storage (fig.8) c. Torque adjustment (Fig.5) Fig.5 • The cordless drill has a 23+1 drill step • The tool is equipped with two bit Fig.8 storages which is located on either torque adjustment, in order to avoid damage to the screw-heads or drill s.
- Page 53 104 105 4. Operation for working. • Keep the drill in line with the hole. Ideally, the drill bit should enter at right angles to the work. If the angle is changed during drilling, this could cause the bit to snap a.
- Page 54 106 107 MAINTENANCE CAUTION! Always disconnect the device before performing any adjustment or maintenance operation. If the supply cord is damaged, it must be replaced by the manufacturer or its service agent in order to avoid a hazard. Disconnect from the power supply immediately if the supply cord is damaged. Take care not to expose this tool to the rain.
-
Page 55: Warranty Certificate
Congratulations! You have made an excellent choice with the purchase of this quality First name Last name product. Our commitment to quality also includes our service. Jumbo offers an excellent repair service, exclusively in Switzerland, for all ayce Street/No. Telephone products. - Page 56 110 111 EU declaration of conformity Apparatus model/Product Product: Cordless drill type: 5272.2 batch or serial number: 1809-2809 Name and address of the manufacturer or his authorised representative: Jumbo-Markt AG CH-8305 Dietlikon Switzerland +41 (44) 805 61 11 This declaration of conformity is issued under the sole responsibility of the manufacturer.
-
Page 57: Technical Drawing
112 113 TECHNICAL DRAWING SPARE PARTS LIST No. Part Name No. Part Name Screw (L.H.) 12 Nut Chuck 13 Electric Assembly Circlips For Shaft-Type B 14 F/R Button Clutch cap 15 Right Housing Tapping Screw 16 Compression Spring Decorate Cover 17 Steel Ball Gear Case ASSY 18 LED Cover... - Page 58 114 115 NOTE NOTE 180605_ayce_5272.2_IM 180605_ayce_5272.2_IM...
- Page 59 CH-Import & Distributed exclusively by: Jumbo-Markt AG, Industriestrasse 34 8305 Dietlikon...
Need help?
Do you have a question about the 5272.2 and is the answer not in the manual?
Questions and answers
Can we use Akku-Bohrschrauber to drill the concrete wall
The Ayce 5272.2 Akku-Bohrschrauber is a cordless drill designed with a brushless motor and features torque adjustment and drill mode. However, the manual does not mention a hammer function, which is typically required for drilling into concrete. Therefore, it is not suitable for drilling into a concrete wall.
This answer is automatically generated