Table of Contents
Advertisement
Quick Links
Advertisement
Table of Contents

Summary of Contents for Mark2 Step Thru
- Page 1 USER MANUAL...
-
Page 3: Table Of Contents
Attaching the handlebars Quick release mechanisms (QR) Seat adjustment Tyres and gears Technical Information Battery & Charger Technical data Battery and charger overview General Information Battery installation Charging instruction Environment Charging care Legal Range and storage Mark2 Guarantee Programme Insurance... -
Page 5: Introduction
Introduction Congratulations on your purchase of a new Mark2 electric bike! Every Mark2 has been designed with intelligently integrated and hidden electronics, supreme reliability and exceptional ease of use. But more than this, they are a means of bringing real fun, enjoyment and a true sense of freedom. -
Page 6: Overview
To ensure safety while riding, the electrical We, Mark2, are ready to consult you and, if controls have been ergonomically designed for necessary, to provide timely and competent comfortable use. - Page 7 We must stress that your Mark2 should not be this instruction in an appropriate way. It is used on off-road terrain that exceeds these...
-
Page 8: Explanation Of Parts
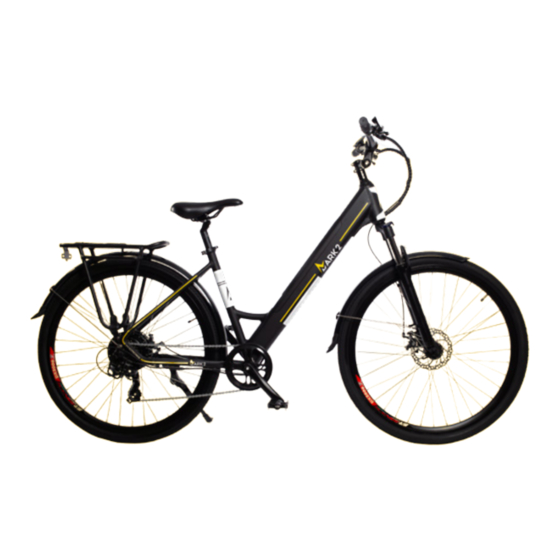
Explanation of Parts - Model Step Thru The diagram to the right provides an overview of the parts on your new eBike. These will be referenced throughout the manual, and it may be useful to bookmark this page for quick reference. - Page 9 Overview | Page 5...
-
Page 10: Assembly
• Hexagon socket wrenches from 2 to 8 one of the tyres. mm (Allen keys) • Flat-head screwdriver Your Mark2 requires some adjustments and • Cross-head screwdriver minor assembly before it can be ridden. You • Knife or snips may need to attach the front wheel to the... -
Page 11: Front Wheel Installation
1. Front wheel installation Mount the front wheel, making sure you guide the rotor between the brake pads carefully. Close the quick-release and verify that the wheel is securely fixed. For further help with the Quick-Release (QR) mechanism, please go to page 3X. -
Page 12: Pedal Installation
2. Pedal installation Each pedal is designed for a specific side. They have a corresponding L (Left) or R (Right) letter to identify the required side. Identify the left and the right crank. Position the right pedal in the right crank and screw the bolt by hand in a clockwise direction. -
Page 13: Seat Installation
3. Install the seat post • Unpack the seat post and saddle. • Put the seat post into the frame. • Adjust seat post to the height that suits your riding position best and tighten quick release. Ensure that the quick release is tightened firmly. •... - Page 14 • Undo the 4 screws at the top and fit the handebar. When you have lined the handlebar and front wheel at the correct angle, you should tighten the two bolts on the handlebar stem, as shown in the image on the right. •...
-
Page 15: Seat Adjustment
5. Seat Adjustment The height of the saddle should be adjusted in such a way that when pedalling your leg remains slightly bent as the pedal is at its lowest point, see image to right. When the saddle is adjusted in an optimal way, you should be able to touch the ground with the tips of your toes on both feet at the same time. -
Page 16: Tyres And Gears
Inflating the tyres Gears The gears should be used as with a Warning conventional bicycle. For starting and at The tyre pressures should be checked low speeds a lower gear is best. At higher • each time before riding or at least once a speed, a higher gear should be selected. -
Page 17: Battery & Charger
Battery & charger Battery and charger overview 1. Battery 2. Battery port 3. Charging socket 1. Mains plug (240V) 2. Charging plug 3. Charger 4. LED charging indicator (RED = charging. GREEN = charged) Battery and charger | Page 13... - Page 18 Battery Your Mark2 uses maintenance-free Lithium-Ion The range of the battery is significantly influenced batteries. by a number of parameters. Some of these being user weight, riding manners, terrain, surface and tyre The battery is delivered with a capacity of pressure, along with rider effort.
-
Page 19: Battery Installation
1. Battery Insertion With the battery port at the bottom insert that end first and push the top end into the frame until it locks into position. The battery can be charged while in the bike through the external charging point accessed through rubber cover. -
Page 20: Charging Instruction
Charging instruction • To charge the battery on the bike, simply place the bike within reach of the power supply and plug it in. • The battery can either be charged while on the bike or the battery can be removed and charge data place of your convenience. •... -
Page 21: Charging Care
Charging Care When storing the battery for more than a month, When the battery is lower than 1bar on the meter (e.g. during wintertime) it is important to place the the motor will stop working. If only lights are being fully charged battery on a flat and dry place. -
Page 22: Range And Storage
Storage Range The range of a battery charge depends heavily If the bike is not used for more than a month, on various conditions, such as (but not limited it is best to store the battery as follows: to): At 40% - 60% of its capacity, recharge •... - Page 23 Winter Storage Disposal of battery If you put away your eBike for periods greater than Batteries contain substances that can be harmful one month, it will be sufficient to charge the battery to human health and the environment if not once a month.
-
Page 24: Meter Operation
Meter Operation Meter overview 1. Power/Mode 2. Batterry level 3. Speed 4. Power Assistance Level 5. Odometer... -
Page 25: Meter Instruction
Meter instruction To switch the eBike system on/ To change PAS level, press the + Press ”-”, until the PAS become “0” off, hold the POWER/MODE / - to increase and decrease until to ride without motor assistance. bottom for 2 seconds. The default the desired assistance level is value for power assistance (PAS) displayed. -
Page 26: Safety
Safety Cycling, particularly off-road, can be dangerous. by law for helmets is a CE certificate. With the correct equipment and understanding, When you are purchasing a helmet, try on several many of the risks can be minimised. different styles and sizes. Choose one that is comfortable and safe, that fits well to your forehead Once you make up your mind to ride a eBike, and straps that are distant from your ears (see image... - Page 27 !!!) If the helmet was worn in an accident, it is the stability and the proper installation of the essential that you replace it. Its shell may have saddle, the handlebar, the wheels and tyres, the been weakened, and the ability of the lining to pedals and the cranks;...
- Page 28 • Lubricate the chain with appropriate lubricant, Replace tubes and tyres as soon as you have depending on the expected use; discovered signs of wear or damage. Before replacing the tubes, tyres and rim tape, you • Check if reflectors and lights are correctly must make sure that the new components are positioned and cleaned;...
- Page 29 Maximum Rider Weight The load (rider and luggage) on your Mark2 should not exceed 110kg. Safety | Page 25...
- Page 30 Luggage No child seat or trailer coupling should be mounted on the eBike, as it reduces stability The Mark2 is manufactured in accordance with an when riding the eBike. approved specification, and its safety is guaranteed by us. We cannot guarantee the safety of the...
- Page 31 Light and sound signals polarity when placing them into the battery compartment. Do not mix old batteries with new or different type ones. Promptly remove Each time you use the eBike on the public roads, the batteries if they are discharged or when check whether the lights and the bell work and not using the eBike for a long time to prevent whether the cables are properly attached.
- Page 32 The Mark2 is equipped with high-end hydraulic disc brakes that have superior stopping power To stop effectively, you should apply both brakes and control compared to other types of brake.
- Page 33 rear wheel. When riding down steep slopes, you should reduce the rear braking force and increase the front one, as when riding down a slope your weight normally shifts forward. Key elements for efficient deceleration and safe stopping are good sensitivity to avoid wheel lock up and proper weight shift.
-
Page 34: Practical
Practical Emergency edge of the tyre proves too hard to remove by It is recommended to have with you the following hand, use special tyre levers. emergency set on the road: Remove the inner tube. Inspect the external • wrenches from 10 to 15 mm to use for and internal surface of the tyre carefully to find tightening of screws when loose;... - Page 35 not to pinch the inner tube between the edge of result on other spokes being broken as well thus the tyre and the rim. making the eBike unusable. Slowly inflate the tube up to the specified air Wind the broken spoke around the closest one pressure meanwhile making sure the tyre edges to avoid the risk of the free end whipping the remain inserted in the rim.
-
Page 36: Cleaning, Lubrication And Storage
Cleaning, lubrication or car shampoo. and storage Do not use a high-pressure jet washer, gasoline, strong alkalis, aggressive or abrasive Regular cleaning and lubrication prevents detergents to clean the eBike as they can wear and tear and keeps your eBike in good cause damage. -
Page 37: Maintenance Recommendations
If you have passed through water, or ridden in Maintenance recommendations wet weather, it is recommended to clean the chain before applying the lubricant. You should After the first ride of the eBike its nuts, bolts, use a degreaser, which you can apply with a cables and wheel spokes undergo settling and toothbrush or a special brush for chains, and will probably need adjustment. - Page 38 • Inspect the frame, particularly in the tube Regardless of the circumstances, we (!!!) joint areas, the handlebar, the handlebar do not recommend and shall not be held stem and the seat post. If you notice deep responsible for the safety of your eBike if scratches, cracks or discolouration on their the following repairs and setup of the brake surfaces, it means that they have been...
- Page 39 Contact Mark2 or a service centring inspected. centre for advice or repairs. We assume no responsibility for safety should •...
-
Page 40: Quick Release Mechanisms (Qr)
If you have any the risk of their breakdown and the safety risks they doubts about the successful result, contact involve. Mark2 or a local eBike mechanic. (!!!) You are required to have your eBike inspected in An improperly adjusted mechanism for... -
Page 41: Technical Information
Technical Information Technical data Indicators Items Parameters Product size 186 x 65 x 113cm Dimensions Packing size 148 x 25 x 84cm Frame Material Aluminum Type Brushless Motor Power 250W Bafang Type Lithium-Ion Capacity 36V 10.4AH Samsung Cell Balance, over-charge, under-voltage, Battery Management overheating, automatic shutoff... - Page 42 Display Meter Front fork Front fork Aluminum front fork with lock-out function Front tyre 28” x 1.75” - Chaoyang Tyres Rear tyre 28” x 1.75” - Chaoyang Suitable height 150 - 200cm Load capacity 110kg Speed 25kph, based on terrain & rider weight Riding Range With PAS 35 - 55km...
-
Page 43: General Information Environment
General Information Environment power needed for an eBike is abstracted from a carbon-heavy national grid, the amount of power needed is relatively minimal. As a result, Department for Transport figures show that the carbon footprint compared to a fossil fuel, or currently, for every journey between 2-5 miles even an electric car, is almost negligible. -
Page 44: Legal
Mark2 Guarantee Programme waste or recycling bins. Mark2 Bikes guarantees that all of our bikes Legal are free from defective materials, constructional defects and oxidisation (rusting) so long as the conditions set out in this Mark2 Guarantee To be legally allowed to ride on public roads, Programme are met. - Page 45 The eBike has been used for rental or any a third person. other professional purposes; Mark2 Bikes Ltd has the ultimate decision on the • The eBike has been subject to damage due acceptance of a guarantee claim and the choice between replacement or reimbursement.
-
Page 46: Mark2 Guarantee Programme
Mark2 Bikes, this does not imply an acceptance of the liability for possible damages. Insurance Mark2 excludes all liability for which we are not legally bound to compensate these damages. In relation to insurance matters, the electric bike The guarantee offered in the Mark2 Guarantee is regarded as an ordinary bike;... - Page 47 Notes...
- Page 48 May 2020 | Version 1.1...
Need help?
Do you have a question about the Step Thru and is the answer not in the manual?
Questions and answers