
Related Manuals for Isotta 5DMARKIV


Summary of Contents for Isotta 5DMARKIV
- Page 1 HOUSINGS and ACCESSORIES for UNDERWATER PHOTOGRAPHY Instructions for Canon EOS 5D Mark IV www.isotecnic.it...
- Page 3 Canon ESO 5D Mark IV Housing instructions Thank you for your purchase of an Isotta Housing for your Camera. We are confident that you will benefit from the outstanding performance of our product, manufactured using the most advanced technology available.
- Page 4 Thank you for purchasing a product of the line ISOTTA. We are confident that you will benefit from the outstanding performance of our product, manufactured using the most advanced technology available. Our service goes wherever you go: +39 045 6450480 support@isotecnic.it...
-
Page 5: Table Of Contents
TABLE OF CONTENTS Warranty .............. pag. 06 Package Contents ..........pag. 08 Specifications ............. pag. 09 Precautions ............pag. 10 Quick start guide ..........pag. 11 Parts of the Housing .......... pag. 12 Opening and Locking the Housing ....pag. 14 Installing the Camera ......... -
Page 6: Warranty
Isotta dealer and the serial number of the product making sure to affix the stamp of the dealer on the certificate. - Page 7 8. Isotecnic Srl disclaims any liability for any damage that may directly or indirectly be caused to people, pets or not, or things, caused by flooding due to incorrect installation, use and maintenance of the product. Isotecnic Srl do not reimburse missed services, travel and transportation costs. Any repair of the equipment under Warranty will always be made at the Isotecnic Srl plant and the shipping charges will be paid by the customer.
-
Page 8: Package Contents
PACKAGE CONTENTS • Isotta-EOS 5D Mark IV housing • Lubricant • Spare O-ring Set • Instruction manual ATTENTION Remove the shoulder strap clips prior to inserting the camera into the housing! -
Page 9: Specifications
SPECIFICATIONS All housings are made entirely of Isotta’s signature red-colored anodized aluminum which is anti-corodal with depth rate to 330ft/100m. With double O-Ring seals on each button and on all removable parts to make it extra safe against leakages, every housing has clearly labeled camera controls and is closed with Isotta’s single handed one-turn knob to be operated with ease. -
Page 10: Precautions
Do not use lubricants from other brands with the silicone rubber O-ring on this housing, only use the lubricant provided by ISOTTA. After checking the O-ring to make sure that there are no scratches, dust, or debris, apply a light coating of silicone grease to the entire O-ring with your finger. -
Page 11: Quick Start Guide
QUICK START GUIDE Remove any straps and eyelets from the camera as seen on page 8 1. REMOVE THE BACK FROM THE FRONT Apply a slight upward pull to the locking knob and rotate anticlockwise until the pin is visible. Slightly lift the Back until it comes out from the guide pin on the knob. Remove the Back slantwise, paying attention to the two pins on the opposite side. -
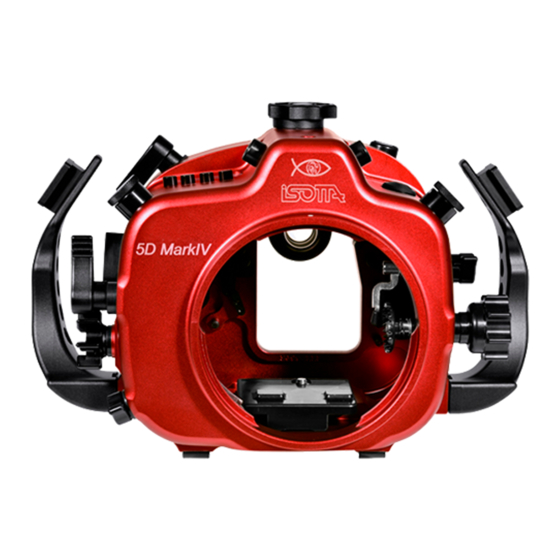
Page 12: Parts Of The Housing
PARTS OF THE HOUSING FRONT All camera controls are external and are laser-engraved with the symbols for the camera functions. Please refer to the Identification of Parts manual to see all controls of the housing. All key Canon EOS 5D Mark IV Camera controls can be accessed. The front ends with the port/lens mount hole that allows to mount different ports (optional). - Page 13 Optical Trigger System / OPTIONAL Only on request. On the upper side the hotshoe features the battery powered TTL electronic trigger to be connected to the hotshoe of the camera. A special internal slot located on the right top of the housing interior allows you to lock the hotshoe when not in use.
-
Page 14: Opening And Locking The Housing
OPENING AND LOCKING THE HOUSING Opening and closing the housing: 1. To open the housing place it on a flat surface, standing upright. 2. It is very important to lift the selector AF/M on the right of the housing before placing the camera inside. -
Page 15: Installing The Camera
INSTALLING THE CAMERA Remove any straps and eyelets from the camera before inserting it inside the housing as seen on page 8. 1. Turn the locking lever on the tray to the left to unblock it. 2. Remove the camera tray from the housing by sliding it outwards. 3. -
Page 16: Mounting The Port
MOUNTING THE PORT Please refer to the ISOTTA PORT CHART for a range of compatible ports: the housing is supplied without ports that can be purchased separately depending on the lens used. IMPORTANT: ports needs to be mounted on land in the open air. - Page 17 (with a field of view of 180°) as there might be a slight vignetting. With Sea & Sea, Subal and Seacam ports with Isotta extension rings this does not happen as the extension to the port is at the same distance.
-
Page 18: Using The Flash
USING THE FLASH You can use the external flashes with the following modalities: With OPTICAL FIBER Two fiber optic connectors are present on the housing top with standard “Sea & Sea” fitting. In this case you have to use the bushings for optical fiber placed on the top. Pass the optical fiber cable of the flash in the specific space on the bushing. - Page 19 If you have problems with strobes from SEA&SEA, INON, IKELITE and Subtronic flash you switch the 1 / 2 / 3 pins on [OFF] as indicated in the figure below. MANUAL MANUAL To insert SYNCRO CORDS - To attach a strobe via electrical sync cord you have to use the bushings with syncro socket placed on the side of housing.
-
Page 20: Using The Flash With Optical Trigger System (Optional) Pag
USING THE FLASH WITH OPTICAL TRIGGER SYSTEM (OPTIONAL) ONLY UPON REQUEST it is possible to use external flash with OPTICAL TRIGGER SYSTEM. Manual Trigger for automatic Flash control (optional) The TTL flash trigger is designed to trigger external flash. It operates via the cameras hot- shoe. -
Page 21: Troubleshooting
Apply lubricant to the button. Press the button several times to distribute the lubricant. N.B.* Don’t use vaseline grease on the O-ring seals. We recommend the use of original ISOTTA products. • THE FLASH DO NOT SHOOT IN SYNCRO MODE Make sure you have inserted the hotshoe contact all the way down and check that you entered correctly the flash contact. -
Page 22: Warnings
WARNINGS • CHECK the housing before installing the camera after dispatch or transport it by plane. • DON’T TRANSPORT the housing hermetically sealed on a plane. Always remove the port or the rear cap or the rear cap’s o-rings. If you remove the O-rings, then remember to put them back on. -
Page 23: Care And Maintenance
N.B. Never use Vaseline oil to lubricate the O-rings, use only silicone grease. We recommend the use of Isotta products. - Do not use solvents, thinners, or alcohol to clean the port, the eye-piece or the monitor. - Treat the surface of the lens port like a camera lens. After use, rinse and gently dry the outside lens port to avoid water spotting. - Page 24 HOUSINGS and ACCESSORIES for UNDERWATER PHOTOGRAPHY Via Milano, 177/B | Castelnuovo del Garda (VR) | 37014 | Verona | Italy Tel. +39 045.6450480 info@isotecnic.it | www.isotecnic.it Follow us on...
Need help?
Do you have a question about the 5DMARKIV and is the answer not in the manual?
Questions and answers