Advertisement
Available languages
Available languages
NOTICE DE MISE EN OEUVRE
ST_KRB1000_A_161020
CARACTÉRISTIQUES TECHNIQUES
h x l x p
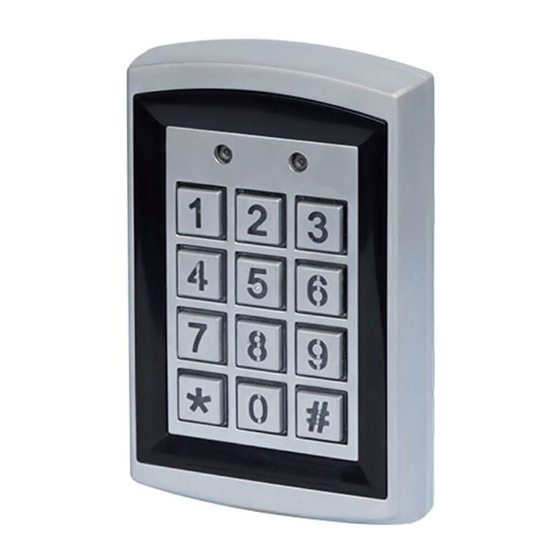
120 x 76 x 26 mm
3 modes de fonctionnement :
● LECTEUR DE PROXIMITÉ
● LECTEUR DE PROXIMITÉ ou CODE
KRB1000
● LECTEUR DE PROXIMITÉ + CODE
125 KHz
(MARIN)
*IP 55 : Protection contre les poussières, pas de dépôts nuisibles. Protection contre les jets d'eau à la lance de toutes directions
DIMENSIONS
ATTENTION : Veuillez respecter la polarité et la tension d'alimentation 12/24V AC/DC !
Lire attentivement cette notice avant mise en service et utilisation.
Utiliser ce matériel pour une application adaptée. Le fabricant n'est pas responsable des dommages éventuels causés par
une utilisation contraire aux dispositions de sécurité.
Le montage, la maintenance et les réparations doivent être réalisés par un personnel spécialisé et autorisé.
La mise en oeuvre est très simple, mais une manipulation correcte et un entretien approprié sont des conditions essentielles
pour garantir un fonctionnement parfait.
13b rue Saint-Exupéry ▪ ZA de l'Aérodrome ▪ CS20152 ▪ F-67503 HAGUENAU CEDEX www.sewosy.eu
50/40
12/24V
0,51
mA
AC/DC
kg
80/40
mA
ATTENTION :
dans ce cas, tous les utilisateurs doivent avoir 1 CODE et 1 BADGE DE PROXIMITE
33 (0)3 90 59 02 20 33 (0)3 90 59 02 19
Sous réserve de modifications techniques !
sortie
30V DC - 2 A
relais
125V AC - 1 A
= 2
KRB1000
1010
entrée
bouton poussoir
Relais 1 = 1000
= 2
Relais 2 = 10
MONTAGE
55*
0 - 99 s
-10+60°C
Ø 6
1/24
Advertisement
Table of Contents

Summary of Contents for Sewosy KRB1000
- Page 1 La mise en oeuvre est très simple, mais une manipulation correcte et un entretien approprié sont des conditions essentielles pour garantir un fonctionnement parfait. 13b rue Saint-Exupéry ▪ ZA de l’Aérodrome ▪ CS20152 ▪ F-67503 HAGUENAU CEDEX www.sewosy.eu 33 (0)3 90 59 02 20 33 (0)3 90 59 02 19 1/24 Sous réserve de modifications techniques !
- Page 2 RACCORDEMENT Cellule photoélectrique d’autoprotection. Pour l’activer se référer à la page 8/24 "Autoprotection" BP 1 SCHÉMA DE RACCORDEMENT = Bouton poussoir Relais 1 BP 2 = Bouton poussoir Relais 2 12-24V = Contact AC/DC Magnétique* = Sonnette* * Voir fonction NO 1 NO 2 sonnette...
- Page 3 EXEMPLES DE CONFIGURATIONS RACCORDEMENT D’UNE GÂCHE ELECTRIQUE* VERROUILLAGE À ÉMISSION ALIMEN- TATION 12-24V 12-24V AC/DC AC/DC AC ou DC en option *exemple RACCORDEMENT D’UN PORTAIL* VERROUILLAGE À ÉMISSION ALIMEN- TATION 12-24V 12-24V AC/DC AC/DC idéal pour portails en option *exemple RACCORDEMENT D’UNE VENTOUSE ÉLECTROMAGNÉTIQUE* VERROUILLAGE À...
- Page 4 PROGRAMMATION Modification du nombre de chiffres (codes) Attention : à modifier avant la première programmation d’un code (réglage usine = 4 chiffres) Entrer 2 X le code maître BIP long + LED droite orange fixe (code maître d’origine : 1234) Entrer * 904 BIP court + LED droite orange fixe Entrer la valeur (X compris entre 2 et 6)
-
Page 5: Ajouter Un Utilisateur
Ajouter un utilisateur ATTENTION : Le code maître ne permet pas de déverrouiller la porte! RELAIS 1 (de 001 à 999 utilisateurs) CARTE OU CODE Entrer 2 X le code maître ou passer la carte maître 1 X BIP long + LED droite orange fixe (code maître d’origine : 1234) Entrer * 001... - Page 6 Enregistrer des cartes en série Cette fonction vous permet d’enregistrer une série de cartes à la suite avec une incrémentation automatique des emplacements Entrer 2 X le code maître ou passer la carte maître 1 X BIP long + LED droite orange fixe (code maître d’origine : 1234) Entrer * 901 BIP court + LED droite orange fixe...
- Page 7 Retour réglage d’usine Cette manipulation efface tous les codes et cartes utilisateurs + la carte maître et le code maître d’origine est restauré : 1234 Entrer 2 X le code maître ou passer la carte maître 1 X BIP long + LED droite orange fixe (code maître d’origine : 1234) Entrer * 899 BIP long + LED droite orange clignotante...
- Page 8 Autoprotection Active le buzzer en cas d’arrrachement ACTIVER Entrer 2 X le code maître ou passer la carte maître 1 X BIP long + LED droite orange fixe (code maître d’origine : 1234) Entrer * 6 LED droite orange clignotante Entrer 02 BIP long + LED droite orange fixe Entrer # #...
-
Page 9: Technical Data
The commissioning is easy, but a correct handling and an appropriate maintenance are mandatory to keep the device working perfectly. 13b rue Saint-Exupéry ▪ ZA de l’Aérodrome ▪ CS20152 ▪ F-67503 HAGUENAU CEDEX www.sewosy.eu 33 (0)3 90 59 02 20 33 (0)3 90 59 02 19... - Page 10 CONNECTION Anti-tamper photocell. To activate the function, please refer to page 16 "Anti-tamper function" WIRING DIAGRAM BP 1 = Exit Button Relay 1 BP 2 = Exit Button Relay 2 12-24V AC/DC = Door magnet* = Bell* * Please refer to Bell function NO 1 NO 2...
- Page 11 EXAMPLES FOR TYPICAL WIRING CONFIGURATIONS CONNECTION OF AN ELECTRIC STRIKE* FAIL SECURE LOCKING POWER POWER SUPPLY SUPPLY 12-24V 12-24V AC/DC AC/DC BP1* AC or DC optional *example CONNECTION OF A GATE* FAIL SECURE LOCKING POWER SUPPLY 12-24V 12-24V AC/DC AC/DC ideal for gates BP1* optional...
-
Page 12: Setting Mode
SETTING MODE Changing number of digits (codes) Attention: this modification must be done before the first programming of a code (factory setting = 4 digits) Enter the master code 2 X long BEEP + right LED will turn yellow (Default code is 1234) Enter * 904 short BEEP + right LED will turn yellow Enter the digits (X is from 2 to 6) -
Page 13: Add A User
Add a user ATTENTION: Please note that the master code don’t unlock the door! RELAY 1 (from 001 to 999 users) CARD OR CODE Enter the master code 2 X or swipe the master card 1 X long BEEP + right LED will turn yellow (Default code is 1234) Enter * 001 long BEEP + right LED will turn yellow... -
Page 14: Delete All Users
Add cards in batches This function allows to register cards in batches with automatic adding of location slots Enter the master code 2 X or swipe the master card 1 X long BEEP + right LED will turn yellow (Default code is 1234) Enter * 901 short BEEP + right LED will turn yellow Enter the first position (3 mandatory digits) -
Page 15: Return To Factory Settings
Return to factory settings This operation removes all user codes + cards + master card and restores factory settings: default code will be 1234 again Enter the master code 2 X or swipe the master card 1 X long BEEP + right LED will turn yellow (Default code is 1234) Enter * 899 long BEEP + right LED will flash yellow... - Page 16 Anti-tamper function This function activates the buzzer in case of tear-off attempt to ENABLE the anti-tamper function Enter the master code 2 X or swipe the master card 1 X long BEEP + right LED will turn yellow (Default code is 1234) Enter * 6 right LED will flash yellow...
-
Page 17: Technische Daten
Die Montage ist sehr einfach, aber eine korrekte Verarbeitung und ein entsprechender Unterhalt sind grundsätzliche Bedin- gungen für eine einwandfreie Funktion. 13b rue Saint-Exupéry ▪ ZA de l’Aérodrome ▪ CS20152 ▪ F-67503 HAGUENAU CEDEX www.sewosy.eu 33 (0)3 90 59 02 20 33 (0)3 90 59 02 19 17/24 Änderungen vorbehalten! - Page 18 ANSCHLUß Fotozelle für Sabotagealarm. Um diese Funktion zu aktivieren, Siehe Seite 24/24 "Sabotagealarm" SCHALTPLAN BP 1 = Druckknopf Relais 1 BP 2 = Druckknopf Relais 2 12-24V Magnetkontakt* AC/DC = Klingel* * Siehe Klingeltaster Funktion NO 1 NO 2 Seite 24/24 COM 1 COM 2 Max: 1 mm²...
- Page 19 BEISPIELANSCHLUßKONFIGURATIONEN ARBEITSSTROM VERRIEGELUNG MIT TÜRÖFFNER ANSCHLUß* NETZTEIL 12-24V AC/DC 12-24V AC/DC BP1* AC oder DC optional *Beispiel ARBEITSSTROM VERRIEGELUNG MIT AUSSENTOR ANSCHLUß* NETZTEIL 12-24V 12-24V AC/DC AC/DC für Tore geeignet BP1* optional *Beispiel RUHESTROM VERRIEGELUNG MIT HAFTMAGNET ANSCHLUß* NETZTEIL 24V DC 12-24V AC/DC BP1*...
- Page 20 PROGRAMMIERUNG Änderung der Ziffernanzahl (Codes) Achtung: diese Änderung muss vor der ersten Codeprogrammierung erfolgen (Werkeinstellung = 4 Ziffern) 2 X Mastercode eingeben (Ursprungsmastercode: 1234) langer PIEP Ton + rechte gelbe LED leuchtet * 904 eingeben kurzer PIEP Ton + rechte gelbe LED leuchtet Neuer Wert eingeben (X zwischen 2 und 6 begriffen) langer PIEP Ton + rechte gelbe LED leuchtet Eine Änderung der Ziffernanzahl löscht alle vorrige Speicherungen!
- Page 21 Benutzer Speicherung ACHTUNG: Der Mastercode entriegelt die Tür nicht! RELAIS 1 (von 001 bis 999 Benutzer) KARTE ODER CODE 2 X Mastercode eingeben oder 1 X Masterkarte an den langer PIEP Ton + rechte gelbe LED leuchtet Leser halten (Ursprungsmastercode: 1234) * 001 eingeben langer PIEP Ton + rechte gelbe LED leuchtet...
- Page 22 Serienmäßige Speicherung von Karten Diese Funktion ermöglicht die aufeinanderfolgende Kartenspeicherung mit automatischer Inkrementierung der Kartenplatzierungen 2 X Mastercode eingeben oder 1 X Masterkarte an den langer PIEP Ton + rechte gelbe LED leuchtet Leser halten (Ursprungsmastercode: 1234) * 901 eingeben kurzer PIEP Ton + rechte gelbe LED leuchtet Erste Position eingeben langer PIEP Ton + rechte gelbe LED leuchtet...
- Page 23 Rückkehr zur Ursprungeinstellung Das Zurücksetzen in den Installationsmodus löscht alle Codes und Benutzerkarten sowie der ein- gegebene Mastercode und hat die Wiederherstellung des Ursprungsmastercode zufolge (1234) 2 X Mastercode eingeben oder 1 X Masterkarte an den langer PIEP Ton + rechte gelbe LED leuchtet Leser halten (Ursprungsmastercode: 1234) * 899 eingeben...
- Page 24 Sabotagealarm Diese Funktion aktiviert den Summer im Falle eines Vandalismusversuchs (Abreißen des Geräts) AKTIVIEREN 2 X Mastercode eingeben oder 1 X Masterkarte an den langer PIEP Ton + rechte gelbe LED leuchtet Leser halten (Ursprungsmastercode: 1234) * 6 eingeben rechte gelbe LED blinkt 02 eingeben langer PIEP Ton + rechte gelbe LED leuchtet...
Need help?
Do you have a question about the KRB1000 and is the answer not in the manual?
Questions and answers