Table of Contents
Advertisement
Quick Links
Advertisement
Table of Contents

Summary of Contents for SensorLink Amcorder 920
- Page 1 Operators Manual Recording Ammeter Amcorder SensorLink ...
- Page 2 Unit and Accessory Part Numbers Amcorder Model 920 *Qty (1) sold in 6-920-1 Kit *Qty (3) sold in 6-920-3 Kit Universal Switch Stick Adapter Model 7-053 *Qty (1) sold in 6-920-1 Kit *Qty (1) sold in 6-920-3 Kit Universal Switch Stick Receiver Model 7-054 *Qty (1) sold in 6-920-1 Kit *Qty (3) sold in 6-920-3 Kit...
-
Page 3: Table Of Contents
Operators Manual Amcorder Recording Ammeter Available Stock Codes: 920-50HZ 920-60HZ 920-EURO 920 FRG Table of Contents Page Specifi cations Safety Information Theory of Operation Preventative Maintenance Cleaning Low Temperature Applications Powering the Unit Sample and Log Intervals Battery Replacement and Operation Installing on a Line Installing on a line with a Shotgun Hot Stick Installing on a line with a Universal Switch Stick Hot Stick... -
Page 4: Specifications
Indoor/Outdoor Use Relative Humidity 90% Non - Condensing Altitude 9800 ft, 3000 meters Software Requirements Softlink by SensorLink, included in sales kit Operating System Windows 7, 8, or 10 Data Collection Space 64,000 Data points EEC Standards Successfully passed international test standards indicated by CE... -
Page 5: Safety Information
The Amcorder uses the same current sensor technology as the original ® ® SensorLink Ampstik , which does not use magnetic materials and has no moving parts. Measurements are taken at user defi ned intervals. In Softlink software the user selects how often to sample and log the data. -
Page 6: Preventative Maintenance
Preventative Maintenance The Recorder should be visually inspected for cracks in urethane. Do not use if cracks are present or the unit is damaged. Verify the air vent on the faceplate has not been covered. The membrane on the inside of the faceplate is designed to allow the unit to breath properly. -
Page 7: Battery Replacement And Operation
Battery Replacement and Operation Changing the Battery: The Amcorder requires one 9V battery. Remove the screw at the base of the unit and remove the cover plate. Snap the battery to the connector and insert into the battery slot. Replace the cover plate. The Recorder should have a fresh 9-volt battery replaced each time it is setup and deployed. - Page 8 Installation: Shotgun Style Attaching the Amcorder to a line with a shotgun style hot stick: Step 1: Attach the Shotgun adapter to the Amcorder Step 2: Grasp the Amcorder with the hot stick Step 3: Place the Amcorder on the conductor Step 4: Pull down on the unit to ensure that the urethane springs are securely holding the Amcorder on the conductor Step 5: Release the hot stick...
-
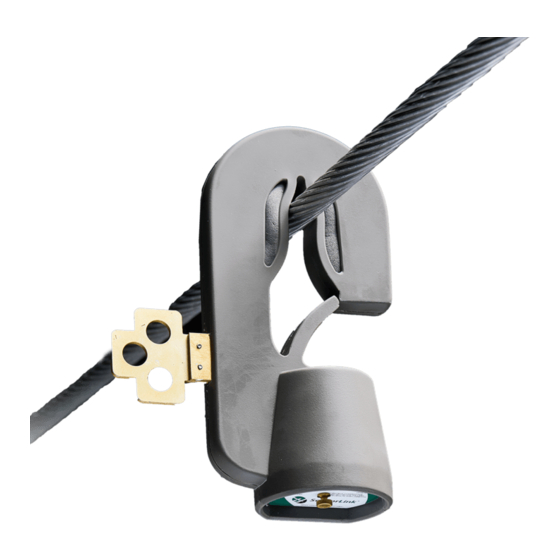
Page 9: Installing On A Line With A Universal Switch Stick Hot Stick
Installation: Universal Switch Stick Attaching the Amcorder to a line with a switch stick style hot stick: Step 1: Attach the Switch Stick receiver to the Amcorder Step 2: Attach the Switch Stick adapter to the switch stick Step 3: Insert the adapter into the receiver and then twist until the adapter locks into the receiver Step 4: Place the Amcorder on the conductor Step 5: Pull down on the unit to ensure that the urethane springs are securely holding... -
Page 10: Installation Of Software And Usb Irda
Softlink Installation Step 1: Softlink Installer is available at www.sensorlink.com/products/amcorder. Save the fi le to the desired location. The Softlink .exe fi le will automatically begin the download when clicked. -
Page 11: Communicating With Recorder
Communicating with Recorder Softlink communicates with one Recorder at a time. To make sure only one Recorder is communicating, stand any other Recorders on their base. To communicate with a Recorder, follow these steps: Step 1: Insert the USB IrDA cable into the PC's user port Step 2: Position the Recorder so the IrDA Port, located at the bottom of the unit, is facing the IrDA Step 3: Open Softlink from either the Desktop or Start Menu. -
Page 12: Confi Gure Recorder
Confi gure Select the Confi gure button to setup Recorder preferences. Name: Identify the Recorder with up to 16 characters. Description: Enter a description of up to 46 characters. For example, you may want to note the Recorder's service location and the date range for the recordings. Log Interval: Select how often to log data. -
Page 13: Entering Nominal Voltage
Download Recorder Data Click the Download button to begin downloading data from the Recorder. The user is able to view the Recorder's confi guration and progress as it is downloading in the graph view. The download can be stopped at any time by selecting the red X button. Repeat these steps to download the data from any additional units. -
Page 14: Saving Recorder Data
Saving Recorder Data Data fi les may be saved as a .csv or .xlsx fi le for future review in Softlink or another data management program. The data from each recorder is saved into its own fi le. Step 1: Select the data fi le by selecting the Recorder on the menu Step 2: Select "save"... -
Page 15: Opening Recorder Data
Opening Recorder Data fi les in Softlink Previously saved fi les from a Recorder may be opened in Softlink. Follow these steps for opening saved fi les: Step 1: Open Softlink Step 2: Close the "Discovering ports and instruments" bar Step 2: Select "Open File"... -
Page 16: Recorder Options
Recorder Options The options button on the Download Screen allows the user to change certain preferences. Radio instruments remembered: Softlink remembers Radio Transcorders that were used in previous downloads. Select "Reset to Default" for Softlink to forget the radios. See the Radio Transcorder User's Manual for further details. Chart line thickness: The thickness of the graph lines can be changed by the user. -
Page 17: Graphing Recorder Data
Graphing To graph the downloaded data, click the Graph Icon on the download screen. Graph A second screen will open and display the data in graphical format. Report Options Select the units and measurement parameters to graph by clicking in the selection boxes. -
Page 18: Troubleshooting
Troubleshooting The Recorder is not communicating 1) Position the IrDA no more than three feet away from the Recorder. 2) Examine the IrDA connection to the PC and reconnect if necessary. 3) Verify the battery has greater than 5 Volts with a Voltmeter. Replace if low. 4) IrDA USB cables are not universal;... -
Page 19: Warranty
Repaired, worked on, or altered, including removal of the front panel, by persons un au tho rized by SensorLink Corporation in such a manner as to injure, in SensorLink Cor po ra tion’s sole judg ment, the per for mance, sta bil i ty, or reliability of the in stru ment;... - Page 20 Manual Stock Code No: M050-060-001 Information contained in this document is subject to change without notice. Product specifi cation may change. Contact your SensorLink representative for the most current product information. © 2019 by SensorLink. All rights reserved. SensorLink...
Need help?
Do you have a question about the Amcorder 920 and is the answer not in the manual?
Questions and answers