
Related Manuals for FRC TH4

Summary of Contents for FRC TH4
- Page 1 Document Number: XE-SNB2-TH4PM-R0A 4-Channel Hybrid DVR Installation Guide © Safe Fleet | May 2019 | All rights reserved...
-
Page 3: Table Of Contents
G Sensor Options......40 TH4 Operation.......11 Speed Settings.. -
Page 4: System Components
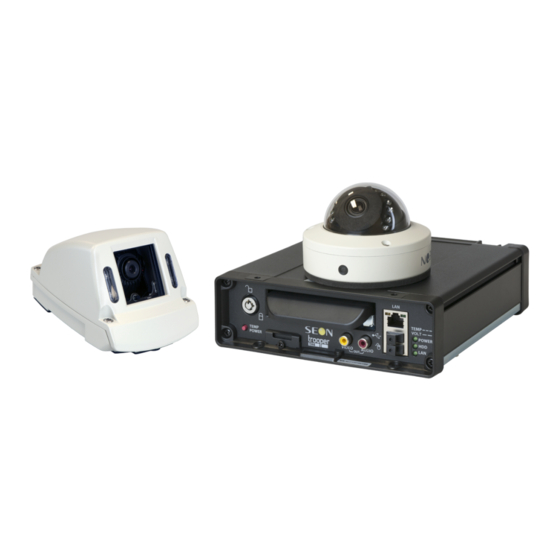
The typical installation components are listed below. The actual contents of your installation package may vary, depending on the options selected. • TH4 video recorder with hard drive, locking front cover, cable cover, fasteners, and mounting plate. • Analog High Definition cameras (HD1W or HD1Q) and Analog Standard Definition cameras (CA10, CJ, CQ or RVC) •... -
Page 5: System Diagram
TH4 Installation and Setup Guide System Diagram System Diagram Click here to see an Interactive System Diagram with more information. © Safe Fleet | May 2019 | All rights reserved p. 5 Document Number: XE-SNB2-TH4PM-R0A... -
Page 6: Th4 Series Installation
Installation Best Practices This section provides best practices for installing Seon TH4 DVRs. Before you begin, keep in mind that it is your responsibility to avoid damaging safety or electrical systems. If you are not confident in your ability to perform the procedures in this guide, please contact FRC Technical Service at 1.800.645.0074 or visit the... -
Page 7: Installing The Dvr
TH4 Installation and Setup Guide TH4 Series Installation Installing the DVR The DVR typically ships with the locking front cover, mounting plate, and cable cover off, but in the shipping box. The hard disk drive is in a separate box in the system shipping kit. -
Page 8: Installing The Adaptor Harness (Optional)
(optional). Installing the Expansion Harness (Optional) The Expansion Harness (Part # 060-1059) can connect the TH4 DVR to Student Tracking and Rear Vision systems, and provide a digital output to trigger other devices when an Alarm is detected. To install the Expansion Harness, connect the 2x4 Microfit connector to the EXPANSION socket on the DVR. -
Page 9: Firmware Updates
NOTE: Firmware Updates Only install firmware updates as directed by FRC Service. The current firmware version appears in the top-right corner of every Configuration menu. For instructions on opening the Configuration menus, see TH Administration: Accessing the On-Screen Display. -
Page 10: Hardware Installation Checklist
TH4 Installation and Setup Guide TH4 Series Installation Hardware Installation Checklist HARNESSES (CAMERA, RECORDER, AND ACCESSORIES) Ensure cables and harnesses are properly secured. Check that sharp metal edges are not touching cables or harnesses. Ensure connections are solid (no shorts). -
Page 11: Th4 Operation
TH4 Installation and Setup Guide TH4 Operation TH4 Operation DVR Front Panel Features 1. DVR Drive lock requires the DVR drive key to 6. USB Port (shown with slot dust cover) supports unlock and remove the DVR drive. USB devices used to: 2. -
Page 12: Dvr Back Panel Features
TH4 Installation and Setup Guide TH4 Operation DVR Back Panel Features 1. CTRL - control connector for Seon equipment other devices 2. GPS - input connector for GPS receiver 8. SIGNALS - connector for signal harness, with an optional adapter for the alarm button/diagnostic 3. -
Page 13: Video System Status
TH4 Installation and Setup Guide TH4 Operation Video System Status How do I know the DVR is working properly? Vehicle Operators should check that the DVR status light TIP: Status Light turns solid green approximately two minutes after vehicle ignition is on. Any deviations (flashing green, yellow, or red) Ensure status light is solid green. -
Page 14: Video Flagging
TH4 Installation and Setup Guide TH4 Operation Video Flagging Flagging and Event Under normal conditions, the DVR is continuously recording when the vehicle ignition is on. If something happens that should be flagged for review, press the Event Button (A) to ensure the event is easy-to-find later. -
Page 15: Health Check
TH4 Installation and Setup Guide TH4 Operation Health Check The Health Check tab provides information on hard drive temperature, hard drive operational hours, Ethernet connections, and general DVR health. Before you begin a Health Check, power up the DVR with a monitor and USB mouse connected, then right-click in Live view and select Configuration. -
Page 16: Th4 Administration
TH4 Installation and Setup Guide TH4 Administration TH4 Administration Accessing the On-screen Display Video Configuration, Playback, and Archiving There are two ways for Installers and System Technicians to access DVR configuration, playback and archiving features: • Locally, via the On-screen Display (OSD) and portable video monitor, as described in this tutorial. - Page 17 Live View During live viewing and recording, in addition to active camera feeds, the information displayed on the OSD includes the items shown in the image and table For how to configure camera titles, see TH4 Configuration: Camera Settings. FEATURE DESCRIPTION [MAIN_TITLE] Main title of the DVR;...
- Page 18 TH4 Installation and Setup Guide TH4 Administration SPEED DISPLAY Vehicle speed in MPH or Km/h. VOLTAGE System voltage from 8 to 32 VDC. TEMPERATURE DVR temperature in degrees Fahrenheit or Celsius. TIME AND DATE Current/recorded time and date. GPS COORDINATES If GPS is connected, the actual coordinates (latitude, longitude, and heading) appear.
-
Page 19: Working With Video
TH4 Installation and Setup Guide TH4 Administration Working with Video Playing Back and Copying Video To search, play back, and archive video from the OSD (On-Screen Display) menus: 1. Connect a portable monitor and USB mouse, and power up the DVR. - Page 20 Cycles through Audio for channel 1, 2, 3, 4, 5, or 6. Metadata Text Overlay Turns on text overlay: temperature, system voltage, GPS data (if recorded), speed, date, and time. For more information, see Metadata Details in TH4-CONF2: Title/Display Menu Show/Hide Playback Tool Bar Shows/hides the playback tool bar. Exit...
- Page 21 2. Use the Start/End Date and Time fields to set the desired period to search. For instructions on how to enter numbers into the Date and Time fields, see TH4 Operation: Using On-screen Keyboards. 3. If desired, use the Search Only pull-down and submenus to specify Alarms, Signals, or System Events to search.
-
Page 22: Th4 Basic Configuration
TH4 Installation and Setup Guide TH4 Basic Configuration TH4 Basic Configuration Setting up the DVR DVR Menu Access You can configure the DVR with its local on-screen menus using a monitor and mouse, or through a Web browser on a connected laptop. These settings can also be accessed remotely over a wireless network. - Page 23 TH4 Installation and Setup Guide TH4 Basic Configuration Time/Display --> Monitor If a Rear Vision Camera is installed, select monitor output settings. Settings Record Set the Record Delay Off to 15-20 minutes for post trip check. If Wi-Fi is used, set the Power Delay Off to 2 hours for archive download.
-
Page 24: Time/Date Menu
TH4 Installation and Setup Guide TH4 Basic Configuration Time/Date Tab Ensure that the Time/Date settings are correct for the customer location/time zone - the DVR date and time are used as an index for searching, archiving, and downloading video, and appear during playback. -
Page 25: Title/Display Menu
TH4 Installation and Setup Guide TH4 Basic Configuration Title/Display Tab All options are set to display by default. You can turn OFF items that are not of interest so the related text will not appear. To update Date/Time settings:: 1. Select Title/Display to open the tab. - Page 26 TH4 Installation and Setup Guide TH4 Basic Configuration Metadata Detail REFERENCE DATA ITEM DESCRIPTION HD Size Hard drive size (GB) HD Used Percentage of drive space used. If the Record o Repeat Record setting is ON, displays "Repeating". For more information, see TH...
- Page 27 TH4 Installation and Setup Guide TH4 Basic Configuration © Safe Fleet | May 2019 | All rights reserved p. 27 Document Number: XE-SNB2-TH4PM-R0A...
-
Page 28: Camera Settings
TH4 Installation and Setup Guide TH4 Basic Configuration Setting the Cameras When a DVR is installed with less than the full number of cameras connected, disable the unused camera input settings to prevent the DVR from generating Video Loss (VLoss) events for those camera inputs. In the DVR Configuration menus, disable settings for unused camera inputs as follows: •... -
Page 29: Signals Setup
TH4 Installation and Setup Guide TH4 Basic Configuration Quality Leave channel resolution at the default setting unless you have SD source: special requirements. [720x480], 720x240, This sets the recording resolution (in pixels). Higher resolution 360x240 reduces the amount of video (recording time) that can be stored. - Page 30 TH4 Installation and Setup Guide TH4 Basic Configuration To Configure Signals: 1. Select Alarm/Signal Signals to open the tab. 2. Configure signals as required. Each signal displays its status (label) when active, and can also trigger an Alarm. For details, see Menu Options, below.
-
Page 31: Alarm Setup
TH4 Installation and Setup Guide TH4 Basic Configuration Alarm Setup Triggered alarms create searchable flags in the recorded video, making it easy to locate alarm events and associated metadata later (for details, see the vMax View User Guide). You can also tell the system to switch to higher recording quality settings when an alarm is triggered - for example, to help identify people or license plates when reviewing video of the event. - Page 32 TH4 Installation and Setup Guide TH4 Basic Configuration ITEM DESCRIPTION VALUE [DEFAULT] Alarm Click to display settings for the selected Alarm. [Alarm1], Alarm2, Alarm3, By default, Alarm1 is connected to the DVR Event/Diagnostic Alarm4 button. Alarms 2-4 can come from Signals, GPS geo-fencing, G-sensor, or Excessive Speed.
-
Page 33: Copying Dvr Configuration
USB mouse, and a USB storage device formatted by a Windows computer using the FAT. To create a configuration file: 1. Insert the USB storage device in the USB port on the DVR's front panel. For more information, see TH4 Operation: Front and Rear Panel Features. - Page 34 TH4 Installation and Setup Guide TH4 Basic Configuration Applying DVR Settings For new DVR installations, apply predefined settings from a configuration file on a USB memory stick. Once a DVR is set up, you can also upload a new configuration file by connecting to the DVR over a network, or via the Commander application if the DVR is equipped with wireless capabilities.
-
Page 35: Th4 Advanced Configuration
TH4 Installation and Setup Guide TH4 Advanced Configuration TH4 Advanced Configuration Configuring Recording Settings To Configure Recording Settings: 1. Select Record to open the tab. 2. Set the record and power delay timers. For details, see Menu Options, below. 3. Click Back to save settings, or click Camera to configure resolution, recording speed/quality, and other camera options. -
Page 36: Network Settings
TH4 Installation and Setup Guide TH4 Advanced Configuration Power-Off If the system is not using Wi-Fi, use the default setting. If Wi- [15 sec.], 0 sec., 30 sec., Delay Time Fi is used, set to 2 hours or more. For more information, see the 1 min., 5 min., 10 min., 20... - Page 37 TH4 Installation and Setup Guide TH4 Advanced Configuration To configure Network Settings: 1. Select Network to open the tab. 2. Configure settings as required. For details, see Menu Options, below. 3. Click Back to save settings, or click Camera to configure resolution, recording speed/quality, and other camera options.
-
Page 38: Advanced Network Settings
TH4 Installation and Setup Guide TH4 Advanced Configuration Advanced Network Settings Configuring Advanced Settings Use the Advanced Settings (vMax Live Plus) tab to set up the DVR to connect with vMax Live Plus via a cellular modem. For more information, see the resources available on the vMax Live Plus product page. -
Page 39: Vms Servers
TH4 Installation and Setup Guide TH4 Advanced Configuration iVML Subnet Set the subnet mask for the iVML IP Address as determined by a [24] Mask qualified network expert. Use a value between 0 and 32. Default Enter the Default Gateway IP address for communicating with the [172.30.2.1]... -
Page 40: G Sensor Options
The unit connects to the G-SENSOR port on the DVR rear panel. For more information see the TH4 Quick Install Guide ii. Click Calibrate. The X, Y, and Z axis planes are set, based on the mounting surface. - Page 41 TH4 Advanced Configuration TIP: G Sensor settings recomendation FRC recommends the default G-Sensor settings for large apparatus movement detection. Smaller vehicles may require lower thresholds - some experimentation may be necessary to define the optimal configuration for each vehicle type. If thresholds are set too low, they may generate many alarms.
-
Page 42: Speed Settings
TH4 Installation and Setup Guide TH4 Advanced Configuration Speed Settings Configuring Speed Settings To configure Speed Settings: 1. Select Alarm/Signal Speed to open the tab. 2. Configure speed settings as desired. For details, see Menu Options, below. 3. Click Back to save settings, then click Back again to return to the Configuration menu. -
Page 43: Gps Settings
TH4 Installation and Setup Guide TH4 Advanced Configuration GPS Fencing Configuring GPS Settings To configure GPS Settings: 1. Select Alarm/Signal GPS to open the tab. 2. Configure speed settings as desired. For details, see Menu Options, below. 3. Click Back to save settings, then click Back again to return to the Configuration menu. -
Page 44: User Levels
TH4 Installation and Setup Guide TH4 Advanced Configuration Circle Center Enter latitude and longitude of the fencing center point. [000.00.00] Radius Define the size of the fencing area diameter, in miles or kilometers. [1 Mile] Top Left Enter the latitude and longitude of the top left point of the fencing area. -
Page 45: System Settings
TH4 Installation and Setup Guide TH4 Advanced Configuration Menu Options ITEM DESCRIPTION VALUE [DEFAULT] Name User names for remote access to the DVR. [Administrator] for Names are case-sensitive, maximum 8 characters. User 1 [Blank] for other Users Password Set a password for each user - maximum 8 characters. -
Page 46: Monitor Settings
TH4 Installation and Setup Guide TH4 Advanced Configuration Menu Options ITEM DESCRIPTION VALUE [DEFAULT] Password When set to ON, local access to the DVR On-screen Display (including all [OFF], ON Enable DVR control, configuration, and playback features) requires the System Settings password. - Page 47 TH4 Installation and Setup Guide TH4 Advanced Configuration Menu Options ITEM DESCRIPTION VALUE [DEFAULT] Front Default Select the default monitor display setting: all cameras (# UP) or a [# UP], Channel Display single camera (choose the Channel it is connected to).
-
Page 48: Appendix
ANY RETURNED PRODUCT WITHOUT AN RMA NUMBER MAY BE REFUSED. Product Information For product information and documentation related to the TH4 Hybrid 4-Camera system, please visit the inView Guardian product page on the FRC Website. Or, for additional information, you may wish to visit Safe Fleet Community website. Please contact FRC Service for the username and password to this online help community website.
Need help?
Do you have a question about the TH4 and is the answer not in the manual?
Questions and answers