Advertisement

LG Electronics Monterrey, México S.A. de C.V.
PART NUMBER: MFL67851407
DESCRIPTION: OWNER'S MANUAL
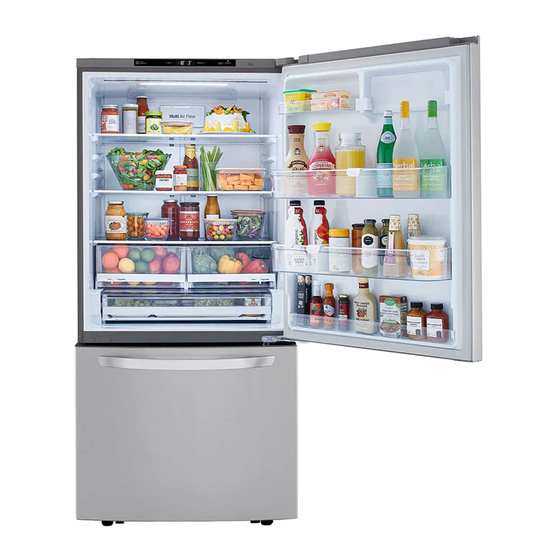
Product: Bottom Freezer Refrigerator
Brand: LG
1. Trim Size (mm): 182 +2 (W), 257 +2 (H)
2. Printing Color: Black
3. Paper Type:
- Cover: Bond 68 gr
- Content : Bond 68 gr
1. This part should comply with the criteria of Level A-I, A-II restricted hazardous substances which refers
to LGE standard LG(10)-A-9023 and the hazardous substance management manual for the suppliers.
2. Blank sheets should be distributed as follows: 1st Blank sheet after cover.
DESCRIPCIÓN: MANUAL DE USUARIO
Producto: Refrigerador con Congelador Inferior
Marca: LG
1. Dimensiones (mm): 182 +2 (A), 257 +2 (L)
2. Color de Impresión: Negro
3. Tipo de Papel:
- Portada: Papel Bond 68 gr
- Contenido: Papel Bond 68 gr
1. La parte debe de cumplir con el criterio de las sustancias peligrosas restringidas del nivel AI, A-II del
estándar LG(10)-A-9023, y al manual de gestión de manejo de sustancias peligrosas para proveedores.
2. Las páginas en blanco deben distribuirse de la siguiente manera: 1ra página en blanco después de la
portada.
Part No.
MODEL DESCRIPTION:
Project: Quantum B26
CUSTOMER: LGEYK
PRINTING SPECIFICATION:
4. Printing Method: Off Set
5. Bindery Type: Saddle Stitch
6. Language: English and Hebrew
7. Number of Pages: 84
8. Number of Sheets: 21
NOTES:
Número de Parte:
DESCRIPCIÓN DEL MODELO:
Proyecto: Quantum B26
Cliente: LGEYK
ESPECIFICACIONES DE IMPRESIÓN:
4. Método de Impresión: Off Set
5. Modo de Unión: Engrapado
6. Idioma: Inglés y Hebreo
7. Número de Páginas: 84
8. Número de Pliegos: 21
NOTAS:
DIVISION: REF
DATE:
JAN 20, 2020
MFL67851407
MFL67851407

Advertisement

Table of Contents
loading

Summary of Contents for LG GM-859RSC

  • Page 1 1. La parte debe de cumplir con el criterio de las sustancias peligrosas restringidas del nivel AI, A-II del estándar LG(10)-A-9023, y al manual de gestión de manejo de sustancias peligrosas para proveedores. 2. Las páginas en blanco deben distribuirse de la siguiente manera: 1ra página en blanco después de la...
  • Page 2 OWNER’S MANUAL BOTTOM FREEZER REFRIGERATOR Read this owner’s manual thoroughly before operating the appliance and keep it handy for reference at all times. ENGLISH GM-859RSC GM-859RWC MFL67851407 www.lg.com Rev.00_01082020 Copyright © 2020 LG Electronics Inc. All Rights Reserved.
  • Page 4: Table Of Contents

    TABLE OF CONTENTS SAFETY INSTRUCTIONS SAFETY INSTRUCTIONS WARNING CAUTION PRODUCT OVERVIEW Product Features 11 INSTALLATION Before Installing Choosing the Proper Location Removing/Assembling the Handles Removing/Assembling the Doors and Drawers Reversing Door Opening Direction Connecting the Water Line Leveling Turning on the Power 25 OPERATION Before Use Control Panel...
  • Page 5: Safety Instructions

    4 SAFETY INSTRUCTIONS SAFETY INSTRUCTIONS READ ALL INSTRUCTIONS BEFORE USE Safety Messages Your safety and the safety of others are very important. We have provided many important safety messages in this manual and on your appliance. Always read and follow all safety messages. This is the safety alert symbol.
  • Page 6 5 SAFETY INSTRUCTIONS • Children should be supervised to ensure that they do not play with the refrigerator. • If the supply cord is damaged, it must be replaced by the manufacturer or its service agent or a similarly qualified person in order to avoid a hazard. •...
  • Page 7 6 SAFETY INSTRUCTIONS • Do not touch frozen food or the metal parts in the freezer compartment with wet or damp hands. Doing so may cause frostbite. • Do not refreeze frozen food that has thawed completely. Doing so may result in a serious health hazard. •...
  • Page 8 7 SAFETY INSTRUCTIONS Grounding Instructions • Improper connection of the equipment-grounding conductor can result in a risk of electric shock. Check with a qualified electrician or service personnel if you are in doubt whether the appliance is properly grounded. Do not modify the plug provided with the appliance; if it will not fit the outlet, have a proper outlet installed by a qualified electrician.
  • Page 9: Product Overview

    PRODUCT OVERVIEW PRODUCT OVERVIEW Product Features The images in this guide may be different from the actual components and accessories, which are subject to change by the manufacturer without prior notice for product improvement purposes. Exterior Refrigerator Fresh food compartment Handle Opens and closes the refrigerator door.
  • Page 10 PRODUCT OVERVIEW Interior LED Interior Lighting Lights up the inside of the refrigerator. Humidity Controlled Crisper Helps vegetables and fruit to stay crisp and controls humidity. Auto-Closing Hinge The refrigerator doors and freezer drawers close automatically when pushed slightly. (The door only closes automatically when it is open at an angle of less than 30°).
  • Page 11 Durabase and Durabase Divider Provides storage for large food items. Electrical requirements: 230 V, 50 Hz Min. / Max. water pressure: 20 - 120 psi (138 - 827 kPa) Model GM-859RSC / GM-859RWC Description Standard-depth, French door refrigerator, bottom freezer Net weight...
  • Page 12: Installation

    11 INSTALLATION INSTALLATION Before Installing Installation Overview Please read the following installation instructions first after purchasing this product or transporting it to another location. Unpacking the Refrigerator Choosing the Proper Location Disassembling/Assembling Connecting the Water Line Leveling and Door Alignment WARNING •...
  • Page 13: Choosing The Proper Location

    12 INSTALLATION Choosing the Proper Unpacking the Refrigerator Location WARNING • Use two or more people to move and install the Water refrigerator. Failure to do so can result in back Water supply must be easily connected for the injury or other injury. automatic icemaker.
  • Page 14 13 INSTALLATION Dimensions and Clearances • Check the dimensions of the appliance and the installation path to ensure there is sufficient room to move the refrigerator through doors or narrow openings. • If an opening is too narrow to fit the refrigerator through, remove the refrigerator doors. See Removing/ Assembling the Doors and Drawers in this manual.
  • Page 15: Removing/Assembling The Handles

    14 INSTALLATION Removing/Assembling the fasteners and tightening the set screws with a 3/32 in. Allen wrench. Handles When moving the refrigerator through a narrow opening, removing the doors is preferred. The appearance of the handles may vary from what is shown. WARNING Removing the Refrigerator Handles •...
  • Page 16: Removing/Assembling The Doors And Drawers

    15 INSTALLATION CAUTION Removing/Assembling the Doors and Drawers • When lifting the hinge, be careful that the door does not fall forward. If the entrance door is too narrow for the refrigerator to pass through, remove the refrigerator doors and move the refrigerator sideways through the doorway.
  • Page 17 16 INSTALLATION WARNING Pull the drawer open to full extension. • Do not hold the handle when removing or Gently lift and pull out the ice bin. replacing the drawer. The handle may come off, causing personal injury. Lift the front of the drawer up, then pull it straight out.
  • Page 18 17 INSTALLATION Replace the ice bin in the drawer. Insert the CAUTION Durabase basket in the rail assembly. • Do not hold the handle when removing or replacing the drawer. The handle may come off, causing personal injury. Assembling the Refrigerator Door Make sure that the plastic sleeve is inserted in the bottom of the door.
  • Page 19: Reversing Door Opening Direction

    18 INSTALLATION Reversing Door Opening Assemble the mounting fasteners both ends of the handle using a 1/4 in. Direction (6.35 mm) Allen wrench. NOTE Place the handle on the door by fitting • To assist in the installation of the handle on the the handle footprints over the mounting right side, place a piece of masking tape near the fasteners and tightening the set screws...
  • Page 20 19 INSTALLATION Lift the door from the middle hinge pin and Use a ¼ in (6.35 mm) hex socket wrench to remove the door. loosen the hinge pin and remove. Remove the two bolts , the screw and the hinge . CAUTION •...
  • Page 21: Connecting The Water Line

    20 INSTALLATION Assemble the left hinge cover with the two screws Middle Hinge Bracket Middle Hinge Insert the decorative screw into the outer hole on the right side of the flange. Attach the cover on the right side. Cover is force- fitted.
  • Page 22 21 INSTALLATION CAUTION • Power drill. • ½ in. or adjustable wrench. • To prevent burns and product damage, only • Flat-blade and Phillips-head screwdrivers. connect the refrigerator water line to a cold • Two ¼ in. outer diameter compression nuts water supply.
  • Page 23 22 INSTALLATION Water Line Installation Instructions Fasten the shutoff valve. Install the shutoff valve on the nearest frequently • Fasten the shutoff valve to the cold water used drinking water line. pipe with the pipe clamp. WARNING NOTE • When using any electrical device (such as a •...
  • Page 24 23 INSTALLATION Route the tubing. Connect the tubing to the refrigerator. • Route the tubing between the cold water NOTE line and the refrigerator. Route the tubing • Before making the connection to the through a hole drilled in the wall or floor refrigerator, be sure that the refrigerator power (behind the refrigerator or adjacent base cord is not plugged into the wall outlet.
  • Page 25: Leveling

    24 INSTALLATION Leveling Position the Refrigerator • Arrange the coil of tubing so that it does not The refrigerator has two front leveling legs. Adjust vibrate against the back of the refrigerator or the legs to alter the tilt from front-to-back or side- to side.
  • Page 26: Operation

    OPERATION OPERATION Before Use Checklist Clean the refrigerator. Clean the refrigerator thoroughly and wipe off all dust that accumulated during shipping. CAUTION • Do not scratch the refrigerator with a sharp object or use a detergent that contains alcohol, a flammable liquid or an abrasive when removing any tape or adhesive from the refrigerator.
  • Page 27: Control Panel

    OPERATION Control Panel Depending on the model, some of the following functions may not be available. Control Panel Features Hold 3 seconds Freezer Indicates the set temperature of the freezer compartment in Celsius (°C) or Fahrenheit (°F). The de- fault freezer temperature is 0°F (-18 °C). Press the Freezer button repeatedly to select a new set temperature from 5 °F to -7 °F (-23 °C to -15 °C).
  • Page 28: Sabbath Mode

    OPERATION Shabbath Mode temperature around the appliance, frequency of the door being opened, amount of food stored Using the Shabbath Mode in the appliance, etc.). • The amount and shape of ice may vary according Shabbath mode is used on the Jewish Shabbath to the environment (ambient temperature and holidays.
  • Page 29: Storing Food

    OPERATION water supply system to prevent serious property Food How to Store damage due to flooding caused by ruptured water Fish Freeze fresh fish and shellfish if they lines or connections are not being eaten the same day purchased. Eating fresh fish and Storing Food shellfish the same day purchased is recommended.
  • Page 30: Humidity Controlled Crispers

    OPERATION • Vegetables keeps moist air in the crisper for Follow package or container instructions for proper freezing methods. best storage of fresh, leafy vegetables. • Fruit lets moist air out of the crisper for best Do not use storage of fruit. •...
  • Page 31: Glide'n'serve

    OPERATION Glide‘N’Serve Detaching/Assembling the Full Width Shelf Using the Glide‘N’Serve CAUTION This drawer can be used for large party trays, deli • Do not clean glass shelves with warm water items and beverages. This drawer should not be while they are cold. Shelves may break if used to store vegetables that require high exposed to sudden temperature changes or humidity.
  • Page 32: Durabase

    OPERATION To replace the bin, slide it in above the desired support and push down until it snaps into place. Durabase Using the Durabase CAUTION • If the Durabase divider is removed, there is enough open space for children or pets to crawl inside.
  • Page 33: Smart Functions

    Follow the instructions below to use the audible Communicate with the appliance from a diagnosis method. smartphone using the convenient smart features. • Launch the LG ThinQ application and select the Smart Diagnosis Smart Diagnosis feature in the menu. Follow the • This function provides useful information...
  • Page 34: Maintenance

    MAINTENANCE MAINTENANCE Cleaning Inside Walls • Allow freezer to warm up so the cloth will not WARNING stick. • Use non-flammable cleaner. Failure to do so can To help remove odors, wash the inside of the result in fire, explosion, or death. refrigerator with a mixture of baking soda and warm water.
  • Page 35 MAINTENANCE Guidelines for Application / Water Supply Parameters Service Flow 0.5 gpm (1.9 lpm) Water Supply Community or Private Well - Potable Water Water Pressure 20 – 120 psi (138 – 827 kPa) Water Temperature 33 °F – 100 °F (0.6 °C – 37.8°C) Capacity 200 gallons (757 liters) It is essential that the manufacturer’s recommended installation, maintenance and filter replacement...
  • Page 36: Troubleshooting

    TROUBLESHOOTING TROUBLESHOOTING FAQs Frequently Asked Questions What are the best temperature settings for my refrigerator and freezer? The default setting for the refrigerator is 37° Fahrenheit (3° Celsius). The default setting for the freezer is 0° Fahrenheit (-18° Celsius). Adjust these settings as necessary to keep food at desired temperatures.
  • Page 37: Before Calling For Service

    TROUBLESHOOTING Before Calling for Service Cooling Problem Possible Cause & Solution Refrigerator and The refrigerator control is set to OFF (some models). Freezer section are • Turn the control ON. Refer to the Setting the Controls section for proper temperature not cooling.
  • Page 38 TROUBLESHOOTING Problem Possible Cause & Solution Interior moisture Doors are opened often or for long periods of time. buildup. • When the doors are opened often or for long periods of time, warm, humid air enters the compartment. This raises the temperature and moisture level within the compartment. To lessen the effect, reduce the frequency and duration of door openings.
  • Page 39 TROUBLESHOOTING Problem Possible Cause & Solution Refrigerator or Refrigerator was recently installed. Freezer section is too • It may take up to 24 hours for each compartment to reach the desired temperature. warm. The air vents are blocked. Cold air circulates from the freezer to the fresh food section and back again through air vents in the wall dividing the two sections.
  • Page 40 TROUBLESHOOTING Ice & Water Problem Possible Cause & Solution Icemaker is not Demand exceeds ice storage capacity. making enough ice. • The icemaker will produce approximately 70-184 cubes in a 24 hour period. House water supply is not connected, valve is not turned on fully, or valve is clogged. •...
  • Page 41 TROUBLESHOOTING Problem Possible Cause & Solution Icemaker is not Refrigerator was recently installed or icemaker recently connected. making ice • It may take up to 24 hours for each compartment to reach the desired temperature and for the icemaker to begin making ice. Icemaker is not turned on.
  • Page 42 TROUBLESHOOTING Parts & Features Problem Possible Cause & Solution Doors will not close Food packages are blocking the door open. correctly or pop • Rearrange food containers to clear the door and door shelves. open. Ice bin, crisper cover, pans, shelves, door bins, or baskets are out of position. •...
  • Page 43 TROUBLESHOOTING Problem Possible Cause & Solution Rattling Rattling noises may come from the flow of refrigerant, the water line on the back of the unit, or items stored on top of or around the refrigerator. • Normal Operation Refrigerator is not resting solidly on the floor. •...
  • Page 44 GM-859RSC GM-859RWC www.lg.com 2020 © LG Electronics Inc...
  • Page 45 Glide'N'Serve Durabase...
  • Page 46 R600a R600a " " 10.8...
  • Page 47 " LPG)
  • Page 48 – •...
  • Page 50 Glide'N'Serve...
  • Page 51 Durabaser o Durabase V, 50 Hz 20-120 psi (138-827 GM-859RSC / GM-859RWC "...
  • Page 52 •...
  • Page 53 • kgf/cm2 kgf/cm2) Volts, 50 Hz, AC, 15 Amps • °C °C (110 °F) (55 °F)
  • Page 54 " " " " " 1740 " 1774 " " F 29 4/9 " " 1355 " " 1185 90° " "...
  • Page 55 3/32 3/32 ® 3/32...
  • Page 56 • 3/32 • Durabase ®...
  • Page 57 • Durabase...
  • Page 58 Durabase • ®...
  • Page 59 © " 6.35 " 3/32 © © " 3/32 © © © •...
  • Page 60 ® " 6.35 fl , fl . • fl , ® " 6.35 •...
  • Page 61 Decorative Screw ---------------- -------------------------------- • • •...
  • Page 62 psi (138-827 20-120 • " " " • " • 5/32...
  • Page 63 • 248CMR • • • • • • • • 49599 49595 • • "...
  • Page 64 " • • Ferrule • Ferrule • •...
  • Page 65 • -12 °C (10 °F) • ON (I)
  • Page 67 Hold 3 seconds °F °C ° (-18 °C) 0°F -15 °C ° °F °F °C 43 °F (3 °C) F ° C ° ° °F ° C ° F Express Frz. Fridge . Express Frz. •...
  • Page 68 ON (| --------------- -------------------------------- • 50-110 ' .( ' .(...
  • Page 70 Glide'N'Serve • Glide'N'Serve Glide'N'Serve Glide'N'Serve Glide'N'Serve • Glide'N'Serve Glide'N'Serve...
  • Page 72 Durabase Durabase Durabase • Durabase Durabase...
  • Page 73 Smart LG ThinQ • Diagnosis LG ThinQ LG ThinQ . LG ThinQ " " 3 • LG ThinQ LG SmartThinQ Google Play Store LG ThinQ Apple App Store • LG ThinQ Smart Diagnosis™ ) § Wi-Fi Wi-Fi...
  • Page 74 • • •...
  • Page 75 psi (138-827 20-120 37.8°C 0.6 °C 100 °F 33 °F •...
  • Page 76 3° 37° -18° 0° ) " " Ice Plus...
  • Page 77 " " 21°C °F (43 °C) 110 °F...
  • Page 78 ." " 5°C 13°C •...
  • Page 79 (43 °C) 110 °F...
  • Page 80 70-184...
  • Page 81 ON/OFF •...
  • Page 82 • • • •...
  • Page 83 • • • • • • • • • • •...
  • Page 84 oiuaiAi £P...

This manual is also suitable for:

Gm-859rwc

Table of Contents