Advertisement
Quick Links
Advertisement

Related Manuals for Gainsborough ASCOT 1600

Summary of Contents for Gainsborough ASCOT 1600
- Page 1 ASCOT 1600...
- Page 2 Cover Contents Pre-installation 1. Pre-installation 2. Pre-installation / water pressure. Installation 1. Installation 2. User Guide 1. User Guide 2. 10. User Guide 3. 11. Maintenance / Trouble shooting. 12. Warranty.
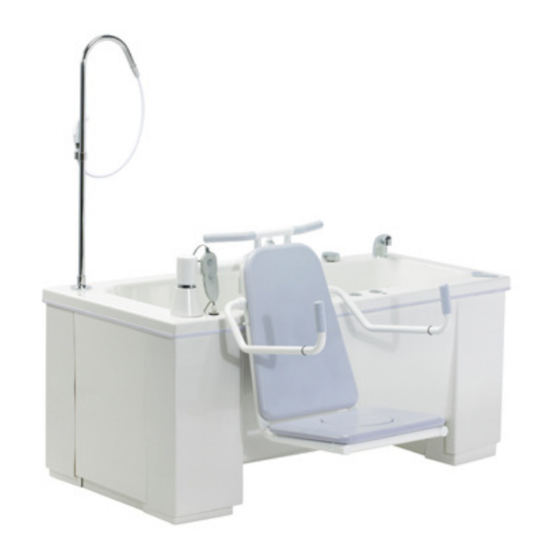
- Page 3 A = 1434mm (56 1/2”) B = 1600mm (63” 800mm (31 1/2”) D = 700mm (27 1/2”) 685mm (27” F= 1020mm (40 1/8”) 150mm (6” H = 515mm (20 1/4”) J = 1085mm (42 3/4”) K= 1985mm (78 1/8”) 290mm (11 3/8”) Floating Floors The definition covers a multitude of floor finishes.
- Page 4 ¾” BSP Male hot water inlet, 30mm from the floor, against the wall, Picture for visual reference only 200mm from the left hand side of the front (tap end) of the bath. ¾” BSP Male cold water inlet, 30mm from the floor, against the wall, 250mm from the left hand side of the front of the bath.
- Page 5 The Ascot bath includes a type 3 Heat guard Thermostatic mixing valve which has been manufactured to NHS model engineering specification D08 and approved under the TMV3 scheme. Please read the following which outlines how a TMV3 may affect the use of your bath. The working parameters of the TMV3 require a water pressure of 1-5 bars with a maximum pressure loss no greater than 10:1 between hot and cold feeds.
- Page 6 Responsibility of the installer. It is the responsibility of the installer to inspect the product prior to installation to ensure the unit is free of defect or damage. In the event of a problem the unit must not be installed. This product complies with internationally recognised safety standards.
- Page 7 Do not use sharp knives or instruments to open this product. Remove the plastic film from all panels. Check with the site owner to confirm the exact installation position. Inspect the unit and panels thoroughly. Ensure all components are present inside the bath pack. (this should include : repair pot, Manual, Waste kit, SWL sticker, lap belt, floor fixing kit and shower unit assembly.
- Page 8 Your Ascot bath is simple to use. However there are some basic guidelines which should be followed to en- sure you get the most out of your unit. The handset control push buttons use air to operate the seat, therefore it is completely safe to use with wet hands.
- Page 9 Exit is a reversal of the previous. Depressing the “out of water” button to lift the seated user up out of the bath. Assistance may be required to lift the user’s legs out of the bath. Then traverse out side the bath. NOTE: when the seat is fully raised they system will briefly pause.
- Page 11 To get the most out of your Ascot bath we recommend that the unit is cleaned and maintained on a daily basis. The chrome seat tube should be cleaned using a silicone based cleaning product (such as Mr Sheen) Spray a small amount on the tube when the seat is fully raised and wipe with a dry soft cloth. This will avoid any build up or soap, water or atmospherics.
- Page 12 This product is warranted as being free from defects during the period of warranty. This does not cover minor blemishes, etc. which may be part of normal manufacturing processes. The warranty covers manufacturing defects in the products, starting from the date of manufacture. Contact your Supplier to find out more about the warranty period.
Need help?
Do you have a question about the ASCOT 1600 and is the answer not in the manual?
Questions and answers