D-Link DWL-900AP+ User Manual
2.4 ghz wireless access point
Hide thumbs
Also See for DWL-900AP+:
- Manual (67 pages) ,
- Quick installation manual (9 pages) ,
- Brochure (8 pages)

Related Manuals for D-Link DWL-900AP+


Summary of Contents for D-Link DWL-900AP+
- Page 1 D-Link AirPlus DWL-900AP+ 2.4 GHz Wireless Access Point Manual RevA&B. 100404 Building Networks for People...
-
Page 2: Table Of Contents
Contents 1. Package Contents ... 3 2. Introduction ... 4 3. Wireless Basics ... 7 4. Getting Started... 10 5. Using the Configuration Menu ... 12 6. Using the AirPlus AP Manager... 24 7. Troubleshooting ... 28 8. Networking Basics ... 33 9. -
Page 3: System Requirements
Contents of Package: • D-Link AirPlus DWL-900AP+ Enhanced 2.4GHz Wireless Access Point • Power Supply – 5V DC, 2.0A • Manual on CD • Quick Installation Guide • Ethernet Cable Note: Using a power supply with a different voltage rating than the one included with the DWL-900AP+ will cause damage and void the warranty for this product. -
Page 4: Introduction
Unlike most 802.11b access points, the DWL-900AP+ is capable of data transfer speeds of up to 22 Mbps (compared to the standard 11 Mbps) when used with other D-Link AirPlus products such as the DWL-520+ Wireless PCI Adapter. After completing the steps outlined in the Quick Installation Guide (included... - Page 5 • Up to 2X Faster with AirPlus Products - high-speed wireless data transfer rates up to 22Mbps.* With twice the data rate and capacity, the DWL-900AP+ delivers media rich content such as digital images, videos, and MP3 files much faster than standard 802.11b networks •...
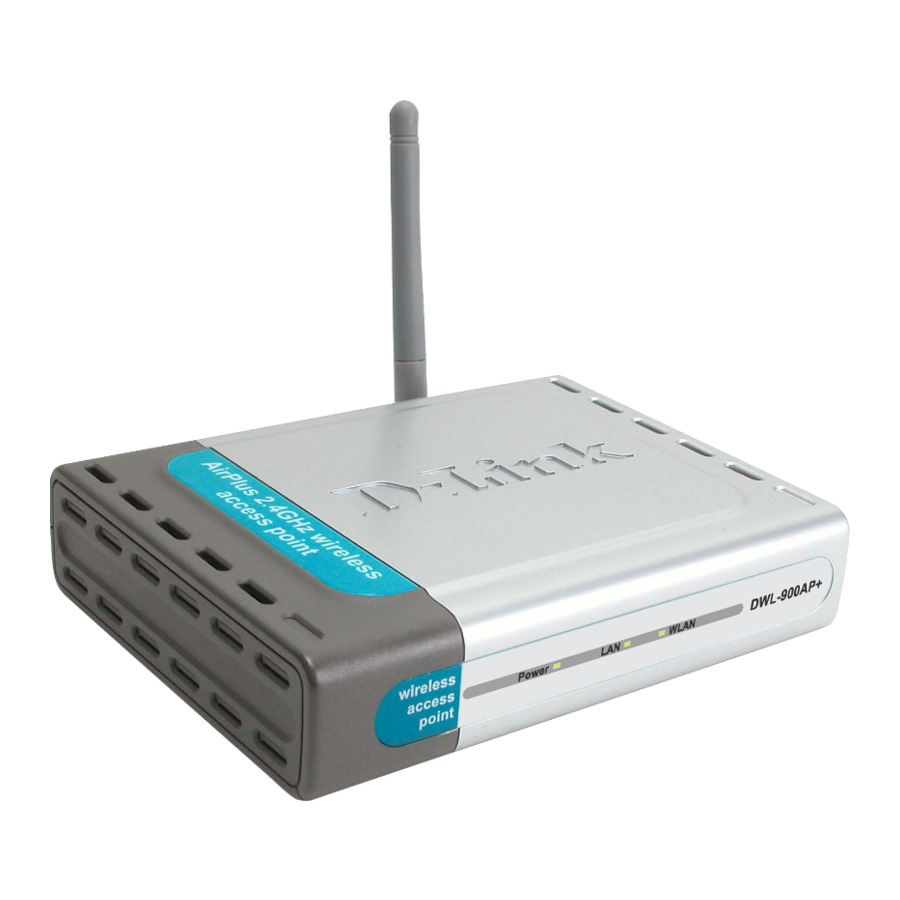
- Page 6 LED stands for Light-Emitting Diode. The DWL-900AP+ Wireless Access Point has 3 LEDs as shown below: Power: solid green light indicates connection LAN: blinking green light indicates activity; solid green light indicates connection WLAN: blinking green light indicates wireless activity; solid green light indicates connection Power WLAN...
-
Page 7: Wireless Basics
Strictly adhering to the IEEE standard, the D-Link AirPlus wireless family of products will allow you to securely access the data you want, when and where you want it. You will be able to enjoy the freedom that wireless networking delivers. - Page 8 This means you will be able to transfer large files quickly or even watch a movie in MPEG format over your network without noticeable delays. The technology works by using multiple frequencies in the 2.4GHz range at speeds up to 22 Mbps. D-Link AirPlus products will automatically...
- Page 9 1. Keep the number of walls and ceilings between the wireless Access Point and your receiving device (e.g., the DWL-650+) to a minimum - Each wall or ceiling can reduce your D-Link AirPlus Wireless product’s range from 3-90 feet (1-30 meters.) Position your Access Points, Residential Gateways, and computers so that the number of walls or ceilings is minimized.
- Page 10 IP Address, one or more of the devices may not be visible on the network. An Infrastructure network contains an Access Point. The Infrastructure Network example shown on the next page contains the following D-Link network devices: A wireless Access Point - D-Link AirPlus DWL-900AP+...
- Page 11 Please remember that D-Link AirPlus wireless devices are pre-configured to connect together, right out of the box, with the default settings. You will need a broadband Internet access (Cable/DSL) subscription.
- Page 12 Access Point. (Skip to Fig. 5.1: entering the IP address) If you are not using a D-Link router in your network, you will need to assign a Static IP Address to the computer that you are using to configure the DWL- 900AP+, within the IP Address Range of the DWL-900AP+.
- Page 13 D-Link devices set to their default settings. If you have changed the IP Address of the DWL-900AP+ to conform to a network other than one with D-Link devices, then input that IP Address in the web browser, instead of the default IP Address shown.) •...
- Page 14 AP Name: You may choose to rename your Access Point, especially if you have more than one Access Point on your network. SSID: (Service Set Identifier) “default” is the default setting. The SSID is a unique name that identifies a network. All devices on a network must share the same SSID name in order to communicate on the network.
- Page 15 The illustration at right shows the recommended default setting (Disabled) for the DHCP Server function of the DWL-900AP+. If you wish to use the DWL-900AP+ as a DHCP server (not recommended if you already have a DHCP enabled router/gateway on your network) then select Enabled.
- Page 16 Address of the remote DWL900AP+ unit that you want to establish a wireless connection. Multi-point Bridge: This mode will allow you to connect multiple wireless LANs together. Other wireless LANs must be using DWL-900AP+s. Advanced > Mode > Site Survey...
- Page 17 Repeater: This mode will allow you to extend the range of your wireless network. The repeater mode will work with another D-Link AirPlus DWL-900AP+, DI-614+, DI-714P+, AirPro DI-764, DI-754 (with inserted DWL-650+), or AirPremier DWL-1000AP+. Note! If you use the DWL-900AP+...
- Page 18 The default Performance settings are shown here. Beacon Interval: Beacons are packets sent by an Access Point to synchronize a wireless network. Specify a Beacon interval value. Default (100) is recommended. RTS Threshold: This value should remain at its default setting of 2,432.
-
Page 19: Using The Configuration Menu
network. All devices on a network must use the same SSID to establish communication. Using the Configuration Menu Advanced > Filters Fig. 5.8 Use MAC Filters to allow or deny wireless connection to the DWL- 900AP+. Select Disable MAC Filters (default) to disable this feature. Select Only allow the MAC address…... - Page 20 Fig. 5.10 Tools > Firmware Upgrade the firmware for the Access Point. Click on the link to find upgrades to the firmware on the D-Link website at http://support.dlink. com. After you have downloaded a firmware upgrade to your local drive, click Browse.
- Page 21 Status > Device Info This page displays the current information for the DWL-900AP+. It will display the Ethernet and Wireless information. Ethernet: MAC Address IP Address Subnet Mask Gateway DHCP Server Wireless: MAC Address SSID Encryption Channel AP mode Fig. 5.12 Status >...
- Page 22 Syslog Server Using third party syslog software, the Syslog Server function will download the DWL-900AP+’s log automatically to an IP address specified server. Status > Stats Displays the network traffic statistics for both received and transmitted communications through the Ethernet port and wireless connections associated with...
- Page 23 Status > Wireless Displays the list of computers that are connected to the DWL-900AP+ wirelessly. Fig. 5.15...
- Page 24 The AirPlus Access Point Manger is a Windows based program to help you manage multiple Access Points in one easy view. Please note that the AP Manger software is optional. • Begin the installation by inserting the DWL-900AP+ CD into your CD- ROM.
-
Page 25: Using The Airplus Ap Manager
Using the AirPlus AP Manager Link Information The Link Information screen displays the current settings of the selected Access Point AP Settings The AP Settings screen will allow you to change the Access Point settings for the selected Access Point. AP Settings >... - Page 26 Using the AirPlus AP Manager IP Settings The IP Settings screen will allow you to change the IP Address settings for the selected Access Point. WEP Settings The WEP Settings Screen will allow you to apply WEP Encryption to the selected Access Point.
- Page 27 Using the AirPlus AP Manager Firmware Upgrade The Firmware Upgrade screen will allow you to apply new version of the firmware to selected Access Point.
-
Page 28: Troubleshooting
This chapter provides solutions to problems that can occur during the installation and operation of the DWL-900AP+ Wireless Access Point. We cover various aspects of the network setup, including the network adapters. Please read the following if you are having problems. Note: It is recommended that you use an Ethernet connection to configure the DWL-900AP+ Access Point. - Page 29 2. The wireless client cannot access the Internet in the Infrastructure mode. • Make sure the wireless client is associated and joined with the correct Access Point. To check this connection: Right-click on the Local Area Connection icon in the taskbar> select View Available Wireless Networks.
- Page 30 3. Check that the drivers for the network adapters are installed properly. You may be using different network adapters than those illustrated here, but this procedure will remain the same, regardless of the type of network adapters you are using. •...
- Page 31 • Look under Device Status to check that the device is working properly. • Click OK D-Link AirPlus DWL-650 Wireless Cardbus Adapter D-Link AirPlus DWL-650+ Wireless Cardbus Adapter D-Link AirPlus DWL-650+ Wireless Cardbus Adapter...
- Page 32 After you have tried other methods for troubleshooting your network, you may choose to Reset the DWL-900AP+ to the factory default settings. Remember that D-Link AirPlus products network together, out of the box, at the factory default settings. To hard-reset the D-Link AirPlus DWL-900AP+ to Factory Default Settings, please do the following: •...
-
Page 33: Networking Basics
Networking Basics Using the Network Setup Wizard in Windows XP In this section you will learn how to establish a network at home or work, using Microsoft Windows XP. Note: Please refer to websites such as http://www.homenethelp.com http://www.microsoft.com/windows2000 for information about networking computers using Windows 2000, ME or 98. - Page 34 Networking Basics Please follow all the instructions in this window: Click Next In the following window, select the best description of your computer. If your computer connects to the Internet through a gateway/router, select the second option as shown. Click Next...
- Page 35 Networking Basics Enter a Computer description and a Computer name (optional.) Click Next Enter a Workgroup name. All computers on your network should have the same Workgroup name. Click Next...
- Page 36 Networking Basics Please wait while the Network Setup Wizard applies the changes. When the changes are complete, click Next. Please wait while the Network Setup Wizard configures the computer. This may take a few minutes.
- Page 37 Networking Basics In the window below, select the option that fits your needs. In this example, Create a Network Setup Disk has been selected. You will run this disk on each of the computers on your network. Click Next. Insert a disk into the Floppy Disk Drive, in this case drive A. Format the disk if you wish, and click Next.
- Page 38 Networking Basics Please wait while the Network Setup Wizard copies the files. Please read the information under Here’s how in the screen below. After you complete the Network Setup Wizard you will use the Network Setup Disk to run the Network Setup Wizard once on each of the computers on your network.
- Page 39 Networking Basics Please read the information on this screen, then click Finish to complete the Network Setup Wizard. The new settings will take effect when you restart the computer. Click Yes to restart the computer. You have completed configuring this computer. Next, you will need to run the Network Setup Disk on all the other computers on your network.
- Page 40 Naming your Computer To name your computer, please follow these directions: In Windows XP: • Click Start (in the lower left corner of the screen) • Right-click on My Computer • Select Properties and click • Select the Computer Name Tab in the System Properties window.
- Page 41 Naming your Computer • In this window, enter the Computer name. • Select Workgroup and enter the name of the Workgroup. • All computers on your network must have the same Workgroup name. • Click OK Checking the IP Address in Windows XP/2000 Go to Start >...
- Page 42 Checking the IP Address in Windows XP/2000 Type Command Click OK Checking the IP Address in Windows XP/2000 Type ipconfig /all at the prompt. Press Enter. All the configuration settings are displayed as shown below. D-Link AirPlus DWL-650+ Wireless Cardbus Adapter...
- Page 43 Checking the IP Address in Windows XP/2000 Type ipconfig /renew at the prompt to get a new IP Address. Press Enter. The new IP Address is shown below. (Windows 98/ME users: go to Start > Run. Type winipcfg at the prompt. The Windows IP Configuration menu will come up.
- Page 44 Assigning a Static IP Address • Double-click on Network Connections • Right-click on Local Area Connections. • Double-click Properties...
- Page 45 Assigning a Static IP Address • Click on Internet Protocol (TCP/IP) • Click Properties • Select Use the following IP address in the Internet Protocol (TCP/IP) Properties window, • Input your IP address and subnet mask. (The IP Addresses on your network must be within the same range.
- Page 46 Assigning a Static IP Address with Go to the Apple Menu and select System Preferences. Click on Network Select Built-in Ethernet in the Show pull-down menu. Select Manually in the Configure pull-down menu. Input the Static IP Address, the Subnet Mask and the Router IP Address in the appropriate fields.
- Page 47 Selecting a Dynamic IP Address with Go to the Apple Menu and select System Preferences. Click on Network Select Built-in Ethernet in the Show pull-down menu. Select Using DHCP in the Configure pull-down menu. Click Apply Now The IP Address, Subnet mask, and the Router’s IP Address will appear in a few seconds.
- Page 48 To be able to connect to a wireless network, make sure the proper network settings are configured for DWL-650+. Go to Start > right-click on My Network D-Link AirPlus DWL-650+ Wireless Cardbus Adapter Places > select Properties > double-click on the Wireless Network Connection associated with the DWL-650+ >...
- Page 49 Connecting to a Wireless Network in Windows 2000 Go to Start > Settings > Network and Dial-up Connections > Double click on D-Link AirPlus DWL-650+ Wireless Cardbus Adapter the Local Area Connection associated with the DWL-650+ > select Properties >...
- Page 50 Networking Basics Connecting to a Wireless Network Connecting to a Wireless Network with a Wireless Router or an Access Point using a DHCP server in Windows 2000. Select Obtain an IP address automatically. Select Obtain DNS server address automatically. Click OK Fig 8.30 Connecting to a Wireless Network with a Wireless Router or an Access Point using a static IP address in Windows 2000.
- Page 51 Go to Start > Settings > Control Panel > Double-click on the Network associated with the DWL-650+ > Click Properties > Select Internet Protocol (TCP/IP) > Click TCP/IP – D-Link AirPlus DWL-650+ Wireless Cardbus Properties Fig. 8.32 Connecting to a Wireless Network with a Wireless Router or an Access Point using a DHCP server in Windows Me and 98.
- Page 52 Networking Basics Connecting to a Wireless Network Connecting to a Wireless Network with a Wireless Router or Access Point using a static IP address in Windows Me or Windows 98 Select Specify an IP address. Input a static IP address within the same IP Address range as the wireless router or access point.
- Page 53 Checking the Wireless Connection by Pinging For Windows Me and 98: Go to Start > Run > type command. A window similar to Fig. 9.26 will appear. Type ping xxx.xxx.xxx.xxx, where xxx is the IP address of the Wireless Router or Access Point.
- Page 54 Adding a local printer (A printer connected directly to a computer) A printer that is not shared on the network and is connected directly to one computer is called a local printer. If you do not need to share your printer on a network, follow these directions to add the printer to one computer.
- Page 55 Adding a local printer • Click Next • Select Local printer attached to this computer • (Deselect Automatically detect and install my Plug and Play printer if it has been selected.) • Click Next • Select Use the following port: •...
- Page 56 Adding a local printer • Select and highlight the correct driver for your printer. • Click Next (If the correct driver is not displayed, insert the CD or floppy disk that came with your printer and click Have Disk.) • At this screen, you can change the name of the printer (optional.) •...
- Page 57 Networking Basics Adding a local printer This screen gives you information about your printer. Click Finish When the test page has printed, Click OK...
- Page 58 Adding a local printer • Go to Start> Printers and Faxes A successful installation will display the printer icon as shown at right. You have successfully added a local printer. Sharing a network printer After you have run the Network Setup Wizard on all the computers on your network, you can run the Add Printer Wizard on all the computers on your network.
- Page 59 Sharing a network printer • Click on Add a Printer • Click Next • Select Network Printer • Click Next...
- Page 60 Sharing a network printer • Select Browse for a printer • Click Next • Select the printer you would like to share. • Click Next • Click Finish...
- Page 61 Sharing a network printer To check for proper installation: • Go to Start> Printers and Faxes The printer icon will appear at right, indicating proper installation. You have completed adding the printer. To share this printer on your network: • Remember the printer name •...
- Page 62 Sharing an LPR printer To share an LPR printer (using a print server,) you will need a Print Server such as the DP-101P+. Please make sure that you have run the Network Setup Wizard on all the computers on your network. To share an LPR printer, please follow these directions: •...
- Page 63 Sharing an LPR printer • Select Create a new port • From the pull-down menu, select Standard TCP/IP Port, as shown. • Click Next • Please read the instructions on this screen. • Click Next • Enter the Printer IP Address and the Port Name, as shown.
- Page 64 Sharing an LPR printer • In this screen, select Custom. • Click Settings • Enter the Port Name and the Printer Name or IP Address. • Select LPR • Enter a Queue Name (if your Print-Server/ Gateway has more than one port, you will need a Queue name.)
- Page 65 Sharing an LPR printer • This screen will show you information about your printer. • Click Finish • Select the printer you are adding from the list of Printers. • Insert the printer driver disk that came with your printer. •...
- Page 66 Sharing an LPR printer • You can rename your printer if you choose. It is optional. Please remember the name of your printer. You will need this information when you use the Add Printer Wizard on the other computers on your network.
-
Page 67: Technical Specifications
Other Tasks For help with other tasks in home or small office networking, see Using the Shared Documents folder and Sharing files and folders in the Help and Support Center in Microsoft Windows XP. Technical Specifications Standards • IEEE 802.11b •... - Page 68 • Detachable Reverse SMA Range • Indoors – up to 328 feet (100 meters) • Outdoors – up to 1,312 feet (400 meters) Temperature • Operating: -10ºC to 55ºC (14ºF to 131ºF) • Storing: -20ºC to 65ºC (-4ºF to 149ºF) Humidity: •...
-
Page 69: Contacting Technical Support
You can find the most recent software and user documentation on the D-Link website. D-Link provides free technical support for customers within the United States for the duration of the warranty period on this product. U.S. customers can contact D-Link technical support through our web site, or by phone. -
Page 70: Warranty
(90) days after any replacement Software is delivered. If a material non-conformance is incapable of correction, or if D-Link determines in its sole discretion that it is not practical to replace the non- conforming Software, the price paid by the original licensee for the non-conforming Software will be refunded by D-Link;... - Page 71 RETURNED TO D-LINK FOR WARRANTY SERVICE) RESULTING FROM THE USE OF THE PRODUCT, RELATING TO WARRANTY SERVICE, OR ARISING OUT OF ANY BREACH OF THIS LIMITED WARRANTY, EVEN IF D-LINK HAS BEEN ADVISED OF THE POSSIBILITY OF SUCH DAMAGES. THE SOLE REMEDY FOR A BREACH OF THE FOREGOING LIMITED WARRANTY IS REPAIR, REPLACEMENT OR REFUND OF THE DEFECTIVE OR NON-CONFORMING PRODUCT.
Need help?
Do you have a question about the DWL-900AP+ and is the answer not in the manual?
Questions and answers