Table of Contents
Advertisement
Quick Links
Advertisement
Table of Contents

Related Manuals for Prestigio Data Safe III

Summary of Contents for Prestigio Data Safe III
- Page 1 Data Safe III USB2.0 External HDD User Manual Version 1.0...
-
Page 2: Table Of Contents
2.2.2 Setting Your Own Password 2.2.3 To Lock/Unlock Security Section 2.2.3.1 To Lock Security Section 2.2.3.2 To Unlock Security Section 2.2.4 To Safely Remove Data Safe III 2.2.5 Setup Options 2.2.6 To Uninstall SecureDrive EX 2.2.7 Other Functions 2.3 Using One Touch Backup (OTB) 2.3.1 To Install PCCloneEX... -
Page 3: Getting Started
1. Getting Started Thank you for purchasing Data Safe III, a stylish HDD Enclosure. You have made an excellent choice and we hope you will enjoy all of its capabilities. The product offers a new concept of mobile data storage which features safety and user friendliness. -
Page 4: System Requirements
device from the computer. Continuing use of the device may result in fire or electrical shock. Please consult your product distributor or the closest support center. To avoid risk of electrical shock, do not connect or disconnect the device with wet hands. -
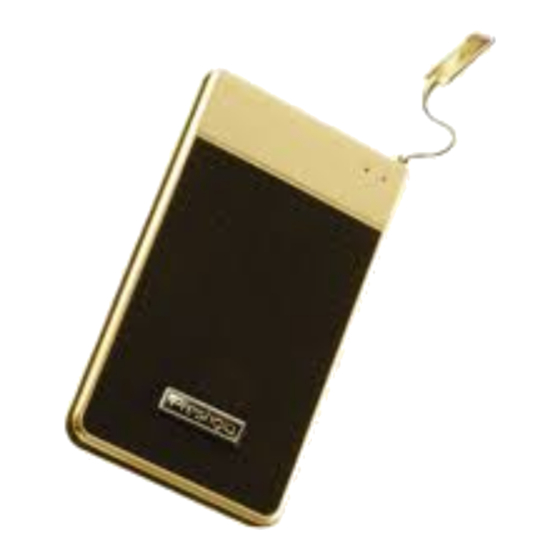
Page 5: Product Views
COPY ON/OFF Switch USB Port 1.5 Product Feature Overview Classy Stylish Coated Craftsmanship Data Safe III brings luxury and simplicity into your daily digital lives. Maximum Data Security (SecureDrive EX) With SecureDrive EX application software, you can protect your device with password log-in and partition your device into “Public”... -
Page 6: Basic Functions
EX DO NOT work on Mac OS and Linux OS. 2.1 Basic Functions 2.1.1 Plug & Play Feature When you connect the device into the USB port of your computer, a “Removable Disk” icon will appear in the file manager window as shown above. On Macintosh machines, you can notice the disk icon in the “Desktop”... -
Page 7: To Remove Device
2.1.3 To Remove Device To minimize risks of data loss on Windows XP and Vista OS, please follow the removal procedures as follows: You can find the safe removal icon in your computer’s notification area. Double click the “safe removal” icon; the “Unplug or Eject Hardware” window will pop up. -
Page 8: Using Securedrive Ex Software
data loss or even damages to the Data Safe III. Warning: If you do not follow the safe removal procedures on Windows, Windows Windows XP and Windows Vista operating systems, data loss may occur due to “write cache” issue. On Macintosh operating systems, you can drag the removable disk icon into the trash. - Page 9 1. Connect Data Safe III to the host computer by the USB cable provided. 2. Double click on “Setup.exe” in “SecureDriveEX” folder to start installation. 3. Please click on the SecureDrive EX License Agreement and read through the agreement for legal usage.
- Page 10 Data Safe III and disconnect it from the host computer. 8. Please reconnect Data Safe III to the host computer and turn on its power to proceed. 9. As shown in the diagram, Data Safe III storage...
- Page 11 Click “Yes” to continue partitioning process or “No” to cancel action. 13. Partitioning process should not exceed 3 minutes depending on the computer capability. Please turn off Data Safe III and disconnect from host computer.
-
Page 12: Setting Your Own Password
Data Safe III 15. A window will pop up requesting for further instruction. Highlight “Run the program” option and click “OK” to continue installation process. 16. A SecureDrive EX window will pop up for authentication. Please refer to yellow sticker at the last page of quick guide for serial key. - Page 13 Please make sure to write down your password and store it at a safe place where you can always remember. Please connect Data Safe III to the host computer and turn on its power for further actions. 1. A window will pop up requesting for further instruction.
-
Page 14: To Lock/Unlock Security Section
“Cancel” to return to main menu. 2.2.3 To Lock/Unlock Security Section Please make sure that Data Safe III is connected to the host computer and its power is ON. 2.2.3.1 To Lock Security Section Click on “My Computer”. - Page 15 As mentioned in other section, a blue “Unlock” icon indicates an open security section. To lock up, click on blue “Unlock” icon or the HDD graphic to initiate locking sequence. A small window will pop up indicating locking sequence is in process.
- Page 16 A red “Lock” icon indicates security section has been successfully locked up. The password input request will also be displayed. 5. Click on “My Computer”. 6. Security Section is now replaced by AP drive indicating it is locked up for data input/output. Click on “My Computer”.
- Page 17 As mentioned in above session, a red “Lock” icon indicates the security section is locked up. To unlock, simply type in your password in the text field and either click on “return” icon or click on the red “Lock” icon to initiate unlocking sequence.
- Page 18 Warning: When performing he lock and unlock actions with the device, please make sure there is no other applications or programs running or document not closed on the device. Violation may cause data loss or damage if so. 2.2.4 To Safely Remove Data Safe III...
- Page 19 1. Regardless the state of the security area (lock/unlock), Data Safe III can be safely removed from the host computer. 2. Click on the transfer cable to remove the Data Safe III. 3. A dialog box will pop confirming the removal of Data Safe III.
- Page 20 Data Safe III and reconnect it to the host computer. 2.2.5 Setup Please make sure that Data Safe III is connected to the host computer and its power is ON. Click on “Setup” icon. The “Setup” menu will pop up for...
-
Page 21: To Uninstall Securedrive Ex
“Cancel” to exit Setup menu. 2.2.7 To Uninstall SecureDrive EX Please make sure that Data Safe III is connected to the host computer and its power is ON. Warning: After uninstalling SecureDrive Ex, all data in Data Safe III will be deleted permanently. - Page 22 A dialog box will pop up requesting confirmation. Click “Yes” to continue or “No” to cancel action. SecureDrive EX has been removed successfully. Click "Quit" to ext. Data Safe III is now restored to a regular external hard drive.
-
Page 23: Other Functions
2.2.8 Other Functions Click on the "SecureDrive EX" icon for the detailed software specification. Please click on “?” icon at the top right to display Help Center, a tutorial tool that helps user to better use SecureDrive EX. Right-click on the SecureDrive EX icon at the desktop notification area to display shortcuts of partial functions. -
Page 24: Using One Touch Backup (Otb)
2.3 Using One Touch Backup (OTB) Warning: Data Safe III must be unlocked before executing any PCClone EX operations. Please make sure Data Safe III is unlocked during all PCClone EX operations. Violation may result in data loss or damage. - Page 25 Please specify the installation path of PCClonEX. You can also click on “Browse” to examine the tree diagram. A check mark will be placed at “Create Desktop Shortcut” option by default. Remove the check mark if necessary. Click on “Install” to proceed or “Quit”...
-
Page 26: Regular File Backup Functions
Any other devices will not work with this program. 2.3.2 Regular File Backup Functions Please make sure that Data Safe III is connected to the host computer and its power is ON. 2.3.2.1 To Backup File 1. Click on “PCCloneEX” desktop shortcut to execute program.. - Page 27 3. Under “Files Backup” column, place check mark(s) at the file(s)/folder(s) that are to be backed up. 4. Under “USB Device” column, click on the drop down box to select designated back up storage device. 5. Click on “Backup” to start backup process.
-
Page 28: To Restore File
7. The selected file(s)/folder(s) have been backed up from the host computer to Data Safe III successfully. Warning: There is a hidden root directory F: FNet in Data Safe III. backup file(s)/folder(s) will be kept in the directory Please do not remove the directory. -
Page 29: To Delete Backup File
4. Click on “Restore” to start restoring process. A dialog box will pop up confirming action. Please click on “OK” to continue and press “Cancel” to cancel action. 5. Another dialog box will pop up when the process is completed. Please click “OK”... -
Page 30: Quick Launch
For first time use, please refer to “To File Backup” session for selecting preferred files to back up and “Setup session” for hotkey setup. Please make sure that Data Safe III is connected to the host computer and its power is ON. 2.3.3.1 To Backup File using Quick Launch 1. -
Page 31: To Backup File Using One Touch Backup
2.3.4 To Backup File using One Touch Backup This function allows user to backup selected folder(s)/file(s) by only pressing one button on Data Safe III. Please be advised that this function is not supported by Windows 98 or Windows ME editions. Please make sure that Data Safe III is connected to the host computer and its power is ON. -
Page 32: File Manager
Windows Explorer. PC Users is free to drag folder(s)/file(s) back and forth between the host computer hard drive and Data Safe III. It is a feature designed for users to manage their folder(s)/file(s) without having to use “Windows Explorer” or “My... -
Page 33: Setup
2.3.6 Setup File Backup Tab System activity after successful backup. Select “Show After back up complete message” to pop up confirmation dialog box, completed “Return program” to return to program, and “Power off” to close program. Backup file options. Select “Backup all files” to back up all File Backup Type files in the directory and “Backup changed files”... -
Page 34: Other Functions
Others Tab This option will allow PCCloneEX to load automatically Load automatically on windows startup when window starts. Uncheck if necessary. Click on this option to enable COPY button for quick backup Enable USB Button service. Uncheck to disable button function. 2.3.7 Other Functions Please click on “About”... -
Page 35: Appendix
PCClone EX. 3. Appendix 3.1 Product Specifications Product Features Data Safe III USB HDD Enclosure with 1-Botton Backup & Security functions, and soft-touch button control. Interface USB2.0 Interface HDD Type 2.5 inches Serial ATA HDD Max. - Page 36 3.3 Technical Support and Warranty Information Please refer to www.prestigio.com for technical support and warranty information. 3.4 Disclaimer We made every effort to ensure that the information and procedures in this user manual are accurate and complete. No liability can and will be accepted for any errors or omissions.
Need help?
Do you have a question about the Data Safe III and is the answer not in the manual?
Questions and answers