Table of Contents
Advertisement
Quick Links
Advertisement
Table of Contents

Summary of Contents for Tuff T400s
- Page 1 USER MANUAL...
-
Page 2: Table Of Contents
CONTENT INTRODUCTION USING THE TOUCH SCREEN The TUFF T400s 3.1 Single Tap User Information 3.2 Double Tap Legal Notice 3.3 Double Tap (Long-press and Hold) SAFETY MATTERS AND ANDROID TIPS ENVIRONMENTAL PROTECTION 4.1 Screenshot 4.2 Android Phone Power Saving Tips GETTING STARTED 1.1 Product Appearance, Button and... -
Page 3: Introduction
IP68 certified of free swapping old-for-new, free repair and water and dustproof. The T400s is running on a return & refunds. 1.5GHz quad-core MediaTek 6737T processor, 2GB RAM and operates Android 6.0 (Marshmallow) -
Page 4: Legal Notice
SAFETY MATTERS AND ENVIRONMENTAL PROTECTION SAFETY MATTERS AND Legal Notice ENVIRONMENTAL PROTECTION TUFF is a trading style of Tuff Phones Ltd. All Rights Reserved. • Please read the safety precautions carefully to Technical Data is subject to change without notice. - Page 5 SAFETY MATTERS AND ENVIRONMENTAL PROTECTION SAFETY MATTERS AND ENVIRONMENTAL PROTECTION • Switch off your mobile device in aircraft. • Use only approved batteries and chargers to The phone may cause interference to control avoid the risk of explosions. equipment of the aircraft. •...
-
Page 6: Getting Started
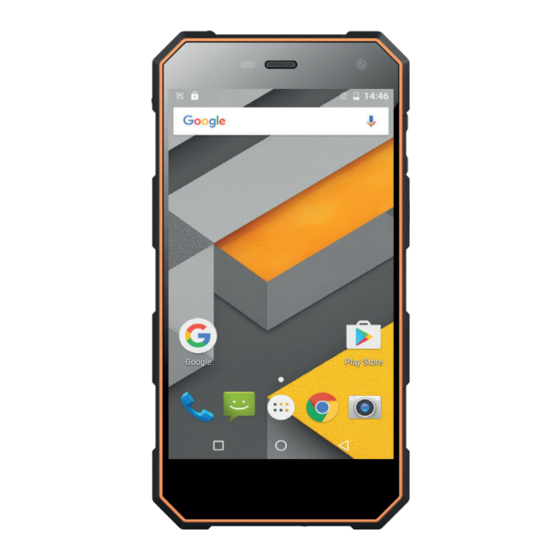
GETTING STARTED GETTING STARTED GETTING STARTED 1.1 Product Appearance, Button and Key Descriptions Earphone jack Earpiece Proximity sensor/light sensor SIM card/Micro SD card tray Front-facing camera Touch screen Volume “+” Volume “-” Power button* Rear-facing camera Flashlight /electric torch Loudspeaker USB battery charging port Microphone *long press for 10 seconds to restart mobile phone... -
Page 7: Installing And Removing Sim Card/Micro Sd Card
GETTING STARTED GETTING STARTED 1.2 Installing and Removing SIM Card/ Micro SD Card 1. Open the SIM tray port plug: 3. Insert your Nano SIM into the SIM tray ensuring that the SIM/SIM/Micro SD Card are correctly seated. Return the SIM tray back into the handset. Replace SIM tray port plug. - Page 8 GETTING STARTED GETTING STARTED 4. Charge the device by removing the rubber port 5. To turn on/off power display, press power button plug and inserting the Micro-USB pin into the to switch on/off. device, then plug the charger into a wall socket. 6.
-
Page 9: Mobile Phone Specifications
GETTING STARTED GETTING STARTED 1.3 Mobile Phone Specifications Phone Type 4G IP68 smart tough phone MMS/ E-Mail/ address book Supported (Address book supports groups) Operating System Android 6.0 (Marshmallow) Video call/ speakerphone Supported/ Supports video call over mobile data Frequency 2G GSM: 850/900/1800/1900 (B5/B8/B3/B2) Call forwarding/ call waiting Depends on network support... -
Page 10: Menu Navigation
MENU NAVIGATION MENU NAVIGATION MENU NAVIGATION 2.4 Start-up and Shutdown Press and hold the Power button to start-up the 2.1 Holding the Phone phone. Please do not cover the antenna area with your Press and hold the Power button, then select hands or other objects. -
Page 11: Using The Touch Screen
USING THE TOUCH SCREEN ANDROID TIPS USING THE TOUCH SCREEN ANDROID TIPS 3.1 Single Tap 4.1 Screenshot Single tap on the display to select one icon or You can take a screenshot using a shortcut by option. For example, tap “Phone” on the main pressing and holding both the Power button and screen to open the dial pad. -
Page 12: Memory Card
MEMORY CARD MEMORY CARD MEMORY CARD 5.2 Storage Tips 5.1 Connecting your phone to a PC as a media You can use the USB data cable to copy or move device files between a PC and your device. MP3 files are stored in the “My Music”... -
Page 13: Ce Sar Compliance
CE SAR COMPLIANCE CE SAR COMPLIANCE CE SAR COMPLIANCE During use, the actual SAR values for your device are usually well below the values stated. This is Your mobile device is a radio transmitter and because, for purposes of system efficiency and to receiver. - Page 14 CE SAR COMPLIANCE...
Need help?
Do you have a question about the T400s and is the answer not in the manual?
Questions and answers