
Summary of Contents for Avipas AV-1070
- Page 1 Model: AV-1070 HD Video Conferencing Camera (SDI) User Manual V1.0 Please Read this User Manual throughout before using www.avipas.com...
- Page 2 Preface Thanks for using this HD Video Conferencing Camera. This manual introduces the functions, installation process and operation of the HD camera. Prior to installation and usage, please read the manual thoroughly. Precautions This product should only be used under the specified conditions in order to avoid any damage to the camera: ...
-
Page 3: Table Of Contents
Contents Note ................................. 4 Supplied Accessories ..........................4 Quick Start ............................... 5 Features ..............................6 Product Specifications ..........................7 Main Units ............................... 9 Dimensions ............................10 IR Remote Control Menu ........................11 RS-232 Interface ............................ 13 Serial Communication Control ......................14 PTZ over TCP/UDP .......................... -
Page 4: Note
Note Electric Safety Installation and operation must accord with electric safety standard. Use caution to transport Avoid stress, vibration or soakage in transport, storage and installation. Polarity of power supply The power supply of this product is +12V, the max electrical current is 2A. Polarity of the power supply plug is shown in the drawing below. -
Page 5: Quick Start
Quick Start Step1. Check if connections are correct before starting. Step2. Power on, check if the power light is on (front panel). Step3. Pan-Tilt function rotates the camera to its maximum position of top right upon startup, then it returns to the center, and the process of initialization is finished. (Note: if there is an entry for position preset 0, the corresponding position preset 0 will be called up after initialization.) -
Page 6: Features
Features New design Designed with worm gear transmission, completely new look, mini size. 1080p full HD Support Panasonic's 1/2.7 inch, 2.07 million effective pixels with high quality HD CMOS sensor. The camera can reach a maximum image resolution of 1920 x 1080. ... -
Page 7: Product Specifications
Product Specifications Name HD Video Conference Camera Camera Sensor 1/2.7'', CMOS, Effective Pixel: 2.07M Scanning Mode Progressive Lens 12x, f3.5mm ~ 42.3mm, F1.8 ~ F2.8 Digital Zoom 16x (optional) Minimal Illumination 0.5 Lux @ (F1.8, AGC ON) Shutter 1/30s ~ 1/10000s White Balance Auto, Indoor, Outdoor, One Push, Manual Backlight Compensation... - Page 8 640x360,480x270,320x240,320x180 Bit Rate 32Kbps ~ 20480Kbps Bit Rate Type Variable rate, fixed rate Frame Rate 50Hz: 1fps ~ 25ps, 60Hz: 1fps ~ 30fps Audio standard Audio rate 96K,128K,256k Support protocols TCP/IP,UDP, HTTP, RTSP, RTMP, Onvif, DHCP, Multicast etc Input/Output Interface 1xRS232: 8pin Min DIN, Max Distance: 30m, Protocol: Communication Interface VISCA/Pelco-D/Pelco-P...
-
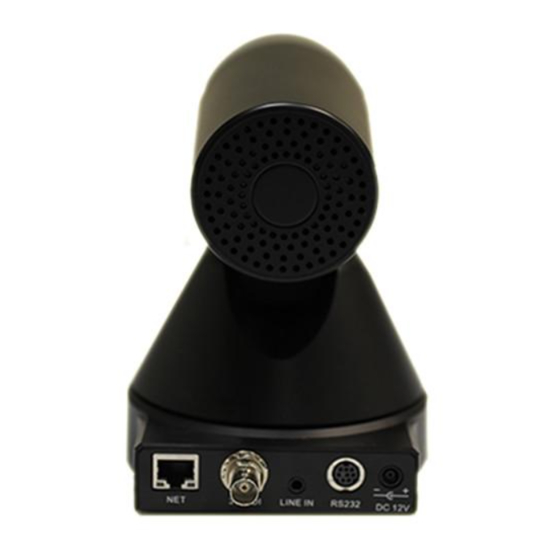
Page 9: Main Units
Main Units 1. Net Interface 3. Line in Interface 2. 3G-SDI Interface 4.RS232 Interface 5. DC IN 12V jack... -
Page 10: Dimensions
Dimensions... -
Page 11: Ir Remote Control Menu
IR Remote Control Menu 1. Standby Button Press this button to enter standby mode. Press it again to enter normal mode. (Note: Power consumption in standby mode is approximately half of the normal mode). 2. Position Buttons To set or call preset. 3. - Page 12 manually, press [MANUAL]. Adjust focus with Note: if there is a light source behind the subject, [Far] (focus on far object) or [NEAR] (focus on the subject will become dark. In this case, press near object). the backlight ON/OFF button to adjust. 10.
-
Page 13: Rs-232 Interface
RS-232 Interface Camera Windows DB-9 1.DTR 1.CD 2.DSR 2.RXD 3.TXD 3.TXD 4.GND 4.DTR 5.RXD 5.GND 6.GND 6.DSR 7.IR OUT 7.RTS 8.NC 8.CTS 9.RI Camera Mini DIN Function 1.DTR 1.DTR 2.DSR 2.DSR 3.TXD 3.TXD 4.GND 4.GND 5.RXD 5.RXD 6.GND 6.GND 7.IR OUT 7.NC 8.NC 8.NC... -
Page 14: Serial Communication Control
Serial Communication Control In the default working mode, the camera is able to connect to a VISCA controller with RS232C serial interface. ➢ RS232 Communication Control: The camera can be controlled via RS232. Parameters are as follows: Bit rate: 2400/4800/9600/38400 bit/s. Start bit: 1 bit. -
Page 15: Menu Settings
Menu Settings EXPOSURE 1. MENU Mode Auto Press [MENU] to display the main menu on ExpCompMode the screen. Use the arrow buttons to move the cursor. Press [HOME] to enter the corresponding Backlight sub-menu. Gain Limit Anti-Flicker 50Hz MENU Meter Average Exposure Color... - Page 16 Bright: Bright intensity control. Options: Auto, Indoor, Outdoor, One Push, Manual. 00~17 (effective only in Bright mode). RG: Red gain. Options: 0~255 (effective only Iris: Aperture value. Options: F1.8, F2.0, in Manual mode). F2.4, F2.8, F3.4, F4.0, F4.8, F5.6, F6.8, F8.0, F9.6, BG: Blue gain.
- Page 17 5. P/T/Z IMAGE P/T/Z Luminance SpeedByZoom Contrast AF-Zone Center Sharpness AF-Sense High Flip-H L/R Set Flip-V Display Info B&W-Mode Image Freeze Gamma Default Digital Zoom Style Clarity Call Preset Speed Select Item Select Item Change Value Change Value [Menu] Back [Menu] Back Luminance: Brightness adjustment.
- Page 18 SETUP NOISE REDUCTION Language NR2D-Level Video Format 1080P60 NR3D-Level D-HotPixel Select Item Select Item Change Value Change Value [Menu] Back [Menu] Back NR2D-Level: 2D noise reduction. Options: Language: Menu language. Options: English, Off, Auto, 1 ~ 5. Chinese, Russian. NR3D-Level: 3D noise reduction. Options: Video Format: Options: 1080P60, 1080P50, Off, 1 ~ 8.
- Page 19 9. RESTORE DEFAULT COMMUNICATION SETUP Move the cursor to Restore Default in the Protocol VISCA main menu and press [HOME]. RESTORE V_Address DEFAULT menu is shown below. V_AddrFix RESTORE DEFAULT Net Mode Serial Restore? Baudrate 9600 Select Item Change Value [Menu] Back Change Value Protocol: Control protocol type.
-
Page 20: Network Function
Network Function Method 1: press * and # and 4 on remote 1 Operating Environment control in order, the camera’s IP address will Operating System: Windows 2000/2003/XP/ display on screen. vista/7/8. Method 2: connect the camera to a PC with Ethernet cable. - Page 21 camera. NOTE! If the camera is used for the first time with NOTE! Internet connection, the user must install a video IP camera’s default IP address: "192.168.100. player (VLC). Please go to VLC website 88", user: "admin", password: "admin". http://www.videolan.org/vlc,download; download 4.2 Visit/Access IP Camera and install as instructed.
- Page 22 5.2 Dynamic DNS visits camera Input URL address: Set domain name to camera, and set the rtsp://ip: port number/1 (First stream); parameters. Then the dynamic DNS can access the rtsp://ip: port number/2 (Second stream). camera. Access link: http://hostname: port number. NOTE!...
- Page 23 Parameter setup: function buttons. A. Video viewing window Video viewing window must accommodate the video resolution: the higher the resolution is, the bigger the playing area should be. Double clicking the viewing window will enable full-screen; double clicking again will return to the initialized size.
- Page 24 information. Click "Set" button to confirm. When the PTZ turns to other positions, click "Call" button or click "No.", the PTZ will redirect to the corresponding preset position. 6) MENU/ PTZ: MENU: OSD menu displays at the upper corner of the image page. PTZ direction control box: up/down button moves to the menu item;...
- Page 25 Second bit flow supports 1280x720, 1024x576, NOTE! 720x576 (Under 50Hz), 720x480 (Under 60Hz), 720x408, 640x360, 480x270, 320x240 To adjust the parameters, click "apply" to 320x180. The higher the resolution is, the clearer save; click "cancel" to discard the change of the the image will be, and more network bandwidth parameters.
- Page 26 parameters; click "default" to restore the default values. 6.4 Click “Audio” for audio setup: 1) Audio Type Audio type: AAC. 2) Sample rate Sample rate: 44.1 K and 48 K. 3) Bit rate 1) Work Mode Bit rate: 96k, 128k, 256k. Work mode: RTSP.
- Page 27 Network camera supports RTSP protocol, and user can use the VLC tools to broadcast. C. PTZ Port Support PTZ protocol, default port: 5678. 3) Control Protocol Setting Set camera-control communication protocols, including Visca address, Pelco-D address, and Pelco-P address. 4) RTMP Setting Set up to two camera streams.
- Page 28 Note: Software version may not be the latest one, the released version shall prevail. 7 Download the upgrade program If the camera upgrade program is needed, please contact the manufacturer.
-
Page 29: Maintenance And Troubleshooting
Maintenance and Troubleshooting Camera Maintenance If camera will be idle for a long time, please turn off the power switch and disconnect AC power cord from the outlet. Use soft cloth or tissue to clean the camera (lens cleaning not recommended). ... - Page 30 Unable to access IP Camera by IE browser. 1. Access network with PC, check if network works. In this way, the user can get rid of any cable failure or network failure. 2. Disconnect IP Camera from network. Connect IP Camera to PC, and re-set the IP address following the proper operations.
- Page 31 This Limited Warranty covers any defect in material and workmanship under normal use within the Warranty Period. AVIPAS Inc. will repair or replace the qualified products at no charge. AVIPAS Inc. provides a two (2)-year warranty (from the date of purchase) for this HD Conference Camera.
- Page 32 VER: 2017-09-07 (EN) Manufacturer: Distributed by: AViPAS Inc. SWIT Electronics USA, LLC www.avipas.com www.swit.us 4300 Stevens Creek Blvd. Suite 230 3350 Scott Blvd. 61-02 San Jose, CA 95129 Santa Clara, CA 95054 (408) 983-0866 1-844-228-4727 (408) 228-8438...
Need help?
Do you have a question about the AV-1070 and is the answer not in the manual?
Questions and answers